7 Top Ways to Fix Shared Albums Not Showing on iPhone
In this article, we have provided effective ways to address the issue of shared albums not showing up on iPhones. We have covered seven key methods, with a stepwise guide for each method. We have also provided an excellent alternative to share photos between iPhones.
AnyTrans for iOS – Share Photos Between Devices
Free download AnyTrans to 1-click to transfer all photos (Camera Roll, Photo Library, Photo Stream, and Albums) from iPhone to PC or Mac computer.
Many people open the shared album when they are in a hurry to show their best pics. But have you ever faced an issue of shared albums not showing up at that time? This common issue can be a real headache when you’re eager to share memories with friends and family.
In this article, we have provided the solution for this. We’ll show you why the shared album iPhone not working and how to fix it. We’ll also provide an alternative to share pictures from one iPhone to another. So why are we still waiting? Let’s get started.
Why Shared Album Not Showing Up/Working on iPhone or iPad
If a shared album is not showing up or working on your iPhone or iPad, it could be due to a variety of reasons related to settings, iCloud, or network issues:
- iCloud shared albums not enabled
- Network connection issues
- Outdated iOS version
- iCloud storage full
- Album invite not received or accepted
- Issue on sync between devices
- Apple server issues
7 Ways to Fix Shared Album iPhone Not Working
Here are seven effective methods for you. Each of these might seem simple, but they often prove quite effective. We’ll start with a basic yet powerful solution.
Way 1. Turn off and on Share Album
This method involves a simple on-off switch for your Shared Album feature. It’s like giving your iPhone a quick refresh in terms of the shared album feature. Ultimately, it will clear minor glitches that may be preventing shared albums from appearing correctly. Follow these steps to turn off and on the shared album.
Step 1. Open the “Settings” app on your iPhone.
Step 2. Now click on your profile and go to iCloud settings > Photos.
Step 3. Scroll down and look for “Shared Albums” in the list of options. Now, toggle the “Shared Albums” switch off and then back on.
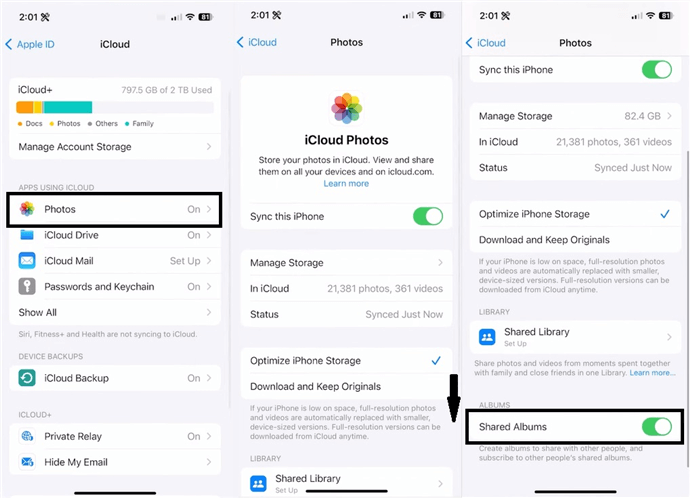
Turn off and on the Shared Album
If it does not work, then check the iCloud photo link.t
Way 2. Make Sure the iCloud Photo Link Not Expired
A common yet often overlooked issue is the expiration of the iCloud photo link. When you share albums via iCloud, these links are only active for 30 days before expiring. Once it expires, the shared album becomes inaccessible. If you try to Accept an expired invitation, you’ll get a “Fail to Retrieve” message.
In this case, renewing the link or resending the images can instantly solve the issue.
But if not, then try out the next solution.
Way 3. Clear iPhone Storage
Limited storage can disrupt various functions of an iOS system. When your iPhone’s storage is almost full, it may struggle to update or sync shared albums. So, clearing up space can optimize your iPhone’s performance and resolve the shared albums issue.
Here’s how you clear your iPhone settings.
Step 1. Open your iPhone “Settings.” Then, go to General > iPhone Storage.
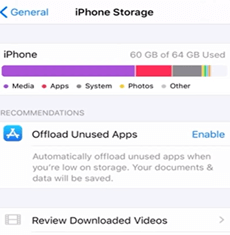
Select iPhone Storage
Step 2. Now, see how much space is used and how much is available. Review this list and start clearing space.
Step 3. Delete apps you no longer use and clear the cache where possible. After that, remove old messages or large media files and offload unused apps.
If you have enough space on your iPhone, then the issue may lie in the network connection.
Way 4. Check Network Connection
A reliable network connection is important for accessing shared albums on your iPhone. If your device isn’t properly connected to the internet, it won’t be able to load shared albums. So, a quick check and adjustment of your network settings might just be the solution you need. Here is a stepwise guide to check your network connection.
Step 1. Swipe down from the top right corner of your iPhone to access the Control Center. This is where you can quickly view your connection status.
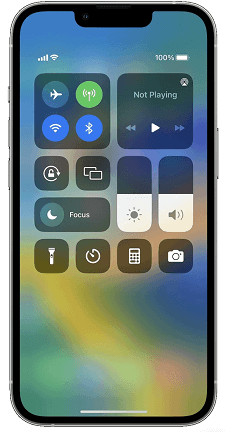
Linked with Wi-Fi Network
Step 2. Look for the Wi-Fi and cellular data icons. If they’re not highlighted, it means you’re not connected to a network.
Step 3. To connect to Wi-Fi, go to “Settings” and select “Wi-Fi.” Turn on Wi-Fi and select a network to connect to.
Step 4. If you are already connected to a network but are still experiencing issues, check your WiFi modem. Try turning it off and then turn it back on. This can refresh your connection.
There’s a chance that your shared album iPhone not working even after all this. So…
Way 5. Turn Off Low Power Mode
Low Power Mode on an iPhone is designed to extend battery life. It reduces background activity and automatic downloads. While this is great for saving battery, it can interfere with the syncing of shared albums. If your iPhone is in Low Power Mode, it might not load new content in shared albums or update them regularly.
So, turning off this mode can allow your iPhone to resume normal processes.
Follow these steps to turn off the low power mode on the iPhone.
Step 1. Open the “Settings” and go to Battery settings.
Step 2. Toggle the switch next to “Low Power Mode” to turn it off. This will deactivate the mode and restore normal iPhone operations.
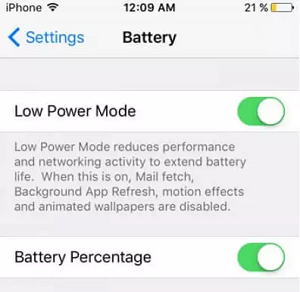
Turn off Low Power Mode
What if you are still on page one? Then, check the Apple system status once.
Way 6. Check Apple System Status
Sometimes, the issue on your iPhone could be due to problems on Apple’s end. Apple System Status is a webpage that provides information about the status of various Apple services. You can determine if there are any known issues with iCloud services from this page.
If there is a problem on Apple’s side, you can’t do anything until they fix it.
Here’s how you check the Apple system status.
Step 1. Open a browser on any device and then go to the Apple System Status website.
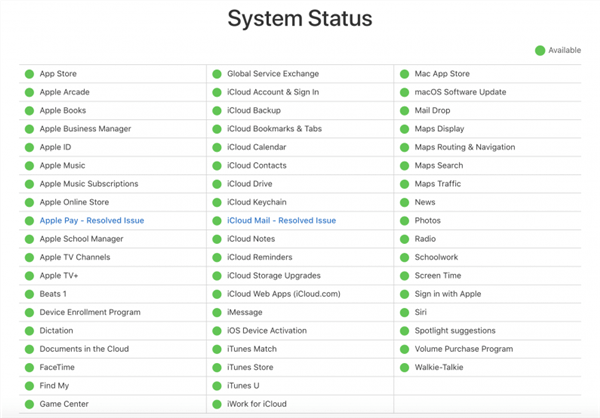
Check the Apple System Status
Step 2. Look for any indicators next to iCloud services, especially Photos or iCloud Drive. A green dot means the service is operating normally.
If the system status of Photos and iCloud Drive is green, then try to upgrade your iOS version.
Way 7. Upgrade iOS Version
Upgrading the iOS version on your iPhone can be a significant step in solving various technical issues. Each update from Apple often comes with bug fixes and improvements. An outdated iOS might lack the necessary features that affect the performance of shared albums.
By updating to the latest iOS, you can have all the latest features and fix the bugs. Here’s how you update your iOS system on an iPhone.
Step 1. Open the “Settings” on your iPhone and tap on “General.”
Step 2. Select “Software Update.” Your iPhone will check for available updates now.
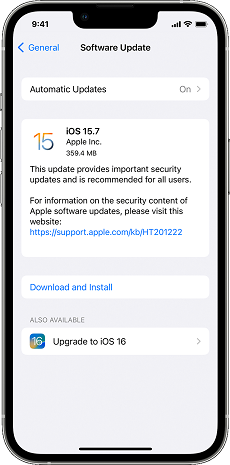
Check the Software Updates
Step 3. If an update is available then tap “Download and Install.” Make sure your iPhone is connected to Wi-Fi and has sufficient battery life.
All the above solutions can work when your shared album is not working. But, if you are still looking for another way to transfer your pics between iPhones, then meet AnyTrans.
Best Alternative to Share Photos Between Devices
The methods discussed above can fix shared album issues. But sometimes, you might need an alternative for transferring photos between iPhones. A specialized tool can make this process simple and efficient. One such tool is AnyTrans – iPhone Data Manager. It’s the perfect application to transfer your photos between different iPhones in just 1 click. AnyTrans is a tool that simplifies the management and transfer of data between iOS devices. It’s not just about transferring photos. AnyTrans handles a variety of data types. Whether you’re looking to move audio, messages, or photos, AnyTrans can make the process effortless. Moreover, its user-friendly interface ensures that even users with minimal technical knowledge can easily perform transfers. You can also transfer photos or other data from Android to iPhone or iOS to computer.
Here are the key features of AnyTrans.
Free Download * 100% Clean & Safe
- Full-Way Transfer – Allowing content transfers across various Apple devices and computers.
- 27 Types of Data Management – Manages almost all types of iOS content, like photos, videos, messages, music, contacts, WhatsApp, etc.
- Flexible Backup Options – Provides choices between full or incremental backups. You also get the options for automatic and wireless backups.
- 1-Click Quick Transfer – Facilitates batch import/export of iOS data with 1 click.
- Wide Device Compatibility – AnyTrans supports all the iPhone, iPad, and iPod touch models having iOS 5 and above.
Here are the steps to transfer pics with AnyTrans.
Step 1. Download and launch AnyTrans on your computer. Connect both the source iPhone and the target iPhone to your computer using USB cables. Wait until AnyTrans detects them.

AnyTrans Interface
Step 2. Select the Phone Switcher option from the left toolbar. Now, choose the Phone to iPhone option.
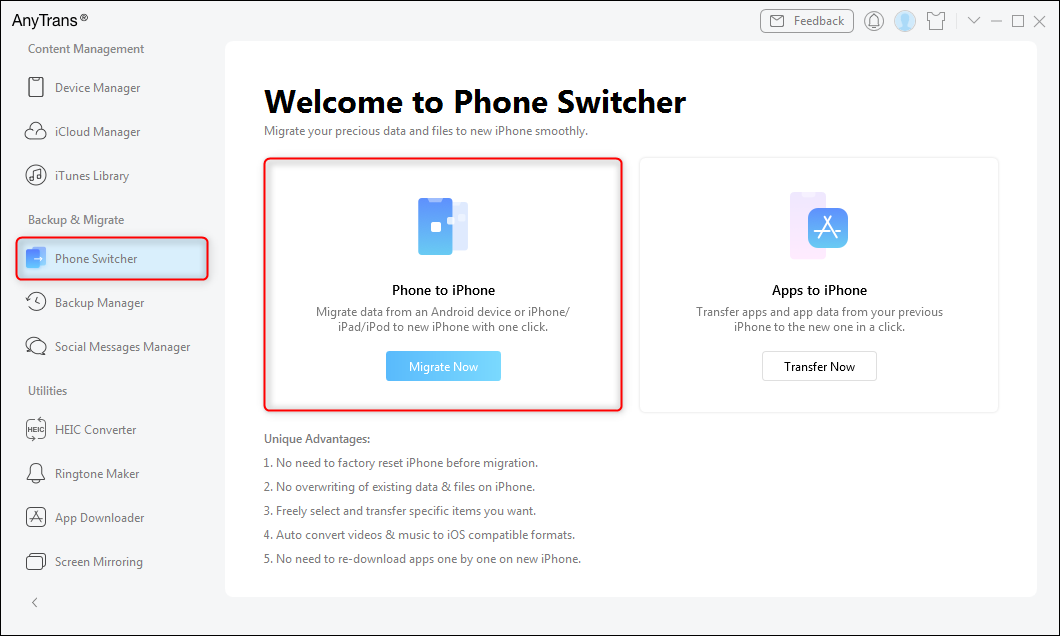
Choose Phone to iPhone on Phone Switcher
Step 3. Select Photos from the list of file categories available for transfer. Click the Next button to start the transfer.
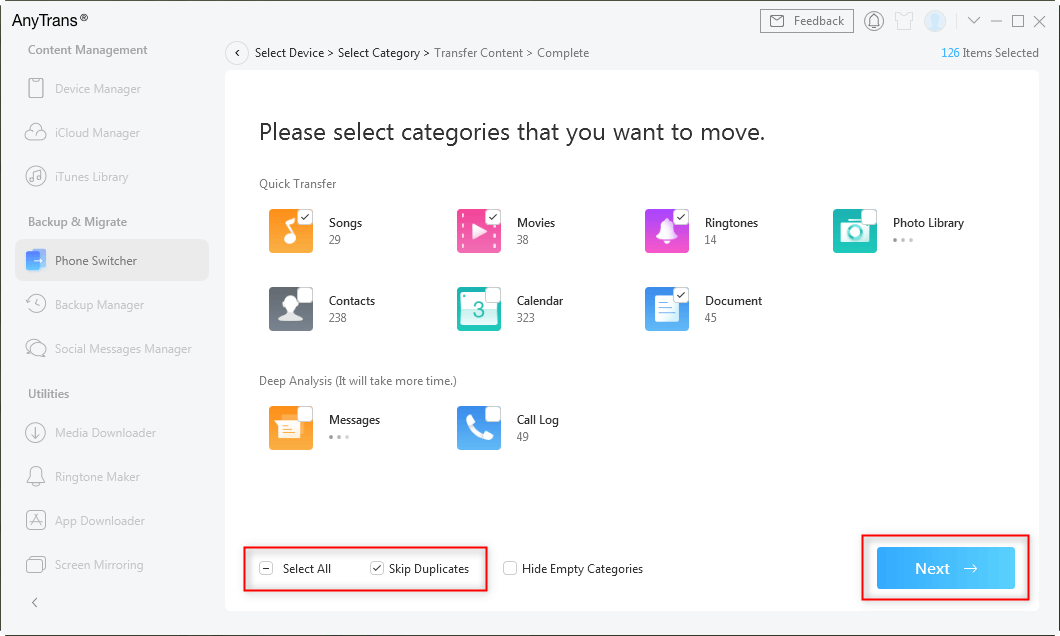
Select Files You Want to Transfer
Step 4. Wait for the process to complete. It may vary depending on the data size. When the process completes, you’ll see this Transfer Completed interface.

Phone to iPhone Transfer Complete
Before we wrap up this article, let’s have a brief look at some of the frequently asked questions.
FAQs about Shared Album
What is a shared album?
A shared album is a feature on iPhones that allows you to share photos and videos with selected people. You can create an album in your Photos app and invite others to view it. Then, they can comment and add their own photos and videos to the album.
It’s a convenient way to collectively share memories without having to send each photo individually.
How do I accept an invite to a shared album?
To accept an invite to a shared album, follow these steps:
- Open the “Photos” app on your iPhone,
- Go to the “For You” tab.
- You’ll find the invitation under “Invitations.” Tap “Accept” to join the shared album.
Once accepted, you can view, contribute to, and comment on the album’s contents.
How do I find a shared album invite?
Shared album invites are received through notifications. If you miss the notification, you can still find the invite in the “Photos” app. Go to the “For You” tab and look under “Invitations.” Here, any pending shared album invites will be displayed. Tap on the invite to view and accept or decline it.
The Bottom Line
Now you know what to do if the shared albums not showing up on your iPhone! With the tips and tools discussed in this article, you’re now well-equipped to face this issue head-on. You can also use AnyTrans to transfer your photos between iPhones. It gives another easy way to share all your photos at once.
Free Download * 100% Clean & Safe
iPhone Transfer Tips
iPhone Manager
- [Solved] How to Fix A Device Attached to the System Is Not Functioning
- How to Access iCloud Photo Library on Mac
- How to Backup iPhone with Broken Screen
- Top 8 Backup Software for Mac
- How to Delete Blocked Numbers on iPhone
4 Ways to Export iPhone Contacts to Excel or CSV- Full Guide on How to Export Safari Bookmarks on iPhone iPad
- How to Delete Duplicate Photos on iPhone? (2024)
- How to Sync Notes from iPhone to Mac with/without iCloud
- iBooks Not Syncing? 7 Quick Fixes Here
- How to Go to iOS Setup Assistant? How to Use It to Transfer Data?
- How to Select All Photos on iCloud on Various Devices
- How to Transfer Google Photos to iCloud (4 Ways)
- 3 Ways to Transfer iTunes Music to iPhone
- How to Transfer Text Messages from Android to iPhone with/without Computer
- Ways to Transfer Videos from iPhone to Windows 10
- Easy Ways on How to View iCloud Photos on PC
- What Happens When I Delete iCloud Backup [2024]
Cloud Transfer

Senior writer of the iMobie team as well as an Apple fan, love to help more users solve various types of iOS & Android-related issues.
Product-related questions? Contact Our Support Team to Get Quick Solution >
