[Full Guide] How to Fix iPhone Update Stuck
This guide provides different proven methods to fix the iPhone update stuck issue. We have disclosed why the problem occurs and covered the possible reasons. We’ve also given detailed methods for fixing the issue in a stepwise manner. Try out every single method to make sure that you get your iPhone back to normal.
I know every iOS update brings a lot of new features. So, it’s hard to resist updating your iPhone as soon as a new version is available. However, many users get their iPhone update stuck when they try updating it. This issue occurs due to many reasons, and it can halt your excitement in its tracks.
If you are in a similar situation, then you don’t have to worry. In this brief guide, we’ll give you practical solutions to resolve the issue. From simple fixes to more advanced methods, we’ll cover all the bases to get your iPhone back to normal in no time.
But before we start these methods, let’s first find out the reason behind this issue.
Why is My iPhone Stuck on Software Update?
There are various reasons that can lead to this problem, and each requires its own approach to resolve. Understanding these reasons is the first step toward solving it.
Here are some of the most common ones.
- Network Connectivity Issues: You need a stable internet connection for downloading updates. If your network is unstable or slow, it can interrupt the update process.
- Insufficient Storage Space: iPhones require adequate storage space to download and install updates. If your device lacks sufficient free space, the update process cannot proceed.
- Software Issue: Occasionally, minor software issues in your iPhone’s operating system can stop the update process. Simple force restart often resolves these glitches. But, sometimes, they require special tools for repair.
- Overloaded Apple Servers: During major iOS releases, Apple’s servers can become overwhelmed with the high volume of download requests. This server overload can lead to delays or interruptions in the update process.
- Outdated System Settings: If your iPhone’s system settings are significantly outdated, it might struggle to download and install the latest update.
All of these reasons can cause iPhone update stuck. We are now going to discuss the methods to solve this problem. All these methods can bring back your iPhone no matter the reason behind this issue.
How to Fix iPhone Stuck on Update Screen
There are many methods to fix an iPhone stuck on the update screen. Out of these, we have made a list of the five most effective ones. Each method comes with a step-by-step guide to ensure that you can efficiently resolve the issue.
It’s important to try every method until you find the one that works for your situation. Let’s begin with the first method.
Method 1. Fix iPhone Update Stuck without Data Loss
iOS repair tools can be incredibly useful when dealing with system issues. One such tool is AnyFix, which is known for resolving a wide range of iOS problems. AnyFix stands out due to its user-friendly interface and high success rate in fixing iOS issues without causing data loss. It’s able to fix your iPhone stuck on the update screen in simple clicks. It’s available for both Windows and Mac while supporting a wide range of Apple devices.
Free Download * 100% Clean & Safe
Key Features of AnyFix:
- Solves 130+ System Issues: Addresses a wide range of problems, including iPhone stuck in boot loop, battery drain, and stuck on Apple logo.
- 200+ iTunes Errors Resolved: Quickly fixes common iTunes errors and restores its functionality.
- Three Repair Modes: Provide Standard, Advanced, and Ultimate Repair modes to fix different severity levels of issues.
- User-Friendly: Simplifies the repair process with easy-to-follow steps that require no technical expertise.
Free download AnyFix and follow the stepwise guide to fixing iPhones with AnyFix.
Step 1. Download and install AnyFix on your computer. Then launch AnyFix and choose the System Repair mode.
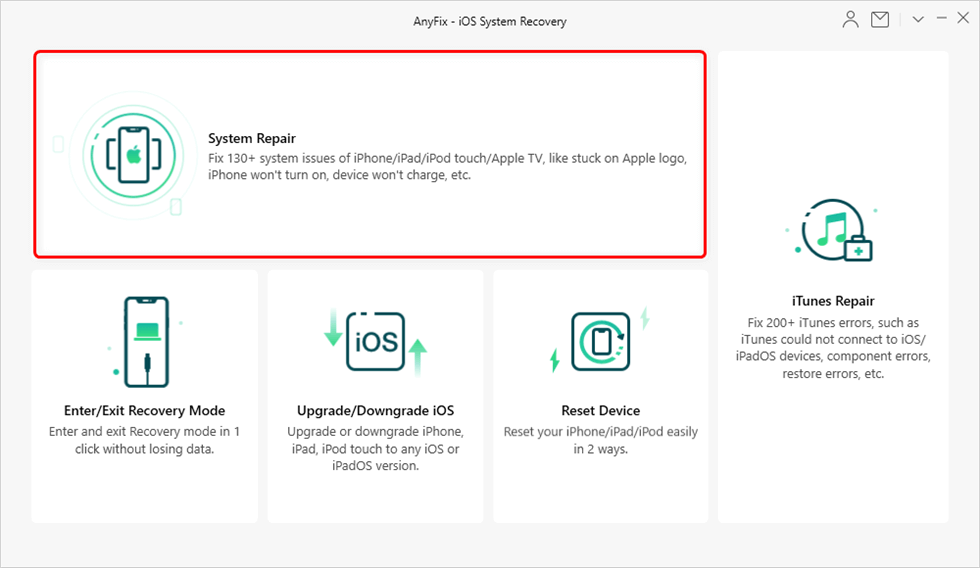
Tap on System Repair
Step 2. Connect your iPhone and wait for it to be detected. When it’s detected, click on the “Start” button and follow on-screen instructions to put your device into Recovery or DFU mode.
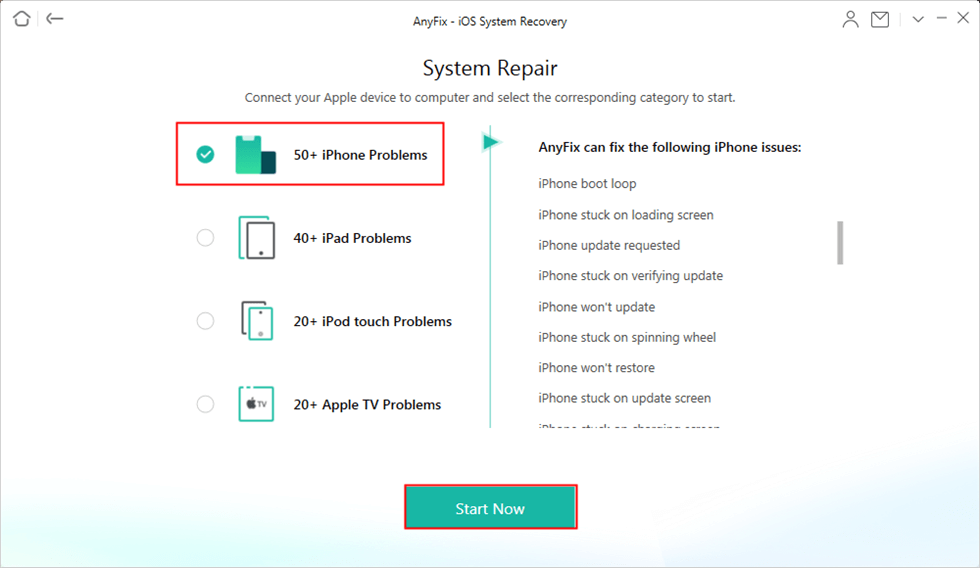
Select iPhone Problems
Step 3. Select “Standard Repair” to fix common issues without data loss. Advanced and Ultimate Repair options are available for more complex problems.
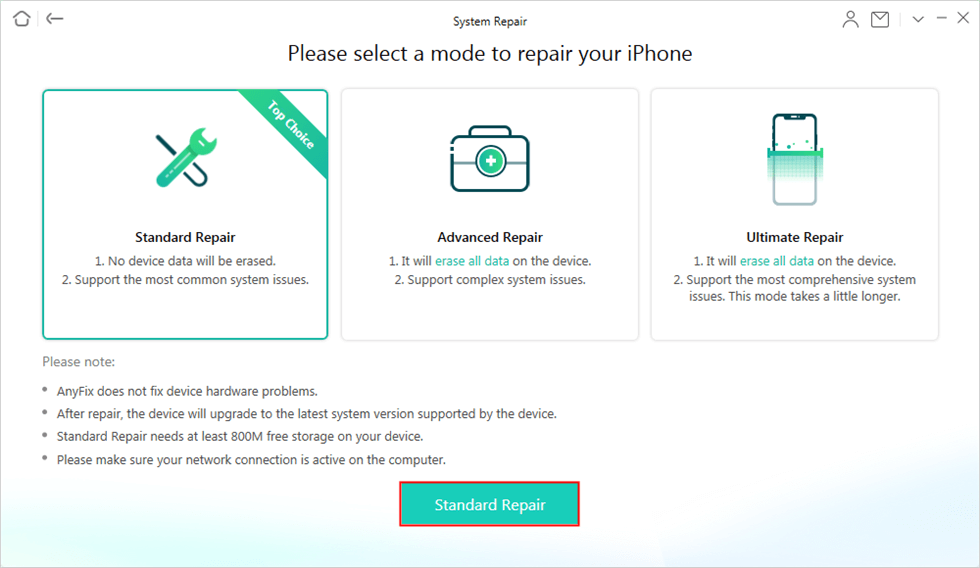
Choose Standard Repair
Step 4. AnyFix will prompt you to download the firmware package suited for your device. Check the iPhone information and click on the “Download” button.
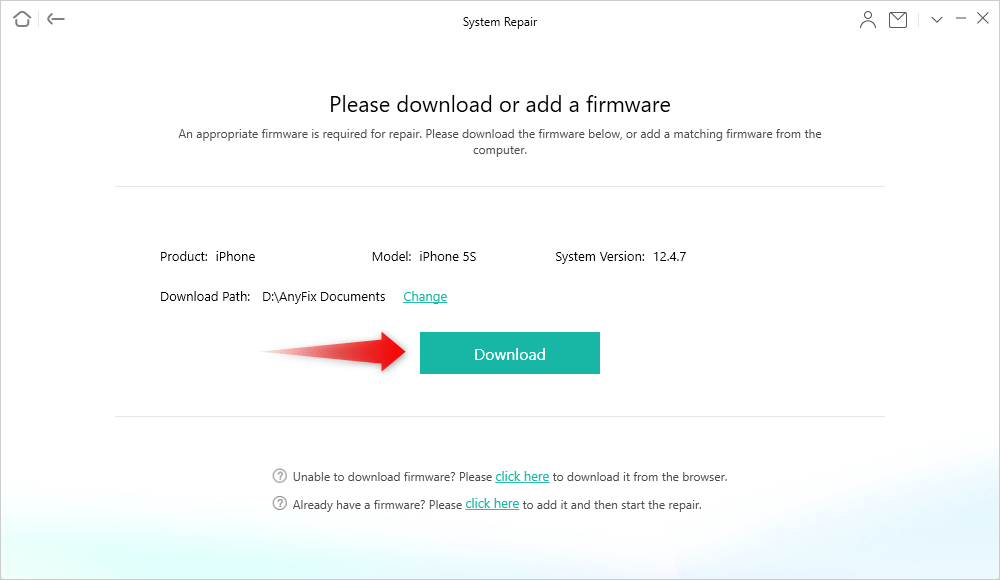
Download a Firmware for Your iPhone
Step 5. After the download, click “Fix Now.” AnyFix will begin repairing your device. Make sure the device is connected throughout the process.
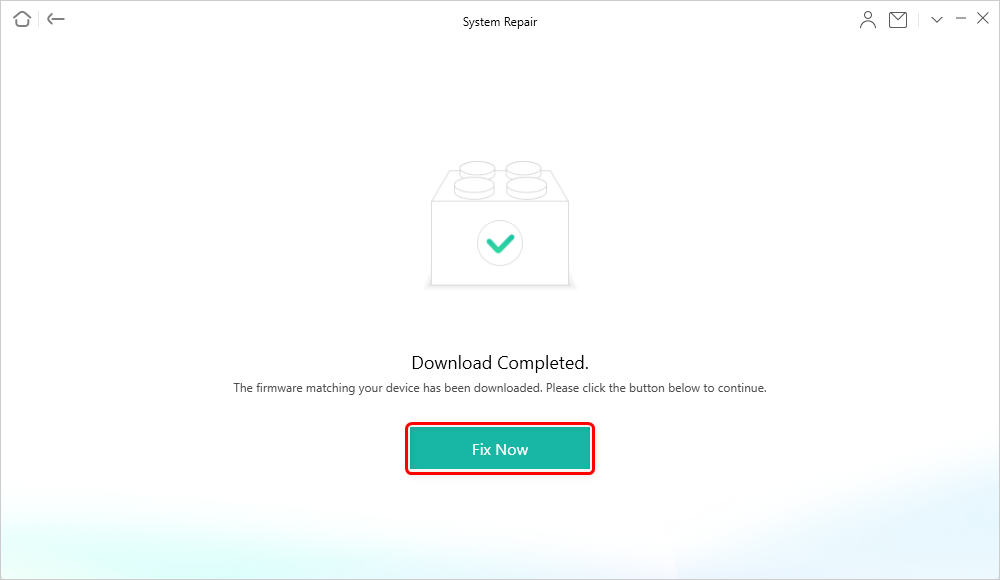
Tap on Fix Now when Firmware Downloaded
Step 6. Once the repair is done, your device will restart. AnyFix will display a confirmation message once the process is successful.
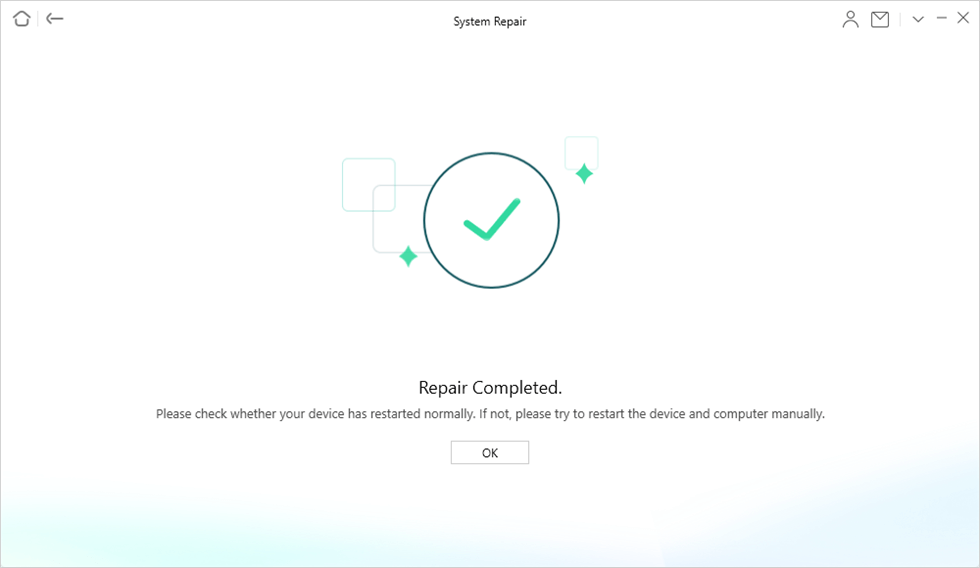
Repair Completed
Method 2. Force Restart Your iPhone
A force restart can sometimes be the simplest yet effective solution for most issues. You can also try it when an iPhone is stuck on the update screen.
This method works by forcibly shutting down and restarting the device. Ultimately, it can reset the system and clear minor software glitches. It’s an ideal first step because this process doesn’t erase your data.
The method to force restart an iPhone depends on its model. Here’s how you do it.
For iPhone 8, iPhone X, and Later Models
- Briefly press & release the “Volume Up” button.
- Immediately after, quickly press and release the “Volume Down” button.
- Press and hold the “Power/Side” button. Keep holding until the Apple logo appears and then release it.
For iPhone 7 or iPhone 7 Plus
- Press and hold both the “Volume Down” and the “Power/Sleep” buttons at the same time.
- Continue holding the buttons until you see the Apple logo, and then release them.
For iPhone 6s, 6s Plus, and Earlier Models
- Press and hold both the “Home” button and the “Sleep/Wake” button simultaneously.
- Keep holding these buttons until the Apple logo is displayed, then release both buttons.
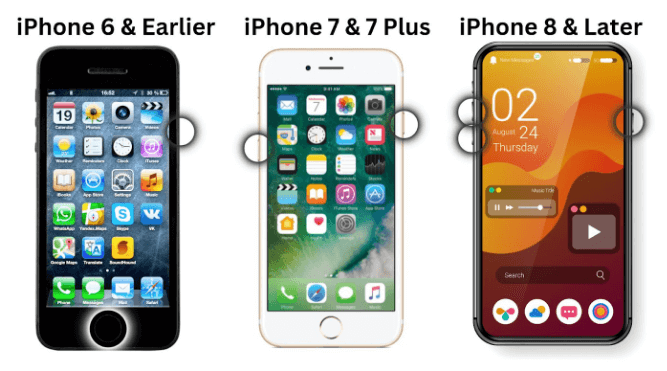
Put Your iPhone In Recovery Mode
After force restart, you can increase your storage space by deleting excess files before attempting another update.
Method 3. Reset Network Settings
If you can use your iPhone when an update is stuck, then resetting the network settings can be helpful. This method is particularly useful if the update problem is related to network issues. Remember, this will erase all saved Wi-Fi networks, passwords, and cellular settings, so you’ll need to set them up again afterward.
Here is a stepwise guide to reset the network settings on the iPhone.
Step 1. On your iPhone, open the “Settings” app. Then go to General and click on Transfer or Reset iPhone.
Step 2. Now scroll down and click on Reset. Many options will appear on the screen. Select “Reset Network Settings.”
Step 3. You will need to enter your passcode when prompted. Confirm that you want to reset your settings.
Then, set up the network again and try updating it now.
Method 4. Restore iPhone via iTunes
Restoring your iPhone via iTunes is a method typically used for resolving various software issues. This process reinstalls the operating system and erases all data on the device. So, it’s important to back up your data before proceeding.
One limitation of this method is that it requires the iPhone to be functioning enough to be recognized by iTunes. If you haven’t connected your iPhone to iTunes before, this process will not work in this case.
Follow these steps to reset an iPhone with iTunes.
Step 1: Get the latest version of iTunes & launch it. Then connect your iPhone to your computer.
Step 2: When iTunes recognizes your iPhone, a small phone icon will appear on the top toolbar. Click on it. Note: Before proceeding, back up your iPhone using iTunes to save your data.
Step 3: Under the “Summary” tab, click on “Restore iPhone.”
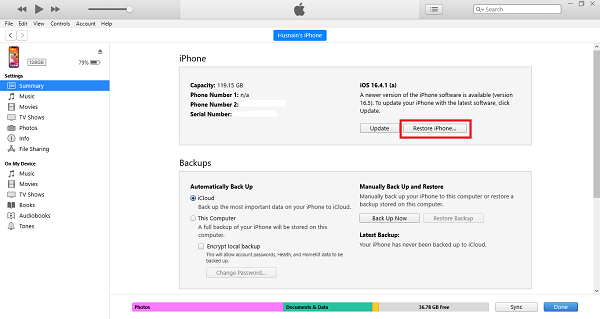
Click Restore iPhone
Step 4: iTunes will confirm that you want to restore your device and erase all data. Click “Restore” to proceed.
Step 5: iTunes will now download the latest iOS software and restore your iPhone. Keep the device connected until the process is complete.
Once the restore is done, your iPhone will restart. You can then set it up as new or restore from a backup.
Method 5. Put iPhone in Recovery Mode
Using recovery mode to restore your iPhone via iTunes is helpful when the device is unresponsive. This method also erases all data, so backing up your iPhone beforehand is essential.
Here are the steps to fix your iPhone in recovery mode.
Step 1: Launch your latest version of iTunes on a computer. Connect your iPhone to your computer.
Step 2: Then, put your iPhone in recovery mode. You can use the same button combinations as force restart but don’t release them when the Apple logo appears.
Step 3: Once in recovery mode, you will be asked to restore or update your iPhone. Choose “Restore.”
Step 4: Confirm your action by clicking on the “Restore & Update” button. iTunes will download & install the latest iOS. The iPhone should remain connected during this process.
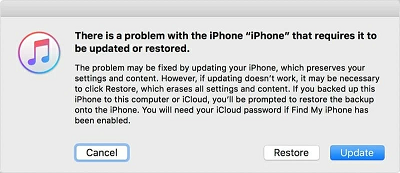
Tap on the Restore button
Step 5: After the restore, your iPhone will restart. You can now set it up as a new device or restore it from a backup.
That’s all we’ve got, folks. If you follow these methods, then you’ll resolve this issue in most cases.
Before we end our guide, let’s have a look at some frequently asked questions about the iPhone update stuck issue.
FAQs
How to Fix iPhone Stuck on Apple Logo After the Update?
A force restart can be an effective solution if you are stuck on the Apple logo after an update. For different iPhone models, the steps to force restart vary. The general idea is to interrupt the current power cycle and reboot the device.
If this doesn’t work, connecting your iPhone to iTunes and performing a restore can help. But be aware this will erase your data, so it should be used as a last resort. You can also try professional tools like AnyFix to solve the issue without data loss.
How to Fix iPhone Stuck on Preparing Update?
When your iPhone is stuck on “preparing update,” first make sure that you have a stable internet connection. Poor connectivity can impede the update process. If the issue persists, try freeing up storage space on your device, as insufficient space can also hinder updates.
If these steps don’t help, reset your iPhone’s network settings to clear any connectivity issues, and then attempt the update again. This process won’t erase your data but will reset Wi-Fi networks and passwords.
The Bottom Line
Solving the “iPhone update stuck” issue may seem like a challenge. But, with the right approach, it’s totally manageable. In this guide, we’ve shown you various causes and fixes when your iPhone gets stuck on an update. If you are looking for a reliable tool to fix an iPhone system, we recommend using AnyFix. It’s specially designed to solve all the common iOS system issues. You’re now well-equipped to handle any update challenges and keep your iPhone running at its best.
Free Download * 100% Clean & Safe
Product-related questions? Contact Our Support Team to Get Quick Solution >

