How to Fix Do Not Disturb Won’t Turn Off iPhone [iOS 18]
Are you tired of iPhone stuck on do not disturb? Many feel the same. But worry not! We’ve got you covered. From simple resets to advanced software repairs, we’ll help you regain control of your notifications.
AnyFix – Repair iOS System Without Data Loss
Feeling overwhelmed by your iPhone stuck on Do Not Disturb? Don’t panic! AnyFix can help you fix it within a few clicks. Free download AnyFix now to get your iPhone back to life instantly.
iPhone gives you the option of silencing your phone with Do Not Disturb. But what if this feature won’t turn off and leaves your iPhone stuck on Do Not Disturb? This can be frustrating! If your iPhone Do Not Disturb is stuck on, it might cause may inconvenience to your life. You will miss no-sound notifications or messages from your boss or family, which might cause unnecessary loss. You are in this situation? Don’t worry! This post will provide 9 effective methods to fix the iPhone Do Not Disturb stuck-on issue.
Why Is iPhone Stuck on Do Not Disturb?
Sometimes, the “Do Not Disturb” setting on your iPhone won’t turn off, even when you try! Here’s why that might happen:
- Settings issue: Sometimes, we might turn on “Do Not Disturb” and forget about it.
- Software glitch: Your iPhone’s software might have a little bug that is messing things up.
- Driving mode: Your iPhone can turn on “Do Not Disturb” while driving or during sleep mode, and it may not turn off automatically.
Apart from the above-mentioned reasons, there might be other less common problems causing the issue, so we’ll try different fixes in the next section.
9 Fixes to iPhone Stuck on Do Not Disturb Issue
We’re now going to fix the iPhone stuck on Do Not Disturb using solutions that are easy to try. We’ll start with simple fixes and move on to repair tools if needed.
Fix 1. Force Restart iPhone
For random software glitches and settings errors, force restarting the device often works like magic. It resets the settings to default and fixes the errors.
Different models of iPhones have different methods to force restart the device. We will start with the latest model first.
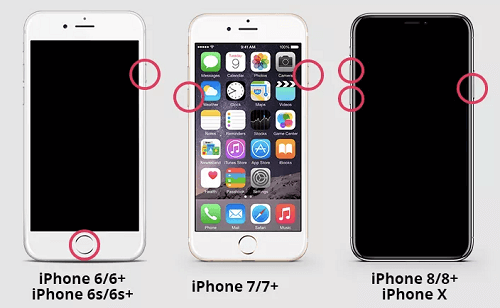
- iPhone 8/X/11/12 (or later):
The steps to force restart the iPhone 8 and later models are mentioned below.
Step 1. Press and release the Volume Up button once.
Step 2. Press and release the Volume Down button once.
Step 3. Press and hold the Power/Sleep/Wake button for 10 seconds or more. The device will show the Apple logo and then restart.
Force Restart iPhone to Fix iPhone Not Responding to Touch or Screen Frozen
- iPhone 7 and 7 Plus:
The method to force restart the iPhone 7 is given in the steps below.
Step 1, Press the Power/Sleep/Wake button and hold it simultaneously with the Volume Down button. You may need to hold both buttons together for about 10 seconds.
Step 2. Hold until your iPhone restarts and displays the Apple logo again.
- iPhone 6S (or earlier):
The steps to force restart the iPhone 6S or earlier versions are given below.
Step 1. Press and hold the Home button and the Power/Sleep/Wake button at the same time.
Step 2. You may need to hold both buttons together for about 10 seconds. Hold until your iPhone restarts and shows the Apple logo again.
If the force restart is not working, check for other solutions in the following steps.
Fix 2. Adjust Do Not Disturb
Sometimes fixing “Do Not Disturb” is just about changing the right settings. Let’s take a closer look at where to find those settings. Follow these steps to adjust Do Not Disturb. In these steps, we’ll check all these settings to make sure they’re how you want them.
Step 1. Find the Settings app with the gear icon and tap to open it.
Step 2. Scroll down the Settings menu and look for Focus, then tap it and choose Do Not Disturb.
Step 3. Look for any schedules that might turn Do Not Disturb on automatically. If you find any, you can turn them off.

Reset the schedule in Do Not Disturb Mode
Step 4. Adjust other settings and turn off both Always and While Phone is Locked options
If the problem persists, you should try some other solutions. Let’s review them.
Fix 3. Reset Do Not Disturb
If adjusting the settings doesn’t work, sometimes a fresh start is the best solution. We’ll reset your “Do Not Disturb” settings back to their original state. It will help if something got messed up in the settings. Follow the steps given below to reset Do Not Disturb.
Step 1. Open the Settings app with the gear icon.
Step 2. Scroll down in Settings, and choose General.
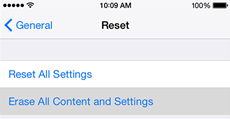
Step 3. Scroll to the bottom and tap Reset then click Reset All Settings.
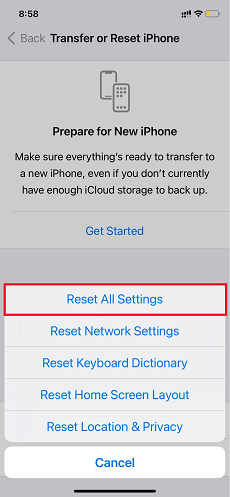
Select Reset All Settings
Step 4. Test if Do Not Disturb turns on and off correctly. You may need to re-adjust some settings to how you like them.
If the iPhone is still stuck, you should probably try fixing the iOS system using repair software.
Fix 4. iOS System Repair Tool – AnyFix [Safe & Fast]
Sometimes, an iPhone stuck on Do Not Disturb is due to a deeper issue within your iPhone’s software. That’s where you need to use repair software to fix the iOS system. AnyFix is a reliable tool to fix the iPhone stuck-on Do Not Disturb issue. Compatible with both Windows and Mac, this tool has been updated to support the latest iOS 18. Thanks to the easy steps and user-friendly interface, AnyFix allows users to repair stuck Do Not Disturb on iPhones without technical skills. As a comprehensive iOS toolkit, it can also help users upgrade or downgrade iPhones, reset iOS devices, etc.
Main Features of AnyFix:
- Fix iPhones stuck on Do Not Disturb without data loss.
- Fast repair process with no technical knowledge required.
- Intuitive interface and easy procedure, suitable for most users.
- Wide compatibility for iOS devices, including iPhone, iPad, iPod touch, and Apple TV.
Free Download * 100% Clean & Safe
Step 1. Download AnyFix and launch it. Connect your iPhone and click System Repair mode.
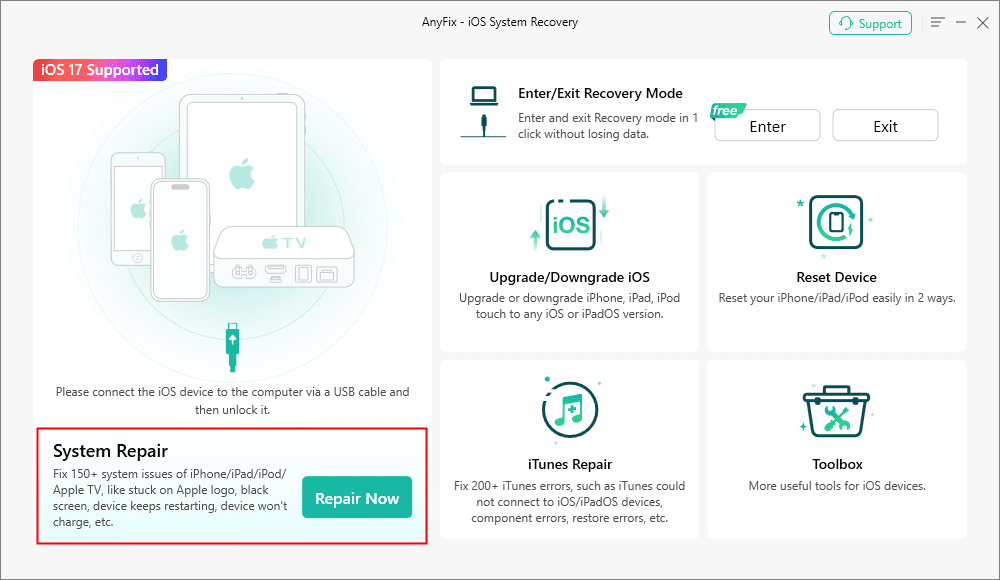
Choose AnyFix System Repair Option
Step 2. Select Device Bug and then click Start Now. After the software has detected your device it will enter the next step.

Select Device Bug Mode
Step 3. Select the Standard Repair option and click the green button to continue.
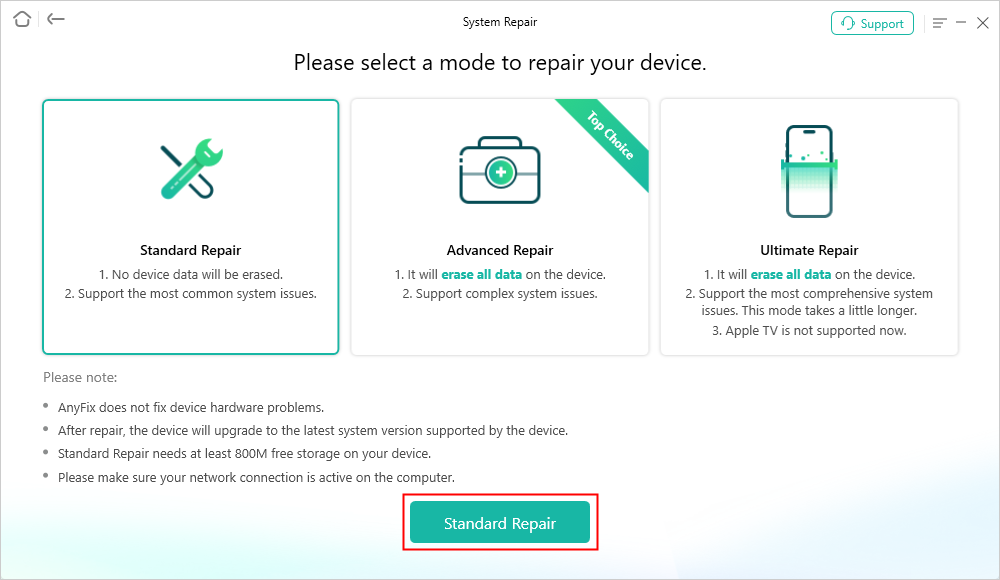
Choose Standard Repair Mode
Step 4. The software needs to download the firmware package required for iOS system repair. Click the Download button to proceed with the process.
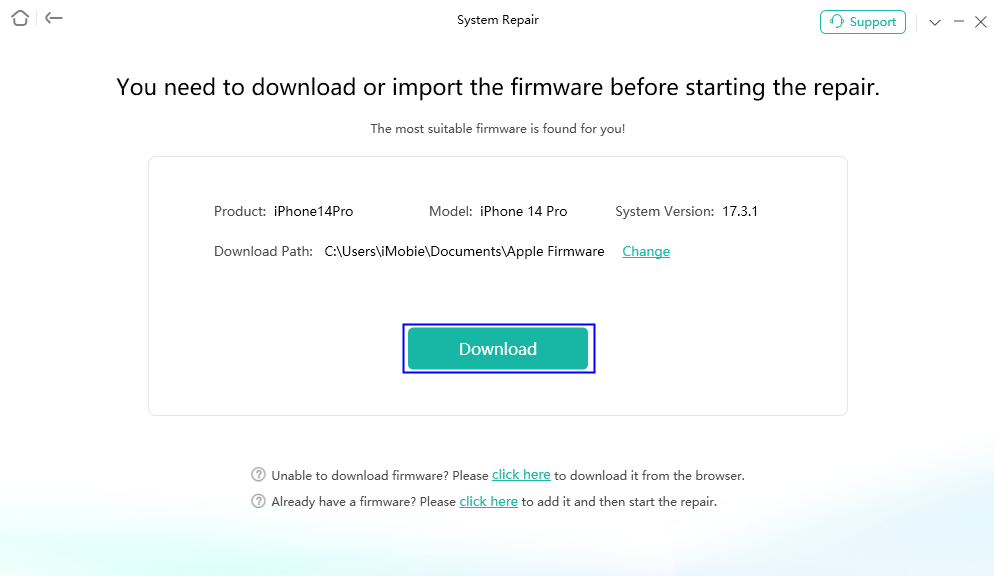
Download Suitable Firmware
Step 5. After the firmware is downloaded, click Start Standard Repair. AnyFix will iOS system automatically. After the repair process is completed, you will see the Repair Completed page.
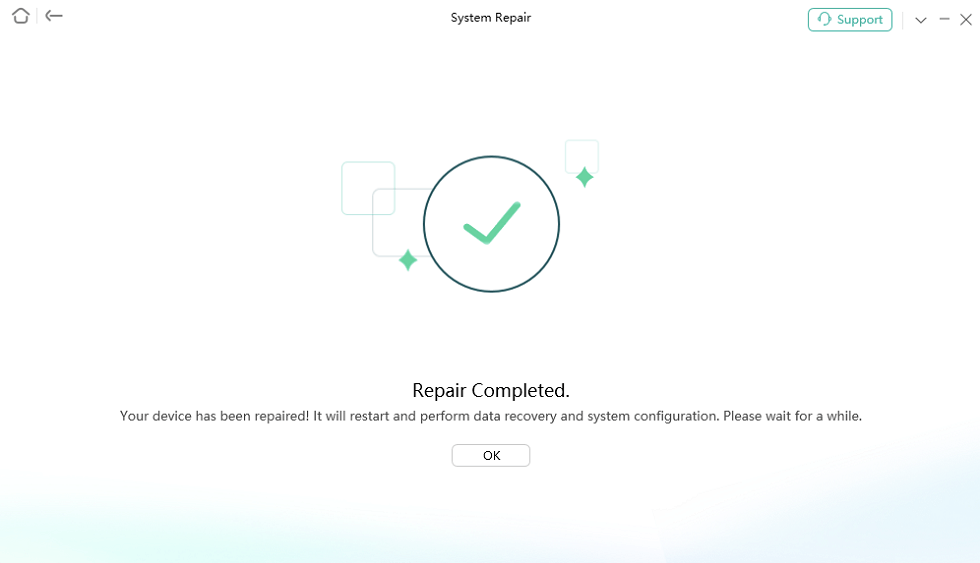
Repair Is Completed
If the repair was successful, “Do Not Disturb” should be back under your control! If you still have the iPhone stuck on Do Not Disturb you need to explore some more solutions with us.
Fix 5. Check Restrictions Settings
Sometimes features on your iPhone can be turned ON and OFF by settings called “Restrictions.” Restrictions let you limit what apps and features can be used on your iPhone. Let’s check if this might be blocking Do Not Disturb.
By following the steps given below, you can check the restriction settings and correct them to remove Do Not Disturb. To check and rectify restrictions settings, follow the steps below.
Step 1. Find the Settings app with the gear icon and tap to open it
Step 2. Scroll down in Settings and tap on Screen Time.
Step 3. Select Content & Privacy Restrictions.
Step 4. Toggle the switch and disable Content & Privacy Restrictions.
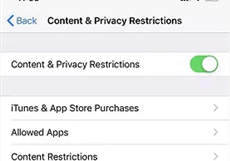
Disable Content & Privacy Restrictions
This fix will turn Do Not Disturb off if restriction settings for driving mode have been enabled. If the settings are still not in control, you may need to update your iOS.
Fix 6. Update iPhone
Follow these steps to update your iOS.
Step 1. Tap the Settings icon, it looks like a gear.
Step 2. Tap on the General section.
Step 3. Tap on the Software Update option.
Step 4. If an update is available, tap Download and Install.
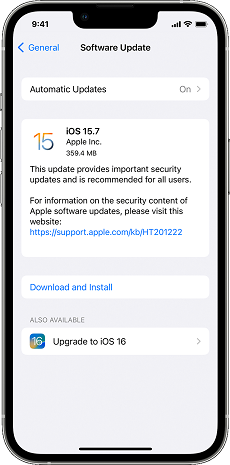
Check the Software Updates
After your iPhone updates and restarts, you will be able to change Do Not Disturb. If this fix won’t work, we have more fixes for you.
If updating iOS doesn’t help, try to change some other settings given in the fixes below.
Fix 7. Disable Sleep Mode
Your iPhone has a “Sleep Mode” that turns off the notifications settings and puts the phone to sleep for night time. Let’s make sure this setting isn’t interfering with your main “Do Not Disturb” settings. The steps to disable sleep mode are as follows:
Step 1. Tap the Settings app with the gear icon.
Step 2. Look for the Focus option in Settings.
Step 3. Select the Sleep mode from the list.
Step 4. Check if Sleep has a schedule turned on. If it does, tap to toggle it off.
This should return the settings control back to normal. If this solution doesn’t help, try restoring your iPhone via iTunes.
Fix 8. Restore iPhone via iTunes
Sometimes, a fresh start is the best way to fix an iPhone stuck on Do Not Disturb. Restoring your iPhone through iTunes can be used to fix deep-rooted software issues that other solutions couldn’t. Restoring erases everything on your iPhone and then installs the latest iOS version. Follow these steps to reset your iPhone using iTunes.
Step 1. Install the latest version of iTunes on your computer and connect your iPhone with a USB cable.
Step 2. When iTunes recognizes your iPhone, click on the Summary tab and locate the Restore button.
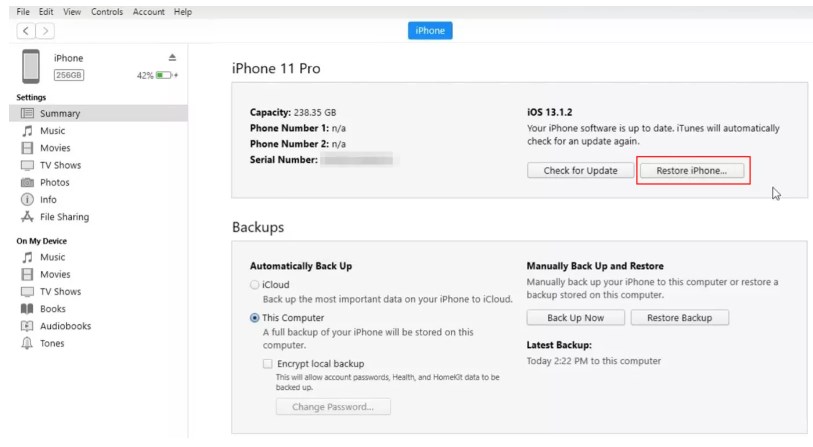
Restore iPhone to Factory Settings Using iTunes
Step 3. iTunes will guide you through the restore process and reinstall iOS on your phone.
If you are still facing the Do Not Disturb issue, there is a last resort for you. Let’s explore the process of factory restoring your iPhone.
Fix 9. Factory Reset iPhone
This is the last solution if other fixes haven’t helped with the iPhone stuck on the Do Not Disturb issue. A factory reset wipes your iPhone, giving you a completely fresh start. This process will erase all your data and settings, including whatever’s causing the “Do Not Disturb” problem. Follow the steps below to factory reset your iPhone.
Step 1. Back up your data before factory resetting the device.
Step 2. Tap the Settings app with the gear icon.
Step 3. Tap General -> Transfer or Reset iPhone -> Reset -> Erase All Content and Settings.
Choose Erase All Content and Settings
If none of the earlier solutions worked, a factory reset often clears up even the most stubborn software problems. Once it’s complete, your iPhone will feel like new without any Do Not Disturb stuck to your device.
How to Turn Off Do Not Disturb on iPhone?
Our “Do Not Disturb” problem is fixed! Now, it’s important to know how to turn this feature on and off the normal way. There are a few different ways to turn it on or off. The methods to normally turn off Do Not Disturb are listed below. You can choose what’s easiest for you.
Method 1 – Control Center
- Swipe down from the top right corner of the screen and tap the crescent moon icon to toggle Do Not Disturb on or off.
Method 2 – Settings
- Go to Settings -> Focus -> Do Not Disturb, and tap the toggle to turn it off.
Method 3 – Siri
- Say “Hey Siri, turn off Do Not Disturb”.
FAQs to iPhone Stuck on Do Not Disturb Issues
Q1. Why can’t I turn off my Do Not Disturb on my iPhone?
Sometimes your iPhone’s “Do Not Disturb” gets stuck for a few reasons. It could be a hidden setting accidentally turned on, a schedule from a different Focus mode, or even just a temporary software glitch. Checking your settings carefully and restarting your phone can often clear up the problem.
Q2. How to put someone on Do Not Disturb on iPhone?
If you want to silence notifications from a specific person, you can put them on “Do Not Disturb” individually. Open the Messages app and find the conversation with that person. Tap their name at the top, then toggle on “Hide Alerts”. Now you won’t get calls or message notifications from them while your phone is locked.
Q3. Why does my DND not work on iPhone?
There are multiple reasons why Do Not Disturb (DND) isn’t working on your iPhone. The most common one is that its settings may allow certain notifications to bypass it. Additionally, another active Focus mode might override DND. Misconfigured scheduling or an outdated iOS version can also interfere with DND functionality. Or, you may need to repair the iOS system to fix the DND not working on the iPhone.
The Bottom Line
In this guide, we have gone through a range of solutions for an iPhone stuck on Do Not Disturb. From simple fixes to more advanced troubleshooting techniques, we have covered it all. If the basic fixes don’t work, a powerful tool like AnyFix can often solve the problem. It’s designed to fix software issues that might be keeping your iPhone stuck on Do Not Disturb. So whenever you’re stuck with Do Not Disturb, use our guide, and hopefully, you’ll be back in control of your notifications in no time!
Free Download * 100% Clean & Safe

Senior writer of the iMobie team as well as an Apple fan, love to help more users solve various types of iOS & Android-related issues.
Product-related questions? Contact Our Support Team to Get Quick Solution >
