7 Ways to Fix Green Line on iPhone Screen [New]
The top 7 ways to fix the green line on the iPhone are well-defined and presented in this article. Fix your issue with third-party tools and instant methods.
The green line on an iPhone screen is a common issue worldwide. Software bugs, accidental damage, or any quirky operating system cause glitches on the screen. Don’t panic if you see a green, glitch, or vertical line on your iPhone.
Fixing this issue with an iOS fixer is a valid and instant way. And you can also read 6 more ways, as described below, to fix the green line on the iPhone screen quickly. Before fixing the issue, you should know why your iPhone screen has this issue.
You may also need this iPhone tip: Ultimate Guide to Fix White Lines on Screen iPhone >
Why Is There Green Line on iPhone Screen?
There are several and most common causes which sometimes we ignore during use, such as giving pressure on the screen or heat-up of the device. The glitch lines are maybe colored lines like white, red, blue, or purple. While in most cases, they are green lines. They are in the horizontal direction or the vertical direction.
The best way to figure out the cause of the iPhone screen glitch is to remember when the problem started and what functions were performed on the device then. However, there may be these causes as stated below:
- Hardware issue: If the problem is stated due to external accidental damage of the LED and digitizer of the iPhone, then it is a hardware issue.
- Software issue: If glitches appear during the use of any app or when the device is updated or reset, it will be a software issue.
- Damaged IC: Any physical harm to the device during packaging or manufacturing faults and temperature conditions cause damaged IC of the iPhone.
- Electro Static Discharge (ESD): The irregular electron discharge or lightning around the device causes screen glitches due to voltage issues and a dry environment.
Now, it’s time to eliminate this issue by following 7 easy ways!
Fix Green Line on iPhone Screen by Restarting
Working normally on iPhone? Opening any app causes a glitchy screen? Then you should restart your iPhone, which is the easiest and instant way to fix the issue. The hard reboot or hard reset is done whenever you face a glitch screen of your iPhone, and it will not harm any file or function of the device. To perform restarting, follow the below steps according to the iPhone model, whatever you have!
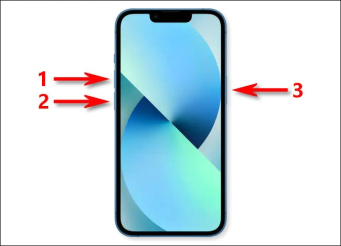
Restart iPhone
Restart iPhone 6, 6s, and Earlier models:
If you have iPhone 6, 6 Plus, iPhone 6, 6s, iPhone SE, iPhone 5/5s, iPhone 4, iPhone 3/ 2, or iPhone1, then follow the below steps to restart:
Step 1. Press and keep the Sleep/ Wake (POWER) button with the Home button together.
Step 2. Free the buttons when you see the Apple logo on the screen.
Restart iPhone 7 and iPhone 7 Plus:
Restart your iPhone 7 or 7 Plus by following the below guidelines:
Step 1. Press the Sleep/ Wake (POWER) button and the Volume Down button together.
Step 2. Free both buttons when you see the Apple logo on the screen.
Restart iPhone 8/8 Plus, iPhone X, and iPhone 11/12/13/14:
Have iPhone 8/8 Plus or have iPhone X or the latest models, then restart it by following the below guidelines:
Step 1. Press and free the Volume Up button. Then press and free the Volume Down button.
Step 2. Next, Press and keep the Side button. Free the button when you see the Apple logo on the screen.
After restarting, if you still do not get out from green lines, then perform the following ways.
Bonus Tip: If your iPad screen keeps flickering, please read 9 Ways to Fix iPad Screen Flickering Issue [Guide] >
Fix Green Line on iPhone Screen via Display Settings
If restarting can’t fix the issue, then screen glitches may be due to brightness adjustments or display settings. If you face any software-related issue, then in most cases, adjusting the screen brightness sort out the issue. Ambient lighting can be automatically adjusted by using the True Tone feature. Follow the below steps to get in touch with this feature:
Step 1. First of all, go to Settings on your iPhone.
Step 2. Then find out Display and Brightness, and tap on it to open.
Step 3. After that, turn the True Tone option on or off.
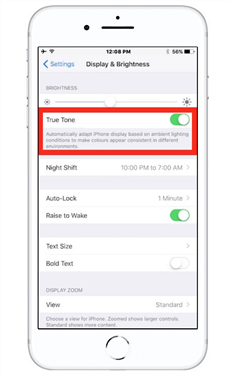
Turn the True Tone Option on
This feature fixes the issue in rare cases, so don’t worry. Move towards the next steps to get out of the issue!
If green lines on the screen are due to display adjustments, then you notice that the screen is working normally and the touch sensor is also good.
Fix Green Line on iPhone Screen with iOS Update
Updating the iPhone is the most valuable way to fix any bug on iPhone. Most users with earlier models like 5s have screen glitching issues due to outdated versions. However, you should update your iPhone whenever you get the latest version because updating the system is helpful in many other device functions. But please remember that if you have essential files and documents, then back up your device with iCloud on the PC. Now fix the green line by iOS update by following the below steps!
Step 1. Ensure that you have a good Wi-Fi connection available during iOS updating.
Step 2. Go to the settings of your iPhone, then General. After that, tap on Software Update.
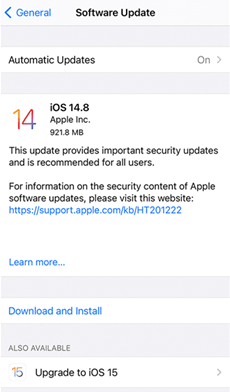
Update iOS on Your iPhone
Step 3. In most cases, you will come up with many software update options. Choose any update option you want to get on your iPhone.
Step 4. Tap on the Download or Install option and then enter your screen lock to continue the process.
Fix Green Line on iPhone Screen without Data Loss
Mostly during the fixation of any issue, there is a risk of losing data. But you don’t need to worry because AnyFix – iOS System Recovery controls everything, and there will be no case of losing any document or file. AnyFix sorts out all issues of iOS and gives a wide variety of over 130+ system repairs. There is no need to do extensive research to use this software. Every issue will be fixed within a few steps instantly. And you can learn more about this tool below.
Free Download * 100% Clean & Safe
- Fixer for all system issues – Won’t charge, stuck on loading screen, reboot loop, frozen screen, etc. all system errors can be easily solved by this tool.
- Provide 3 repair modes – This tool provides corresponding repair modes according to the problem’s difficulty, so as to ensure that each issue can be successfully solved.
- Guarantee data integrity – AnyFix can completely save the data on your device while fixing system, so you can use your phone normally immediately after the repair.
- Repair tool for iTunes – AnyFix can also repair more than 200 iTunes problems, such as iTunes cannot recognize iPhone/iPad, cannot sync data to iTunes, iDevices disabled connect to iTunes, etc.
Now you can get the latest version of AnyFix for free. Then go ahead and look at the steps below to fix green lines by AnyFix!
Step 1. Open AnyFix and connect your iPhone to the PC. Click on the System Repair option, as shown below.
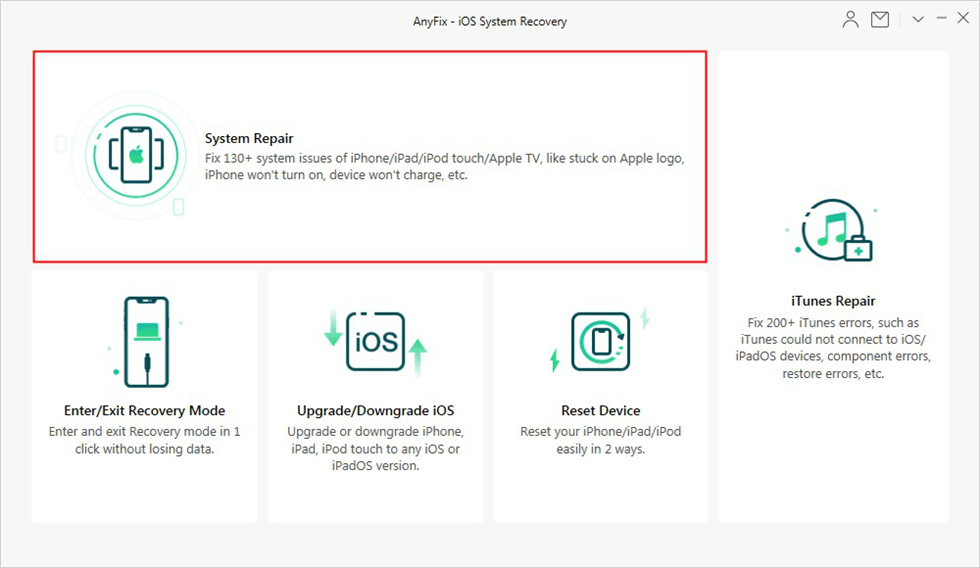
Choose System Repair on the Homepage
Step 2. Select the iPhone Problems option and click on Start Now to proceed further.
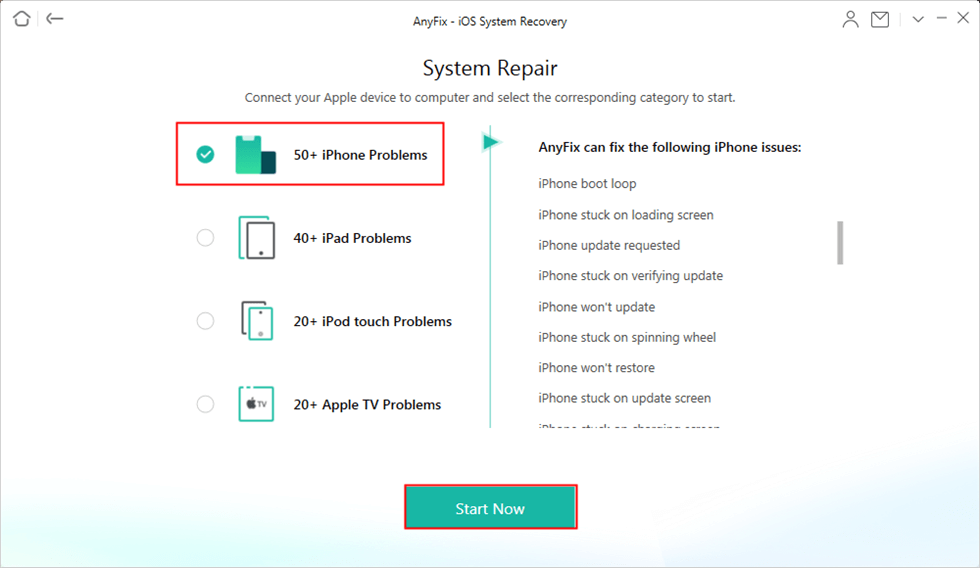
Select iPhone Problems
Step 3. After that, a window will pop up with three modes provided by AnyFix. To avoid data loss, Standard Repair is the best choice and it is helpful for fixing all types of issues. So proceed further by clicking on the Standard Repair button, as shown below.
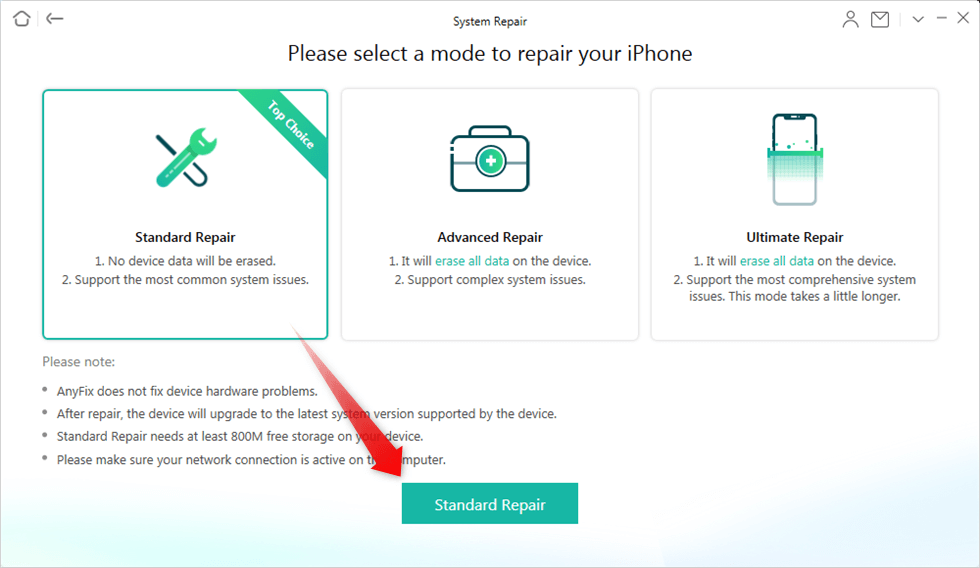
Choose Standard Repair Mode
Step 4. Standard repair mode is enabled and now click on the Download button to get access to Firmware for your iPhone. After downloading related firmware, tap on the Fix Now button.
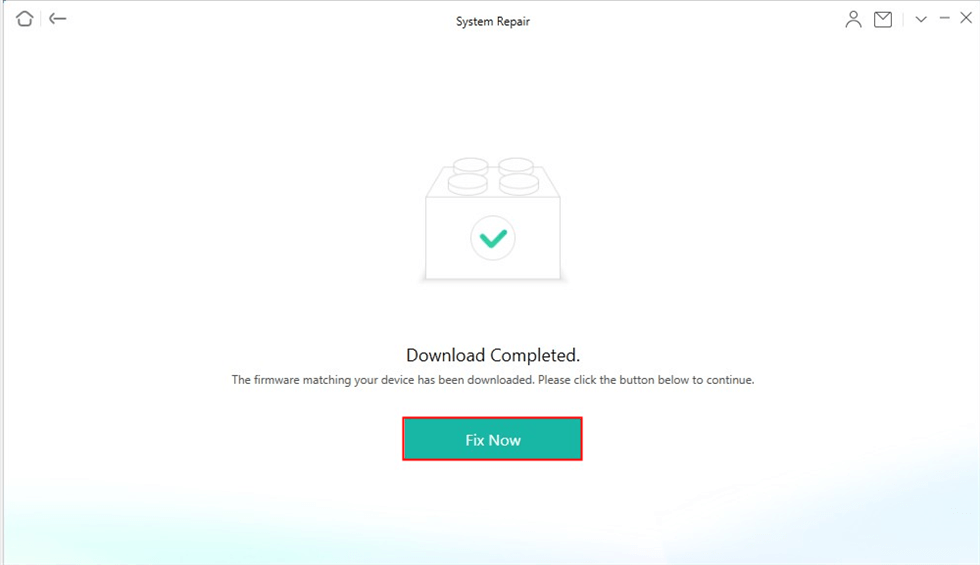
Firmware Download Completed
Step 5. It will start to repair your system and please wait for a while. A configuring window will pop up to confirm that the repair is completed.
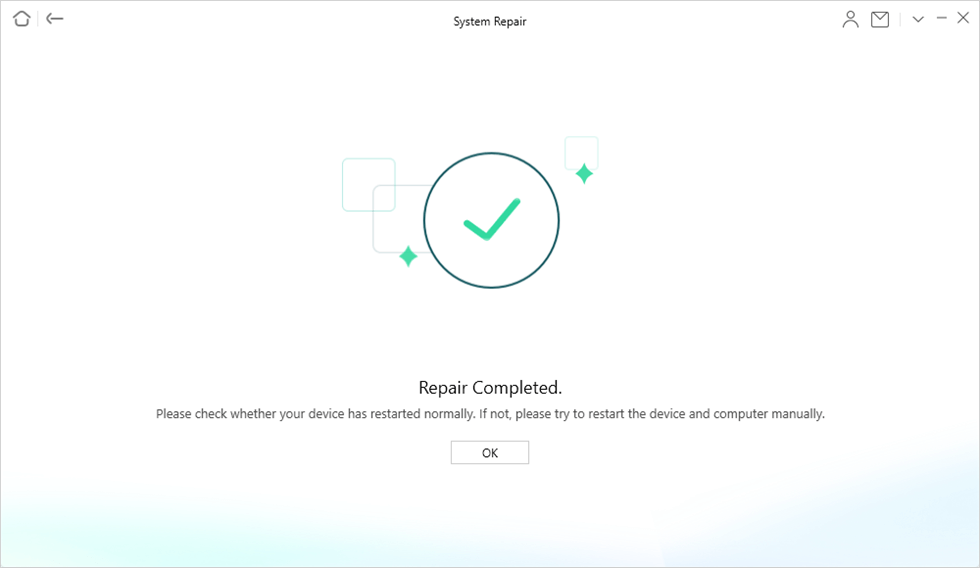
Repair Completed
If you don’t have the PC at repairing time, then don’t worry. Check out further ways to fix your screen glitches!
Fix Green Line on iPhone Screen in DFU Mode
To fix the issue in DFU (Device Firmware Update) mode, will lose all types of data and reset the device. Without any operating system on the device, you will have access to iTunes during DFU mode. But before using DFU mode, ensure that you have done a backup of all important documents through iCloud.
Follow the below steps to enable DFU mode on iPhone:
Step 1. First, attach your iPhone to your PC and open iTunes on it.
Step 2. Then perform the following action, according to the model of iPhone:
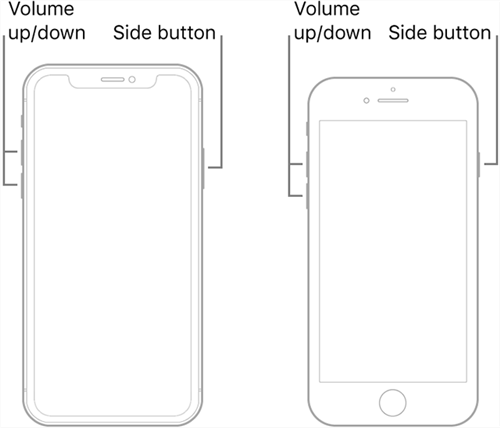
Put Different iPhone Model into DFU Mode
For iPhone 8 and the latest iPhones:
- Press and free the Volume Up button.
- After that, press and free the Volume Down button.
- Now, Press and keep the Side button.
- Free the button when you see iTunes on the screen.
For iPhone 7 and earlier iPhones:
- Press the POWER button, Volume Down button, and Home button together.
- Free both buttons when you see iTunes on the screen. If the Apple logo is shown on the screen, it means that your button-holding time is too much.
- After releasing all buttons, the screen will appear black and confirm that DFU mode is successfully enabled. There will be a notification shown on the PC that iPhone is detected.
- A screen will display the box to take confirmation to restore iPhone. Select the Restore iPhone option and wait until the system is completed.
After all these steps, the device will restart automatically, and you will get your screen good. But if you still see the glitches, then follow the below ways.
Fix Green Line on iPhone Screen with Factory Reset
Factory reset will erase the bugs and fix if there are any software issues. Any color of glitch lines will be removed easily by a factory reset of the iPhone. Follow the below steps to do a factory reset of your iPhone!
Step 1. First of all, open Settings on your iPhone. Then tap on General and select the Reset option.
Step 2. After that, tap on Erase All Content and Settings option.
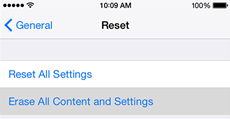
Choose Erase All Content and Settings
Step 3. Now, they will ask about your Apple id or passcode of the device. Enter all the information which is required.
Step 4. Wait for a few minutes and confirm that the factory reset is completed, then the device will restore the data, and the vertical or colored lines will disappear.
Fix Green Line on iPhone Screen via Apple Support
Still, don’t get rid of screen glitches? Then it should be a hardware issue. It means that your screen is external damage. For this, you should contact any technician to sort out your issue. You can also contact Apple Support and repair your device, which is safer than doing it yourself.
The Bottom Line
iPhones are well known for their high-quality function, but sometimes you can get issues with them. But there is no need to worry because there are thousands of ways to come out of all issues, and Apple support also gives an instant response to clients. And to quickly fix the issues in your iOS system, you can resort to AnyFix, which can repair all system problems with simple clicks. If you fix your issue by following the above ways, let us know in the comments! Tell us if you know any other pro tips regarding this issue. Anxiously waiting to hear from your side!
Free Download * 100% Clean & Safe
Product-related questions? Contact Our Support Team to Get Quick Solution >

