How to Solve Cannot Verify Server Identity Problem
If you’re trying to send an email and receive a notification saying “Cannot Identify Server Identity,” don’t worry, because it is a common iOS issue. In this article, we will tell you all about this issue and take you through 7 ways to fix it.
If you have upgraded your Apple device to iOS 26/18, there’s a high chance that you might come across the “Cannot Identify Server Identity” error at some point. This is a common error that many Apple users are facing after the latest update.
What does this notification mean and how can you repair it? Let’s have a look!
What Does Cannot Verify Server Identity Notification Mean?
If you open your mail and are unable to access it due to the “Cannot Identify Server Identity” error, it means that the SSL Certificate on the mail server does not match the server settings on your iPhone. This means that when your iPhone tries to check the reliability of the SSL Certificate by matching it with the domain name, it proves unsuccessful; therefore, it is labeled unreliable and you receive the “Cannot Identify Server Identity” notification.
While, it may appear to be quite an overwhelming issue, especially if you’re trying to send an urgent email, there are several quick fixes for this issue.
8 Ways to Repair Cannot Verify Server Identity Issue
Below we have listed 8 tried and tested ways to fix this issue on your iPhone:
Method 1. Fix Cannot Verify Server Identity by iPhone Repair Software
PhoneReascue for iOS helps you to repair iOS system and get your iPhone out of “Cannot Identify Server Identity” error. Besides, whenever your iPhone is frozen, stuck on black screen, fails to update iOS, you can fix them with PhoneRescue for iOS. It’s a one-solution for system problems, data loss, and locked screen.
At the same time, you do not have to worry about the safety of your data, PhoneRescue for iOS provides a variety of repair modes, you can choose to retain data or not according to your needs. In addition, even if you choose the wipe data repair method, PhoneRescue for iOS can still help you recover your lost data.
Here are the steps to fix cannot verify server identity issue:
Step 1. Get PhoneRecue for iOS installed. When you open it, choose Repair iOS System under Device Rescuer.
Free Download* 100% Clean & Safe
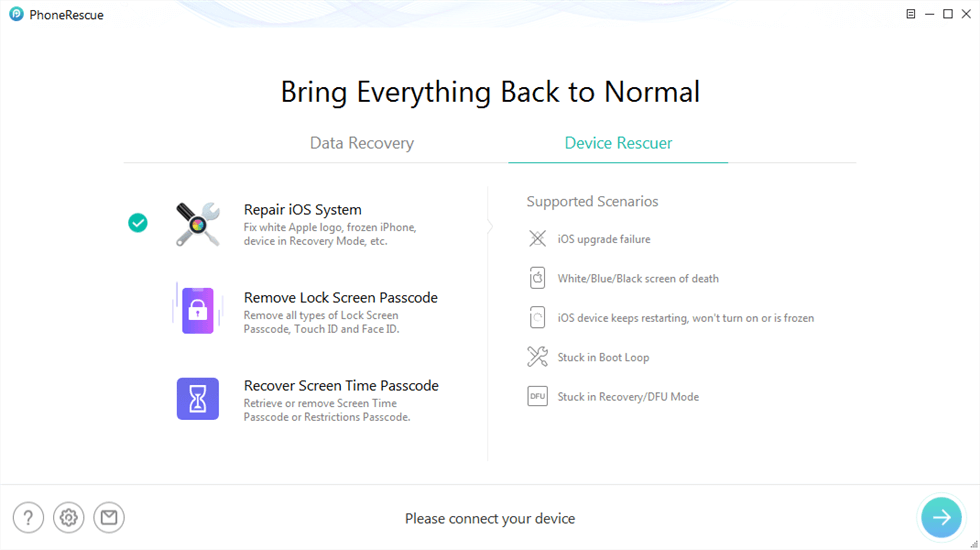
Choose the Repair iOS System Mode
Step 2. Here are two repair modes that you can choose. Advanced Mode allows you to restore iPhone to normal without data loss.
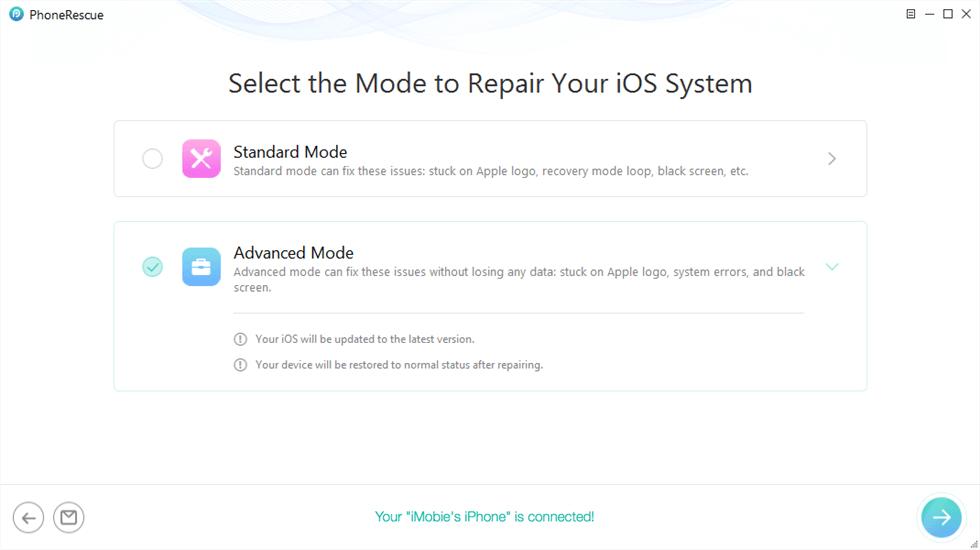
Select the Advanced Mode
Step 3. Follow the on-screen instructions to enter your iPhone into recovery mode.
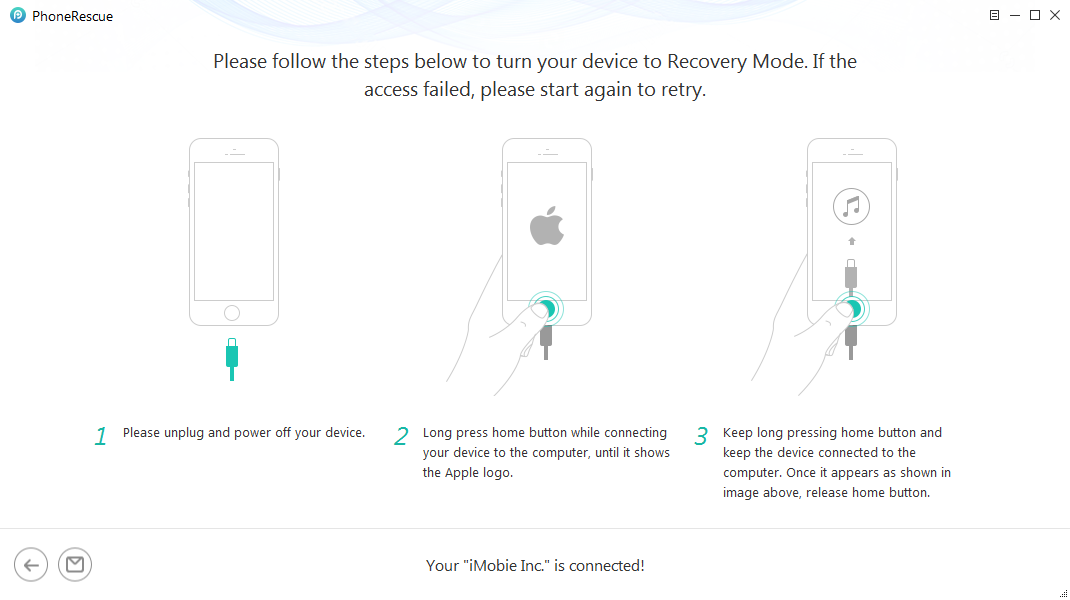
Put Your iOS Device into Recovery Mode
Step 4. Then click Download button to get a matching firmware for your iPhone. After downloaded, the repairing process will start until the completed pages shows below. iPhone will restart normally.
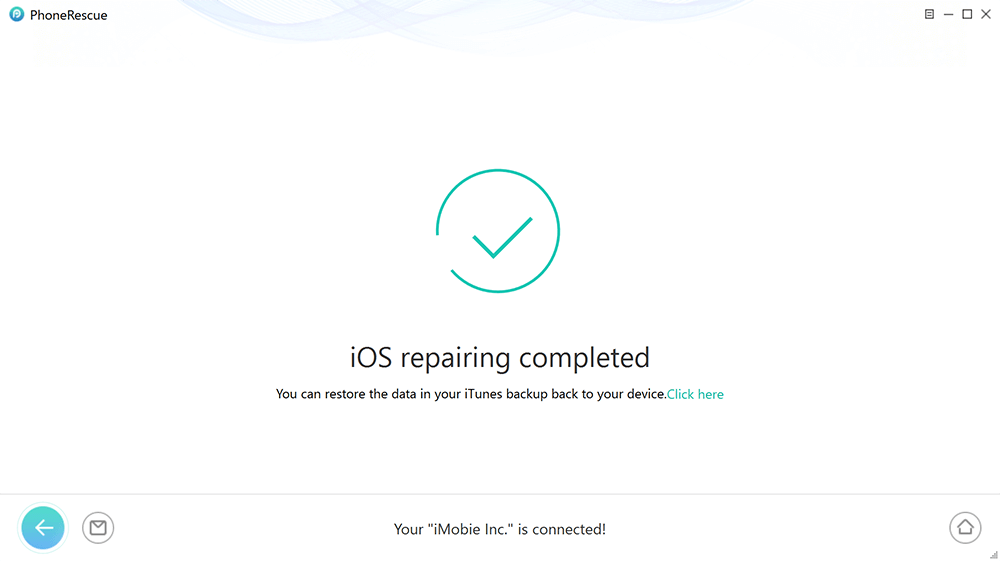
iOS Repairing Completed
Method 2. Exit and Restart Mail App
Restarting an app has resolved more issues than we can imagine; therefore, our first solution to fix this error is to exit and restart the mail app.
Here’s how to do so with different iPhone models:
iPhones with Home Button:
- Double click it to open the App Switcher.
- Now swipe right to find the Mail app.
- Swipe up on it to exit the Mail app.
iPhones without Home Button:
- Swipe up from the bottom of the screen to open the App Switcher.
- Swipe right to locate the Mail app.
- Swipe up on the Mail app card to exit it.
To restart the Mail app, tap the app icon on the home screen.
If the issue is not technical, and is just a small glitch, exiting and restarting the Mail app will get rid of it. However, if you still see the “Cannot Verify Server Identity” error, try the next method on our list.
Method 3. Restart Your iPhone (Pics)
If restarting the app doesn’t work, try restarting your iPhone!
Sometimes the system hangs or faces minor issues that might hinder the apps from working properly, including the Mail app. Therefore, restarting your iPhone might help solve these issues.
Here are the steps on how to restart different iPhone versions:
iPhone 5 and Earlier:
- Press and hold the top button until you see the “Power Off” slider.
- Drag the slider to turn off your iPhone.
- To switch it back on, press and hold the top button again until you see the Apple logo.
iPhone 6,7, and 8:
- Press and hold the side button until you see the “Power Off” slider.
- Drag the slider to turn off your iPhone.
- Press and hold the side button again till the Apple logo appears to switch on your iPhone.
iPhone X and Later:
- Press and hold the volume down and the side button simultaneously till the “Power Off” slider appears.
- Drag the slider to turn off your iPhone.
- Long-press the side button until the Apple logo appears to switch it on again.
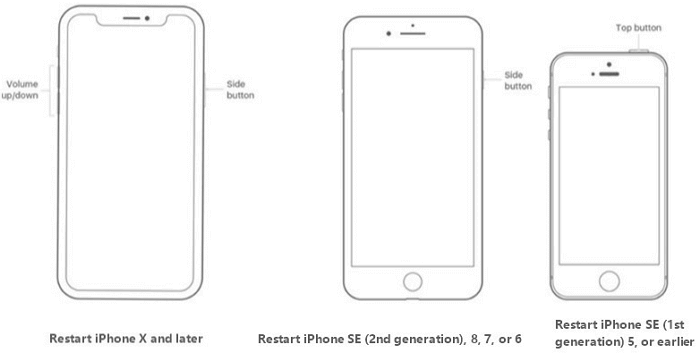
Restart Different Modes of iPhone
If you’re experiencing the error even after restarting your iPhone, let’s take care of it with the next method.
Method 4. Delete Your Email Account and Re-add It
Sometimes removing your email account from your iPhone and re-adding it again can also resolve the “Cannot Verify Server Identity” issue.
Here’s how to go about it:
Step 1. On your iPhone, go to “Settings > Mail > Accounts.”
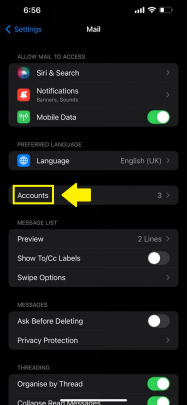
Go to Settings > Mail > Accounts
Step 2. Now, click on the account you’re using for the Mail app.
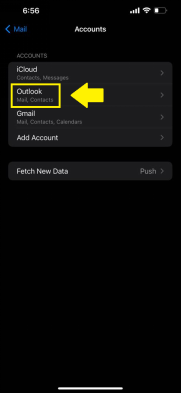
Click on Mail Account
Step 3. Tap Delete Account > Delete from My iPhone.
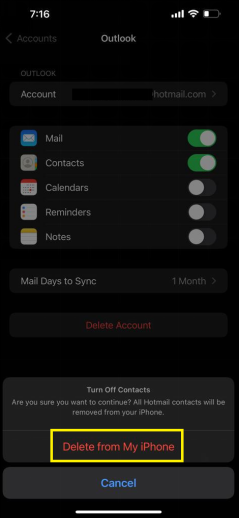
Delete Your Mail Account
This will delete the email account from your iPhone. To re-add it:
Step 1. Go to Settings > Mail > Accounts.
Step 2. Tap Add Account and choose the account you want to add.

Add Any Mail Account
Step 3. Enter the credentials, and your account will be set up again.
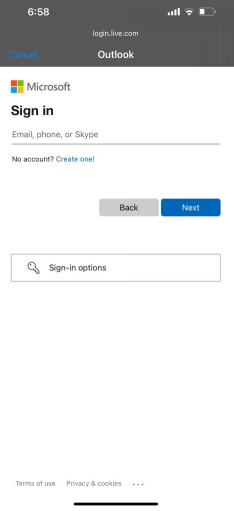
Enter the Credentials
In most cases, deleting and re-adding your email account in the Mail app works. However, if you’re still receiving the “Cannot Verify Server Identity” problem, you can try the next method.
Method 5. Update iOS Version
Let’s try updating your iOS version to see if it resolves this issue.
Step 1. Go to Settings > General > Software Update.
Step 2. Turn “Automatic Updates” on and tap on available updates, if any.
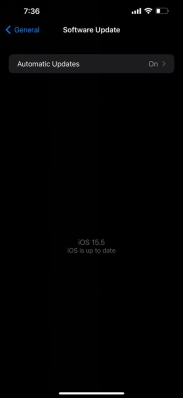
Update iOS Version
If your device is up to date, or if installing a new update also doesn’t fix the “Cannot Verify Server Identity” issue, then it’s time to move on to the next method.
Method 6. Update Carrier Setting
There is a possibility that a conflict in the network settings could cause an issue with email syncing; hence, you’re getting the “Cannot Verify Server Identity” notification. In such a case, updating carrier settings could fix the issue in no time.
Here’s how to update carrier settings:
Step 1. Go to “Settings > General > About.”
Step 2. Follow the on-screen instructions to install the carrier update.
However, if this method also proves unfruitful, you can reset your network settings to resolve the “Cannot Verify Server Identity” issue.
Method 7. Reset Network Settings
Another way to fix this error is to reset the network settings of your iPhone.
Here’s how:
Step 1. Go to “Settings > General > Transfer or Reset iPhone.”
Step 2. Tap on “Reset > Reset Network Settings.”
Step 3. Now enter your passcode to confirm the selection.
Resetting the network settings removes all networks and VPN settings that weren’t installed by a configuration profile or mobile device management. Doing so returns your iPhone to its default settings; hence, removing any glitch or issue causing issues with the apps, including Mail.
Resetting network settings might fix the “Cannot Verify Server Identity” issue; however, if it persists, you still have one option as a last resort…
Method 8. Factory Reset
If nothing else works, factory resetting your iPhone will definitely fix the “Cannot Verify Server Identity” problem.
However, this method will erase everything from your phone, including media files, contacts, etc. Therefore, we recommend backing up your iPhone before proceeding with this method.
To factory reset your iPhone:
Step 1. Go to “Settings > General > Transfer or Reset iPhone.”
Step 2. Tap on “Erase All Content and Settings.” You will get a notification telling you that all your personal data will be erased from this device. Click “Continue.”
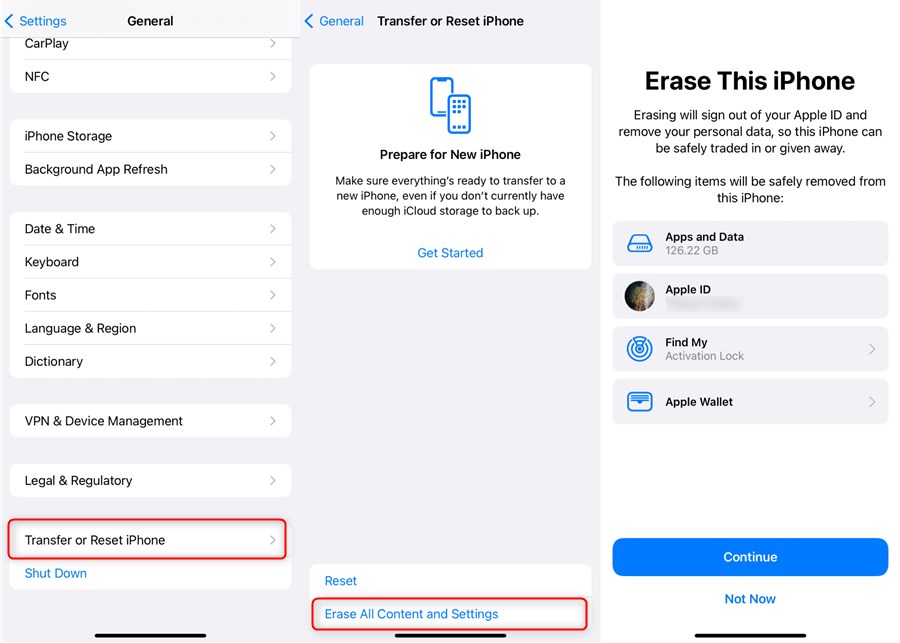
Erase All Content and Settings on iPhone 13
Step 3. Enter your passcode to confirm the selection and factory reset your phone.
Now, when you restart your iPhone, set it up like you did the very first time. Once, it is all set up and online, launch the Mail app to see if the issue persists or has been resolved.
Most probably, factory resetting will make the “Cannot Verify Server Identity” problem go away.
But, in case you’re still facing the issue, we would suggest taking your iPhone to the nearest Apple Store and getting it checked by a professional.
Frequently Asked Questions
Why is Mail not working on my iPhone?
If your SSL Certificate on the mail server does not match the server settings on your iPhone, the Mail app stops working and shows the “Cannot Verify Server Identity” notification.
Where can I find trusted certificates on my iPhone?
You can find the trusted certificates on your iPhone by going to “Settings > General > About > Certificate Trust Settings.”
How do I reinstall the Mail app on my iPhone?
To re-install the Mail app, go to the App Store, and type “Mail” in the search box. When the app appears, click on the cloud button to download and install it on your iPhone.
Is it safe to delete trust certificates on my iPhone?
We recommend not deleting trust certificates on your iPhone as it may limit the functionality of the operating system and can also cause it to fail. Trust certificates are important for backward compatibility.
Conclusion
Many iPhone users have been facing the issue of getting the “Cannot Verify Server Identity” notification when using the Mail app. This issue arose right after the latest iOS 26/18 update and came in the way of users accessing their mail. People tried many ways to resolve the issue but in vain.
In this article, we have put together 8 different ways in which you can attempt to fix this issue. All in all, PhoneRescue for iOS offers you the most comprehensive and fast solution. Not only that, it can also remove screen passwords, remove iTunes encrypted backup passwords and more! Just download and try now.
Free Download * 100% Clean & Safe
Product-related questions? Contact Our Support Team to Get Quick Solution >

