Autofill Not working on iPhone?6 Easy Fixes
“I noticed this a few weeks ago and it’s frustrating because I need to go back and look for the password to add it manually. ”
Introduction
Is autofill not working on iPhone?Stuck with the issue can be frustrating. But take it easy, this page will walk you through the possible causes and six easy ways to solve this issue quickly. We’ve got covered from simple settings to try tools like Anyfix to handle the problem with one click.
Anyway, there must be one perfect for you! Let’s explore how to fix autofill malfunction on iPhone in this detailed guide:
Part 1. Why is My iPhone Autofill Not working?
If autofill is not working on your iPhone, the first step should be to check what has caused this issue. Then you can get the right way quickly. Below are some possible reasons for this problem:
- iOS System Issues
Random bugs and glitches with the iOS system can cause Autofill working failure. This is particularly applicable when using beta updates or the latest iOS version. - Set Up Autofill Feature Incorrectly
If your Autofill feature is not correctly set up, there must be something wrong. So check your Autofill settings and ensure the feature is activated. - Incompatible Apps or Websites
Some Apps or websites may not support Autofill, or there could be compatibility issues between the app and the iOS Autofill feature, which can cause Autofill not to work on your iPhone. - Outdated iCloud Keychain
All your user names and passwords are stored on the iCloud Keychain, so issues with syncing or outdated information in the iCloud Keychain can prevent Autofill from working properly.
No matter what causes this issue, we have according fixes to get Autofill to work again. Following we provide you with six simple and user-friendly ways. Can’t wait anymore? Let’s go to check!
Part 2. Fixes to iPhone Autofill Not working.
Having explored various potential causes for why Autofill doesn’t work, maybe you have had your own judgment about why your Autofill doesn’t work. Then follow this detailed guide to help you find the one that fits your needs best, take action, and make it.
Way 1. Enable your Autofill on Your iPhone
The Autofill malfunction error may happen when you don’t set up the Autofill feature correctly. So go to the settings, check it, and turn on the Autofill feature.
It can be done easily. Here are the steps for it.
Steps to Enable Autofill on iPhone
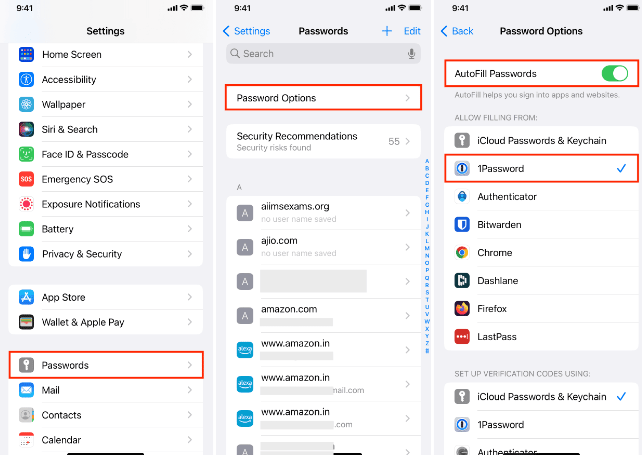
Step 1. Open Settings, then click on Passwords & Accounts or Passwords, which depends on your iOS version.
Step 2. Next, hit Passwords Options.
Step 3. Then tap the “AutoFill Passwords” icon again to turn it on. It should turn green now. You may be prompted to use your iPhone password or Touch/Face ID for verification.
Step 4. Finally, below the toggle, you can choose where Filling from, iCloud keychain, or 1Password if installed. Remember to select “iCloud passwords & Keychain” in SET UP VERIFICATION USING.
Enable Autofill on iPhone
Now, you may have enabled your Autofill, so open any app or website to check whether it works. If not, don’t lose heart, Let’s see another effective method!
Way 2. Force Restart your iPhone
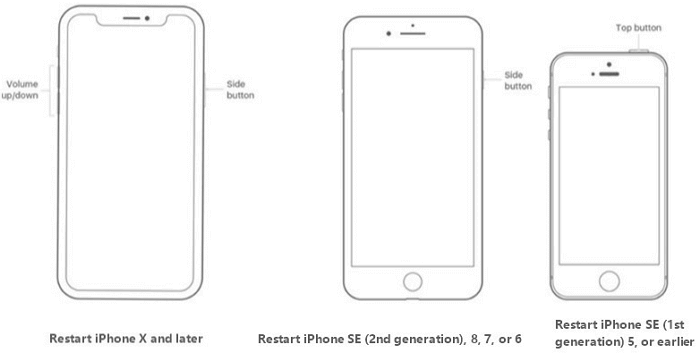
The most simple and direct way is to restart your iPhone. In many cases, people choose this method. Definitely, it is useful most times. Follow the steps to restart your iPhone(this depends on your iPhone model, taking iPhone 8 and later models as an example):
Steps to force restart your iPhone
Step1. First, press and quickly release the volume up button on your iPhone.
Step2. The second step is to press and quickly release the volume down button.
Step3. Next, press and hold the side button.
Step4. Now, release the side button as the Apple logo appears.
Step5. Wait for it to restart your iPhone completely, then check whether the Autofill is working.
Restart Different Modes of iPhone
Does it work? This should help you resolve some random bugs and glitches with iOS system. However, it doesn’t work all the time, so keep going to see other ways.
Way 3. Check App Compatibility
Apps sometimes may not be compatible with your iOS system, so it is a must to have a look at them when Autofill doesn’t work for a particular app or website. There are several easy steps for you to follow:
Steps to check app compatibility
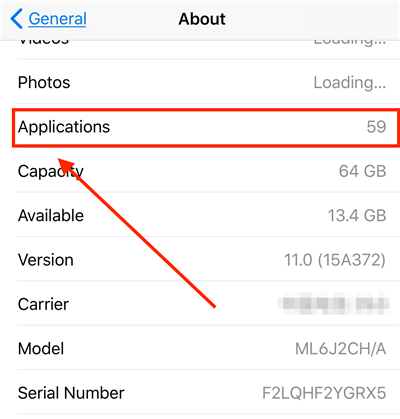
Step 1. Open Settings.
Step 2. Type on Gneral>About>Applications.
Step 3. Enter into the APP Compatiblility page.
Check App Compatibility
Step 4. Check the “No Updates Available” section and you can know which app is not compatible with your iPhone. Click the app for more information.
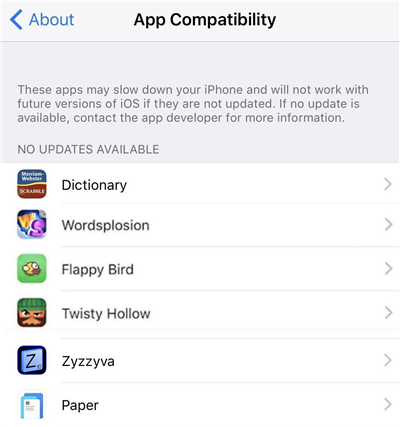
View Updates in App Compatibility
Step 5. Download the suitable version of iOS or update your app. In general, the latest version is always the best.
By following these steps, whether the app is compatible with your iOS system is very obvious. However, if it is, there must be something wrong with other aspects such as outdated iCloud Keychain. Let’s see how to fix it.
Way 4. Check iCloud Keychain
iCloud Keychain is used to store your user names or passwords, so issues with syncing or outdated information in the iCloud Keychain may lead to Autofill not working. Here are some steps for you to have a look at it:
Steps to check iCloud Keychain
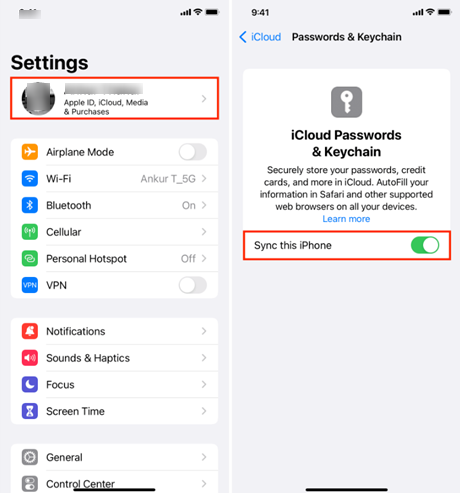
Step 1. Tap on Settings and then hit your name or Apple ID profile picture to access your Apple ID settings.
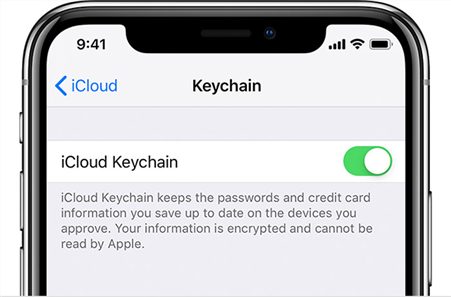
Step 2. Click “iCloud” > “ Keychain” > “iCloud Keychain”.

Enter iCloud and Select Keychain Option
Step 3. Toggle the switch next to “iCloud Keychain” and turn it on. You may need to enter your iPhone password for verification. Then tap on “Advanced” to view saved passwords and websites.
View WiFi Passwords in iCloud Keychain
Step 4. Turn on “Sync this iPhone“. Make sure iCloud Keychain is enabled on all devices to sync passwords and other secure information.
Sync iPhone on iCloud Keychain
Through the process, you can enable your iCloud Keychain to be sync.
Way 5. Factory Reset iPhone
If you have tried each of the above solutions and they still don’t work, you may have to factory reset your iPhone. However, this way will erase all your data, which makes it the last resort. So remember to transfer and store your data first before you do that.
Steps to factory reset iPhone
The following steps will help you reset your iPhone effortlessly.
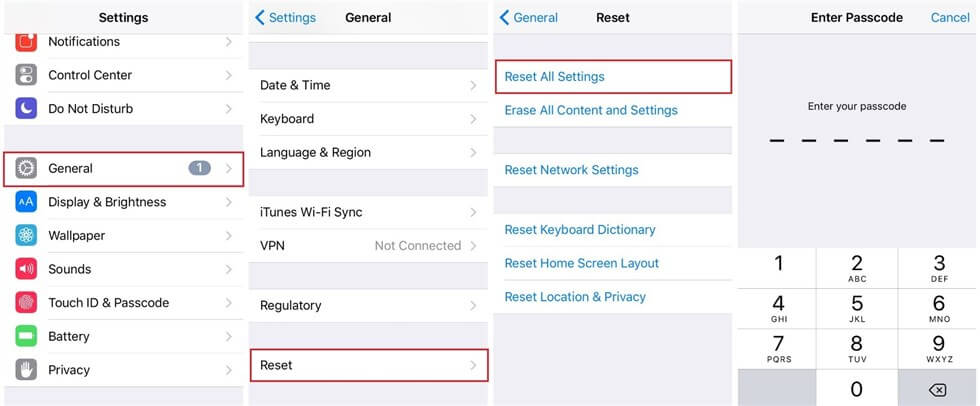
Step 1. First, go to Settings and hit the General option.
Step 2. Secondly, click on the Reset option and proceed.
Step 3. Select Reset All Settings. Enter your passcode for verification if prompted. After completely resetting your iPhone, check whether Autofill works.
Reset All Settings
Considering factory resetting iPhone will lead to data loss, it is the last resort. If you are unwilling to transfer and store your data before you reset your iPhone, below is a better way for you.
Way 6. Repair the iOS System
Can’t bother to recover your data before resetting your iPhone? Still stuck in Autofill malfunction? You may think there is no perfect way for you to fix this issue.
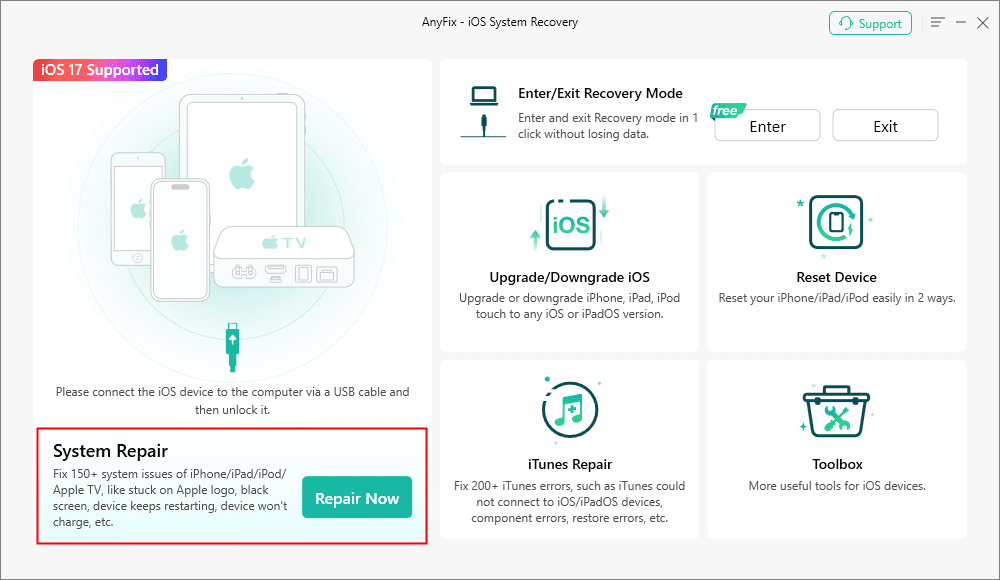
But don’t lose heart, a specialized iOS system repair tool can help you. AnyFix is an advanced system repair tool that removes all the issues with your iOS system, such as WiFi not working on iPhone, iPhone screen not working, iPhone won’t turn off, and so on. With the standard repair option, you can fix your iOS system without erasing your data!
Interested? Come and experience hassle-free troubleshooting with just a few clicks and get back a nicely working Apple device in minutes.
Let’s see how to use AnyFix to get past the Autofill malfunction error in several simple steps.
Below are the steps.
Step 1. First of all, download and install AnyFix on your computer.
Free Download* 100% Clean & Safe
Step 2. Launch AnyFix and choose the System Repair mode. Then choose the Device Bug mode and click Start Now to keep on.
AnyFix System Repair Option
Step 3. Next, select Standard Repair.
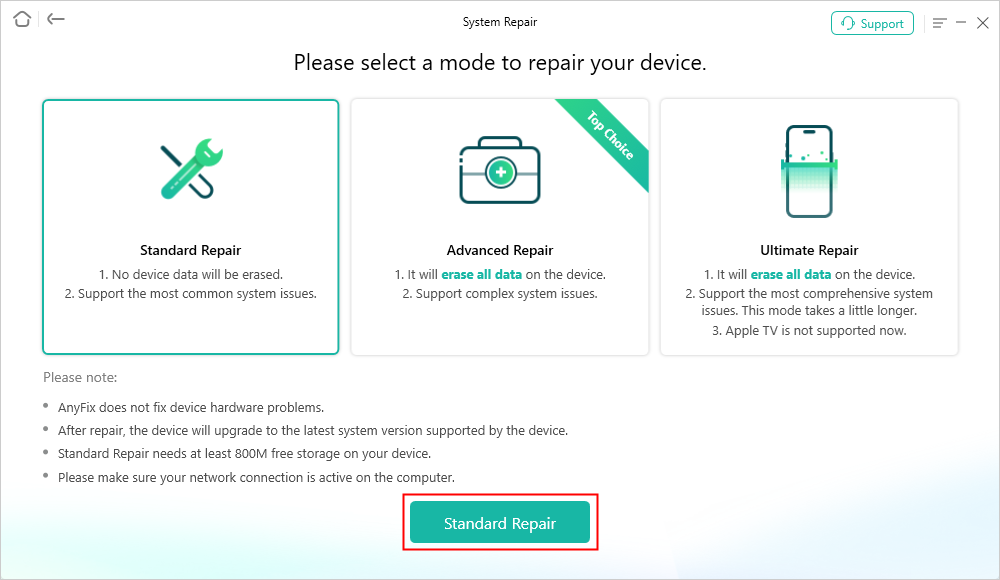
AnyFix Standard Repair
Step 4. Download Firmware Package for your iOS device.
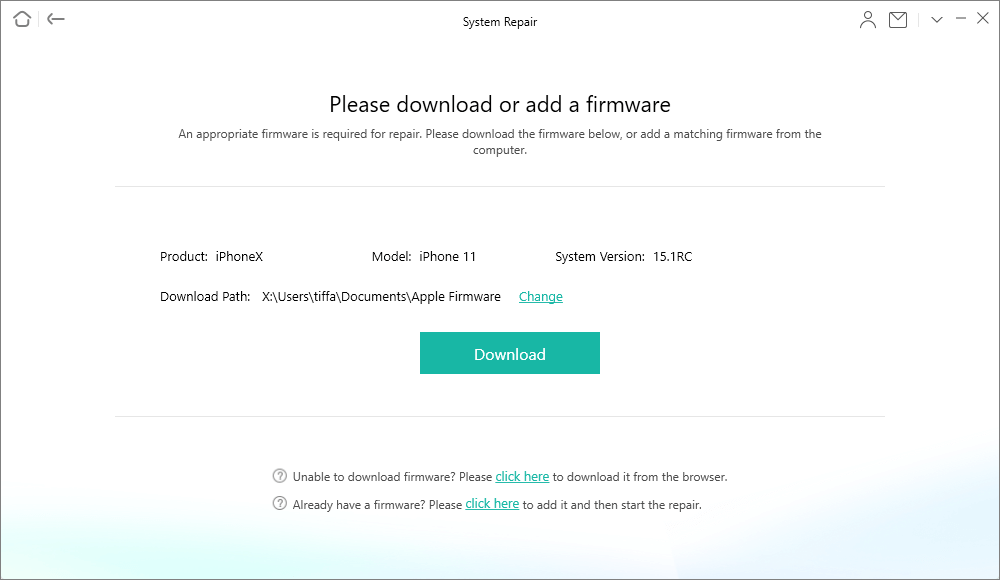
Click Download to Add a Firmware
Step 5. Click the Start Standard Repair button to repair your iOS system issues instantly and easily. Now, AnyFix will start repairing your iPhone. Don’t disconnect your device until it restarts. Once the repair process is completed, click “OK.”
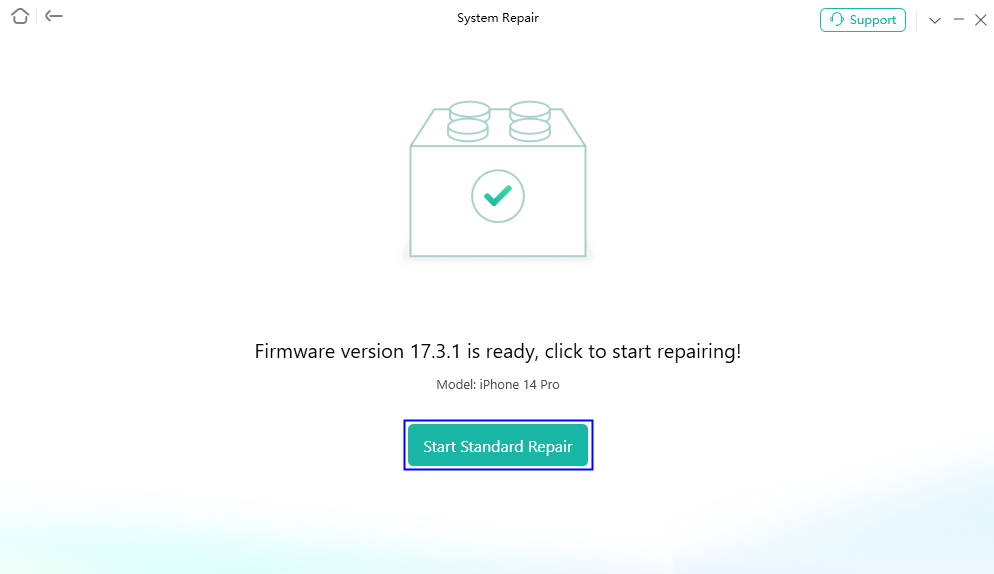
AnyFix System Repair Firmware Finish Downloading
You’ve seen how simple it is to fix an iOS system using AnyFix.
So far, we have discussed six practical methods to fix Autofill malfunction errors, let’s conclude them.
Conclusion
With this detailed guide, you now must have learned more about the causes and solutions for autofill not working on iPhone.From enabling the Autofill feature, and restarting your iPhone to using an advanced iOS system repair tool AnyFix, there are specific steps for you to follow. Specifically, if you want a versatile iOS repair tool, AnyFix is recommended for it can fix 150+ iOS system issues.
Go ahead and use these methods to get your Autofill back in action!
Free Download* 100% Clean & Safe
iOS System Repair
iPhone System Repair
- Latest Guide on Fixing iPhone Ear Speaker Not Working Issues
- How to Fix iPhone Keeps Turning On and Off [7 Ways]
- How to Fix iPhone Stuck on Hello Screen
- Your iPhone 12/11 Won’t Turn on – Here is What You Can Do to Fix It
- [Solved] iPhone Restore Error 1 in iTunes
- How to Fix iPhone Auto-Correct Not Working [7 Ways]
- 11 Quick Ways to Fix iPhone Freezing and Lagging [Solved]
- Why My iPhone Keeps Restarting & How to Fix It
- 9 Ways to Fix iPhone Screen Glitching and Flickering
- [Fixed] iPhone Stuck on Apple Logo Storage Full
- [Full Guide] How to Fix iPhone Update Stuck
- How to Fix iPhone Won’t Charge Past 80% [New!]
- Quick Fixes if your iPhone won’t Restore in Recovery Mode
- How to Renew Wi-Fi Lease on Your iPhone?
- How to Stop iPhone Camera from Shaking [New!]
- WhatsApp Keeps Crashing on iPhone? 7 Fixes
- Fix Apple ID Sign in Request Keeps Popping Up
- Fix Erase All Content and Settings Not Working
iPad System Repair
Other iOS System Recovery
- Why Is There a Blurry Square on My Screen?
- How to Solve Cannot Verify Server Identity Problem
- How to Downgrade iOS without SHSH Blobs [2024]
- How to Fix Weak Security Wi-Fi on iPhone
- Ultimate Guide to Fix Haptic Keyboard not Working
- How to Fix iMessage Waiting for Activation
- 8 Easy Ways to Fix iOS 16 Photo Cutout Not Working
- How to Fix iOS 17 Alarm Not Working [7 Ways]
- How to Fix “Last Line No Longer Available” Error
- How to Fix FaceTime Screen Share/SharePlay Not Showing
- 6 Ways to Fix Shared With You Not Showing
- [6 Way] Fix Unable to Complete Touch ID Setup
- [Solved] How to Fix Your SIM Sent a Text Message Issue on iPhone
- The Developer of This App Needs to Update It to Work? How to Fix

Senior writer of the iMobie team as well as an Apple fan, love to help more users solve various types of iOS & Android-related issues.
Product-related questions? Contact Our Support Team to Get Quick Solution >
