< Back
-
What are the differences between the trial version and registered version in AnyDroid?
With the trial version of AnyDroid, you can transfer 30 items (except Android Mover function ) freely every day and it will last for three days from the day you downloaded. The registered version for AnyDroid provides you with all features completely without any limitations.
To download the trial version of AnyDroid, please refer to the link below:
What Android version is AnyDroid compatible with?
Currently, AnyDroid can support Android device running Android 4.0 version and higher. Please refer to this page to know more details about this:
-
How to install AnyDroid on your computer?
To download and install AnyDroid on Mac computer, please follow the steps below.
1. Please download AnyDroid (Mac version) from the link below:
https://dl.imobie.com/anydroid-en-mac.dmg
2. Click the download file named “anydroid-en-mac.dmg” and open it.

3. Double click the AnyDroid icon to start the installation.
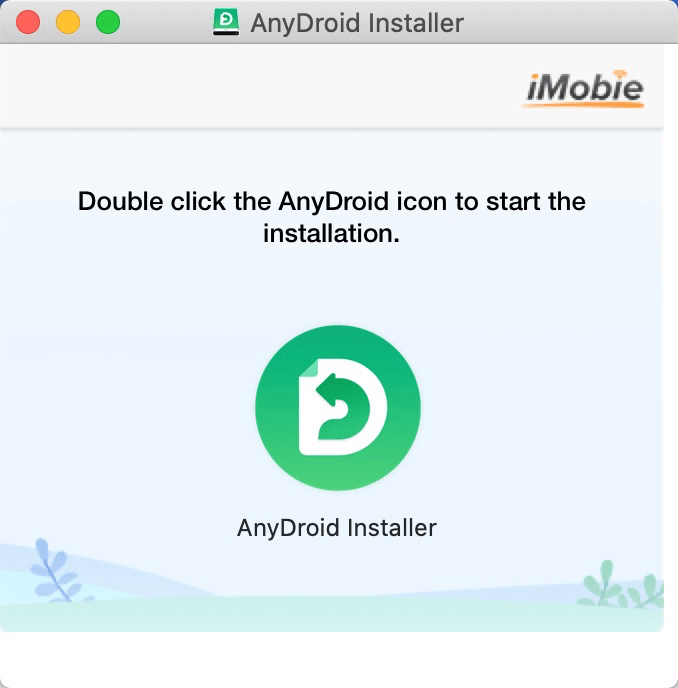
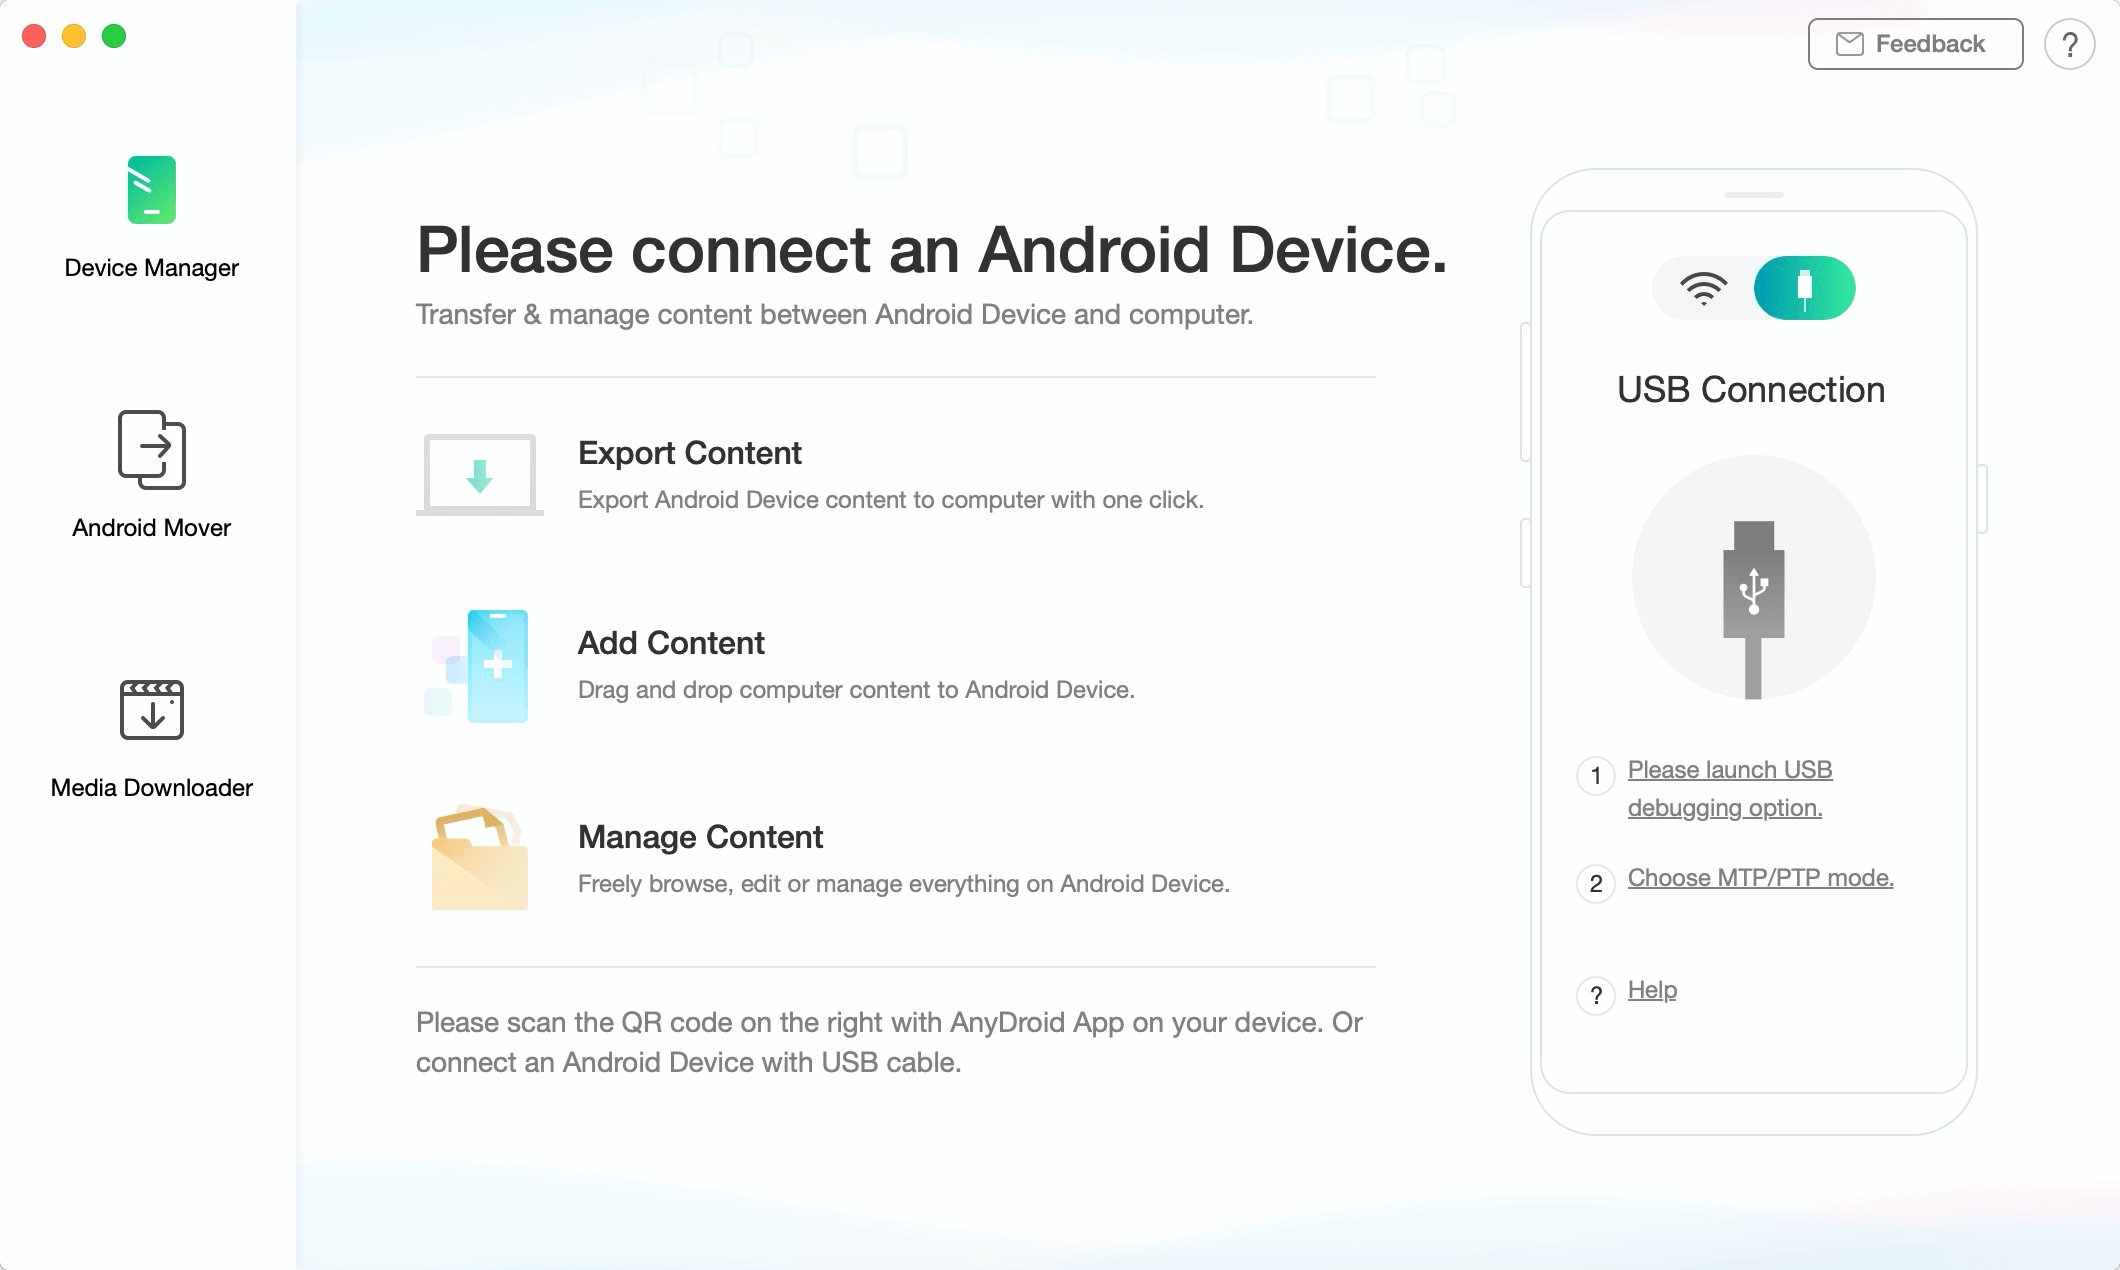
4. Once installed, you can find it in Applications. Then, please click AnyDroid icon to enjoy more convenience.
In order to download and install AnyDroid on Windows computer, please follow the steps below.
1. Please download AnyDroid (Windows version) from the link below:
https://dl.imobie.com/anydroid-en-setup.exe
2. Find the file named “anydroid-en-setup.exe” in your downloads.

3. Click Install Button to install AnyDroid on Windows computer.
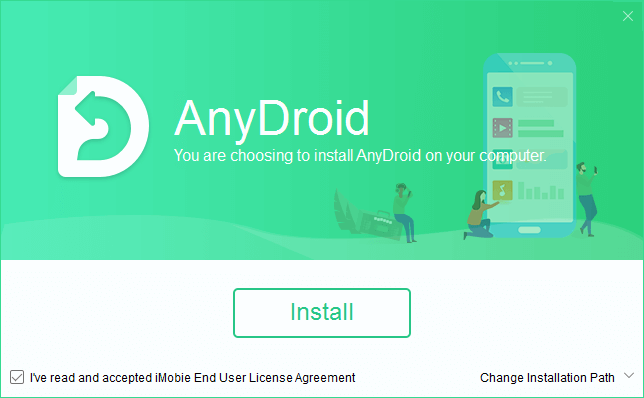
4. It will take some time to install it.
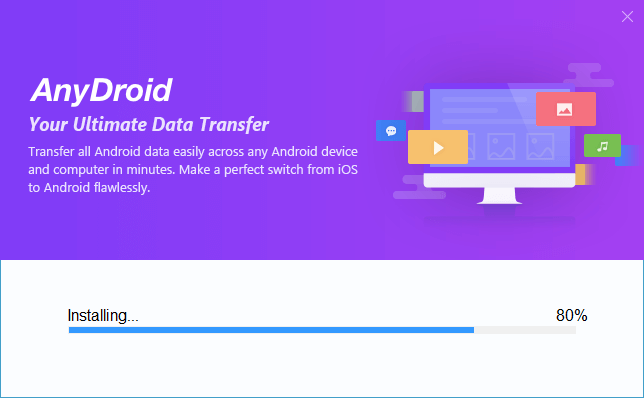
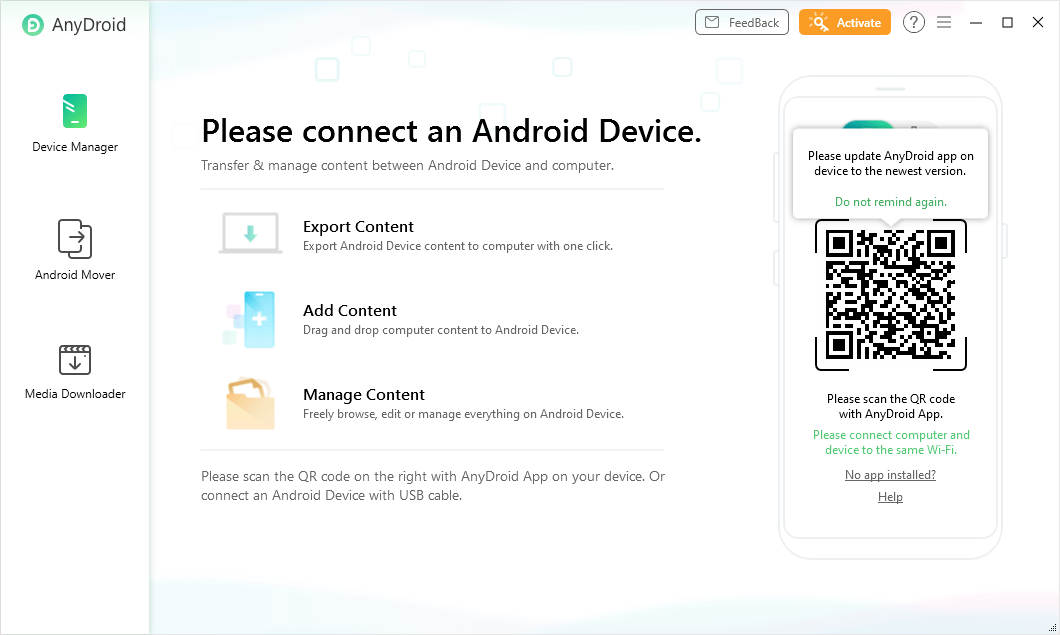
5. Once clicked Start button, you will see the interface below.
How to update AnyDroid to the latest version?
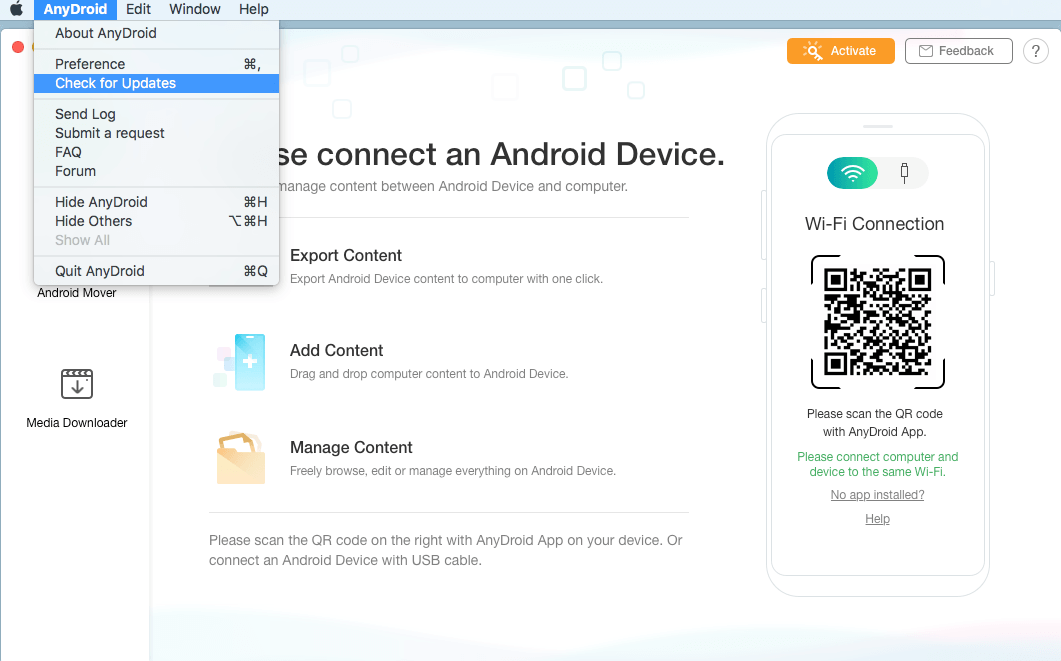
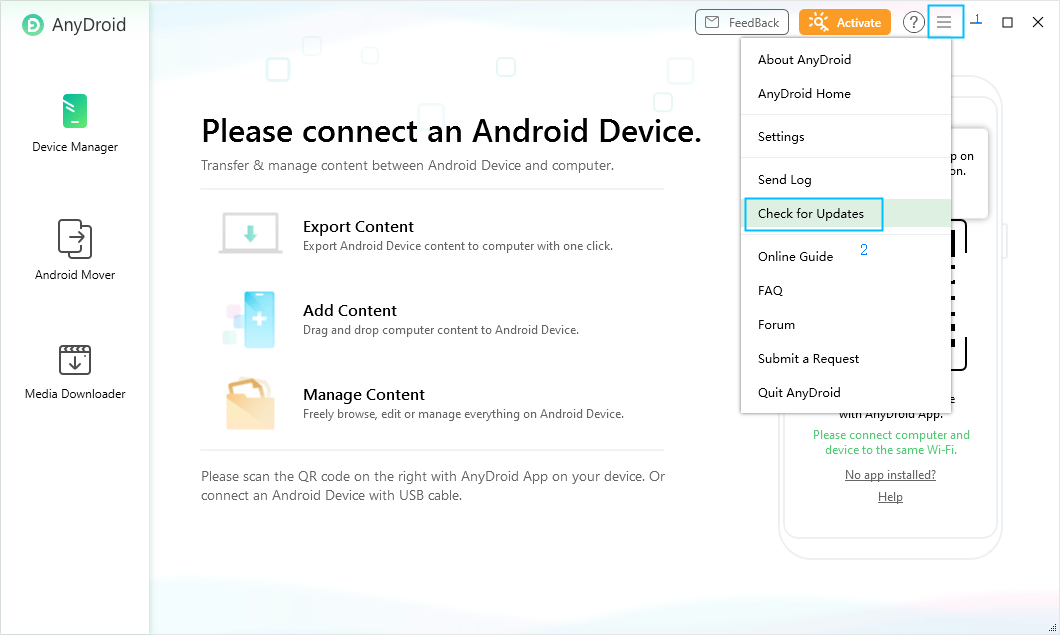
If you want to update your AnyDroid to the latest version, there are two ways to make it for you. The one is to check for updates from AnyDroid directly.
For Mac:
For Windows:
The other one is to download the latest version of AnyDroid from our official website:
How to uninstall AnyDroid?
To uninstall AnyDroid on your computer, please follow the steps below.
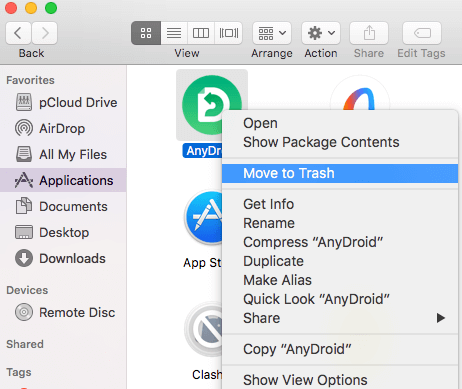
For Mac: Open Finder > Click Applications > Find AnyDroid program > Right-click AnyDroid to choose Move to Trash > Right-click Trash to select Empty Trash.
For Windows: Open Control Panel > Choose Programs > Click Programs and Features > Find AnyDroid program > Right-click AnyDroid to Uninstall/Change.

-
How to activate AnyDroid?
To enjoy all features of AnyDroid without limitations, you need to activate AnyDroid with license code (product key). Please kindly follow the instruction below to activate AnyDroid.
1. Please simply click Activate button on the upper right corner of AnyDroid.
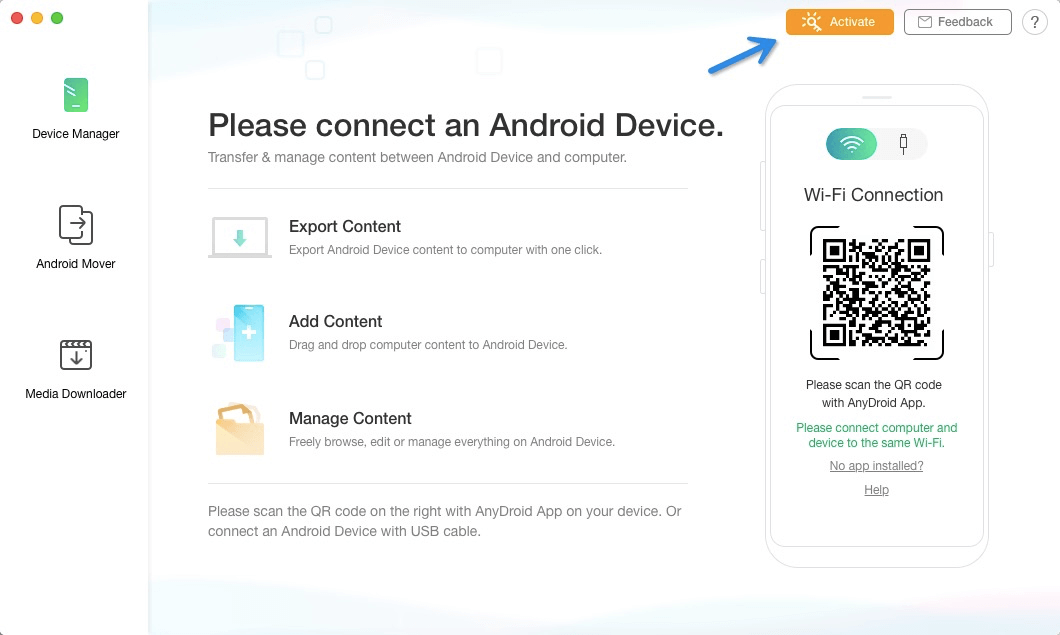
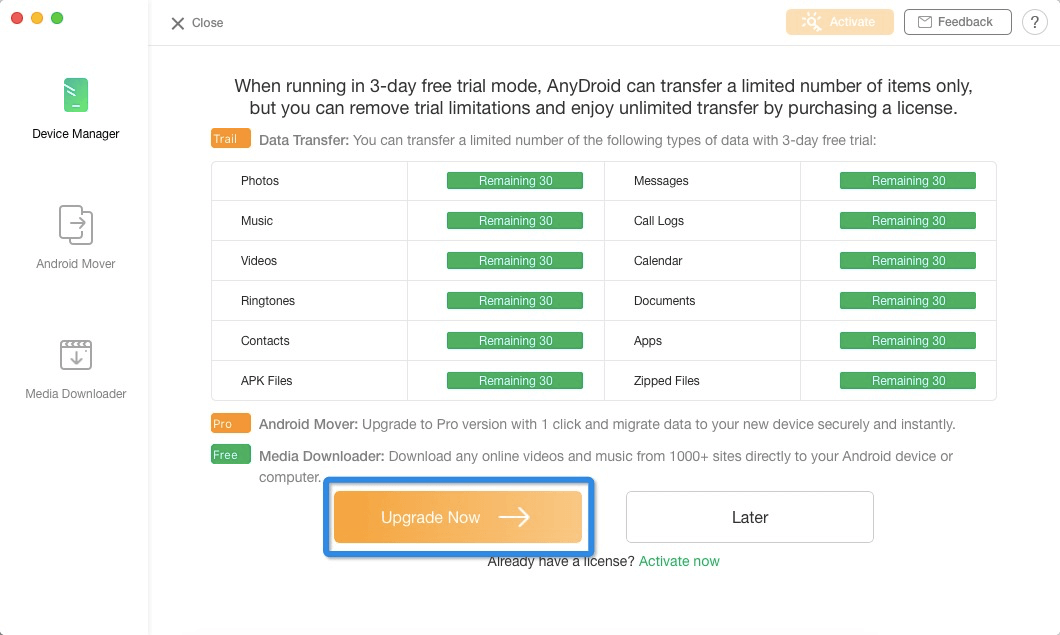
2. If you don’t have license code, please click Upgrade Now button to purchase AnyDroid from our official website. Or if you already have one, please copy & paste the license code (product key) to avoid any typing mistakes. Meanwhile, please make sure the Internet connection is fine while registering.
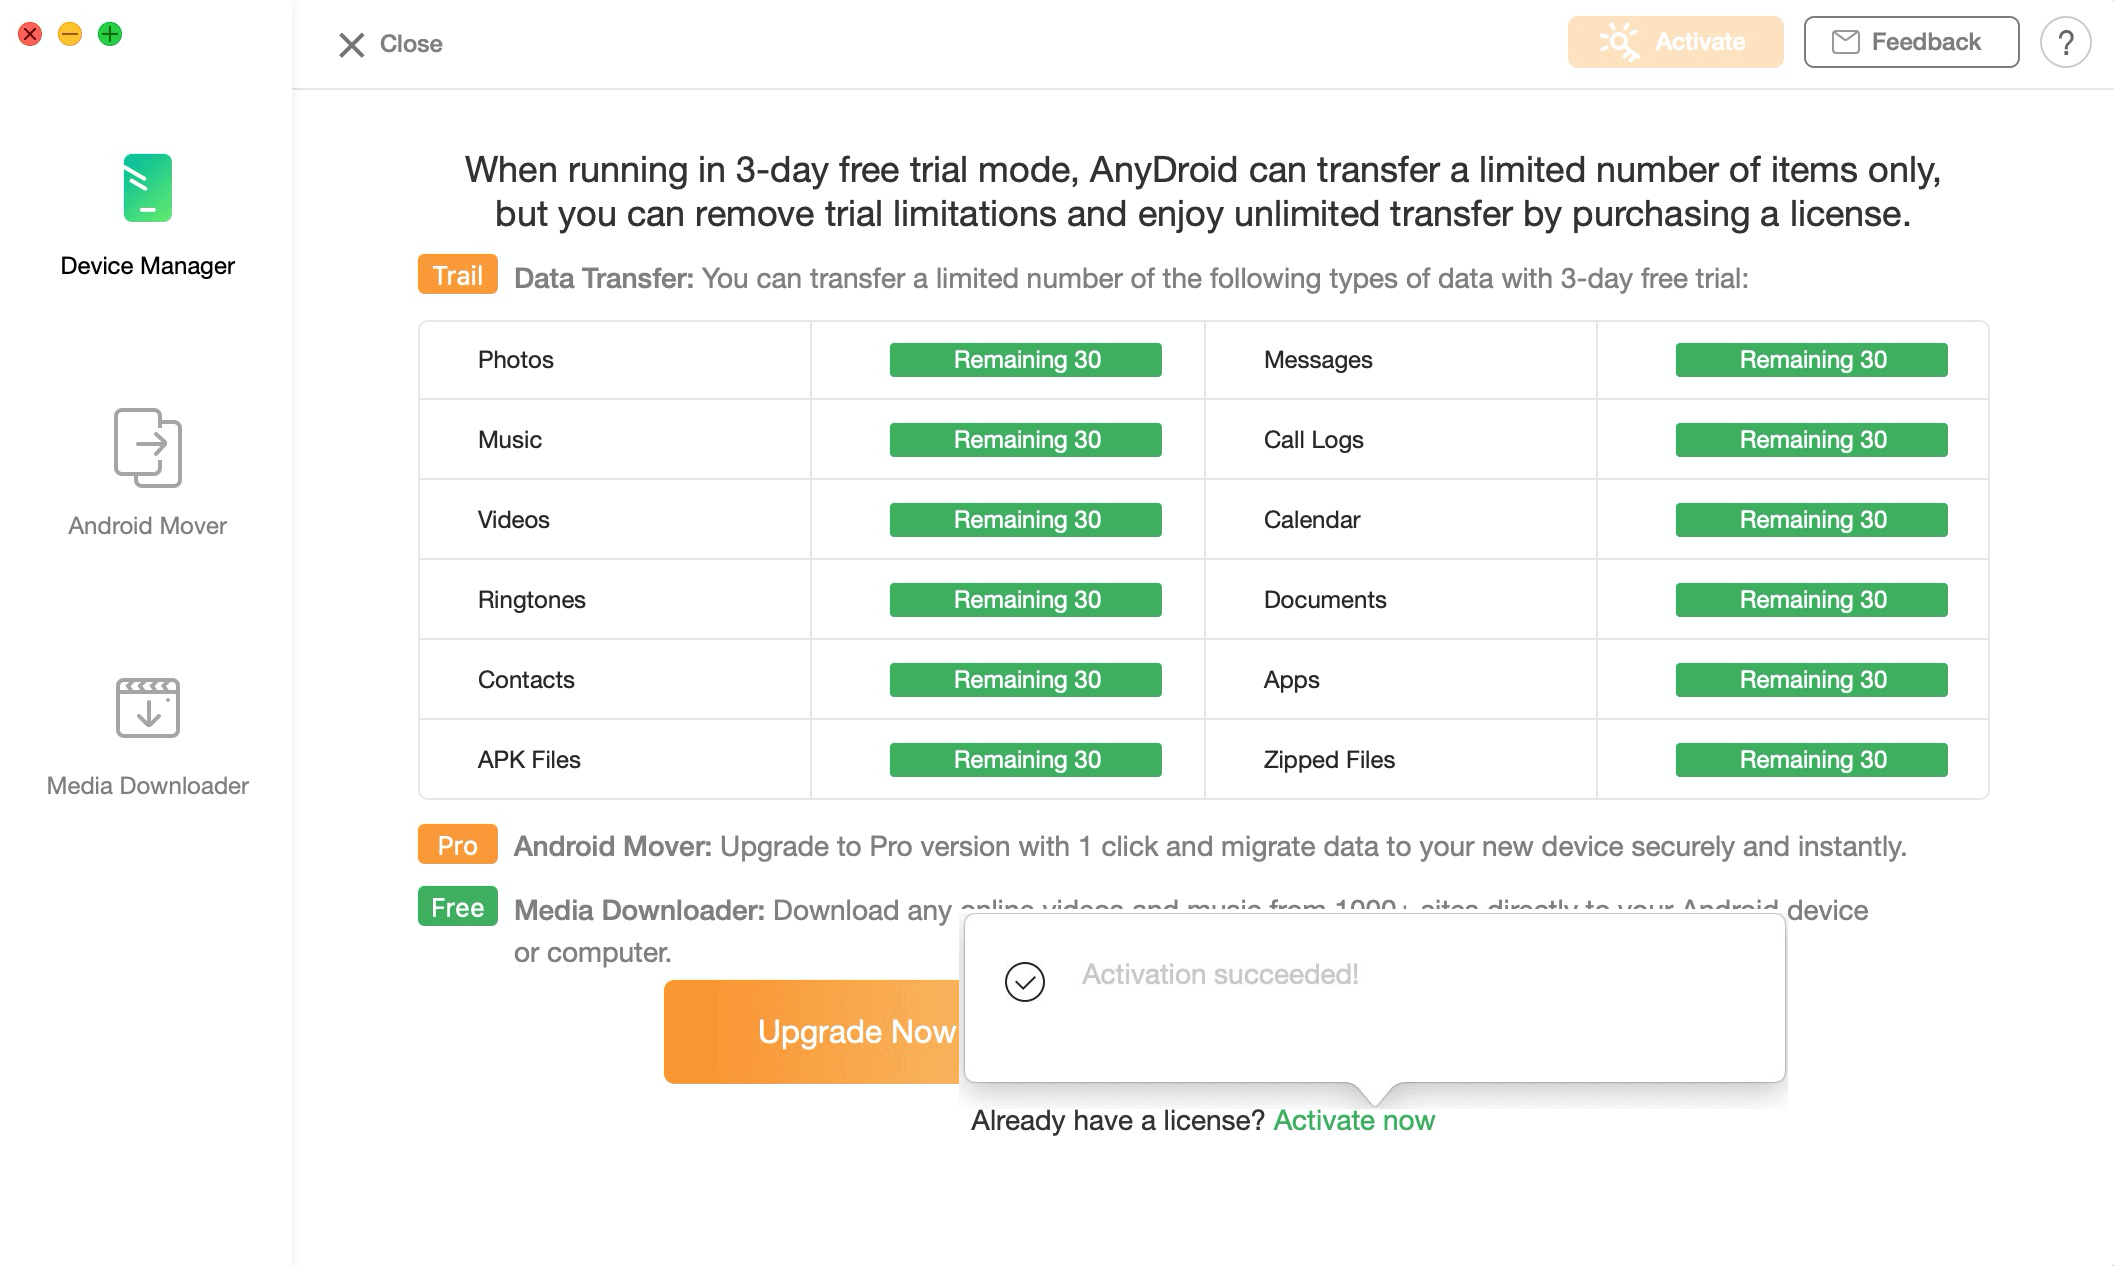
3. Once AnyDroid is activated successfully, the interface below will display.
What to do if you fail to register AnyDroid?
In order to enjoy the purchased version of AnyDroid, you need to use license code to register AnyDroid. However, you might get this message while registering: Verification Failed or error code 006/009. How to solve it? Considering the rare situation you may encounter, please give below suggestions a try:
1. Please use your computer as Administrator account (Important).
2. Please copy and paste the license code directly instead of entering it manually.
3. Please make sure the Internet connection is fine while registering.
4. If the problem persists, please kindly send the screenshot about this issue to Support Team for further analysis.
-
How to launch Developer options on Android device?
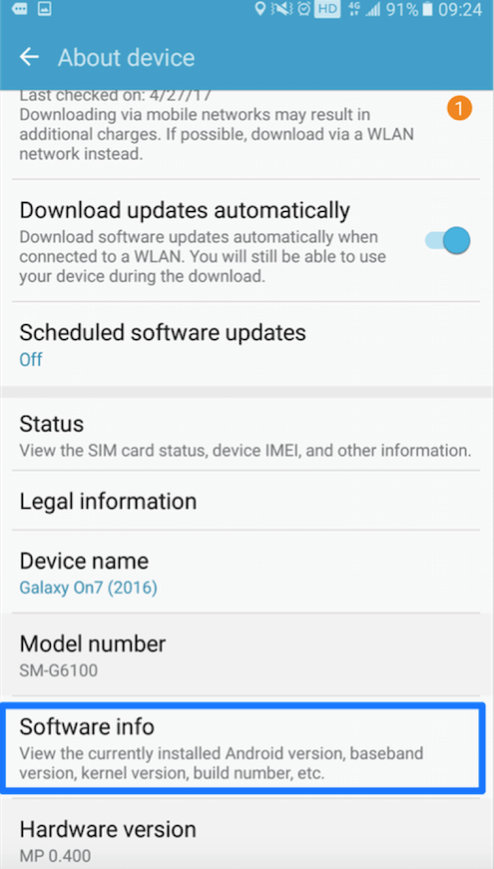
The developer options will not display if you just get a new phone or you clear your device data. Please follow the detailed instruction below to launch Developer options on your Android device(take SAMSUNG as an example):
1. Open SAMSUNG > Go Settings > Click “About device” option > Click “Software info”option.
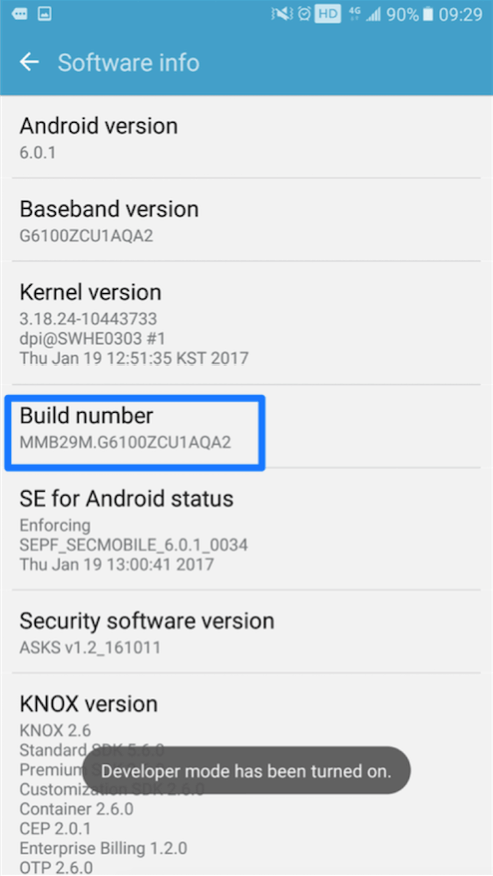
2. Click “Build number” several times, you will get the message “Developer mode has been turned on” on the interface of mobile. Then, you will see the “Developer options” after returning Settings.
How to switch language in AnyDroid?
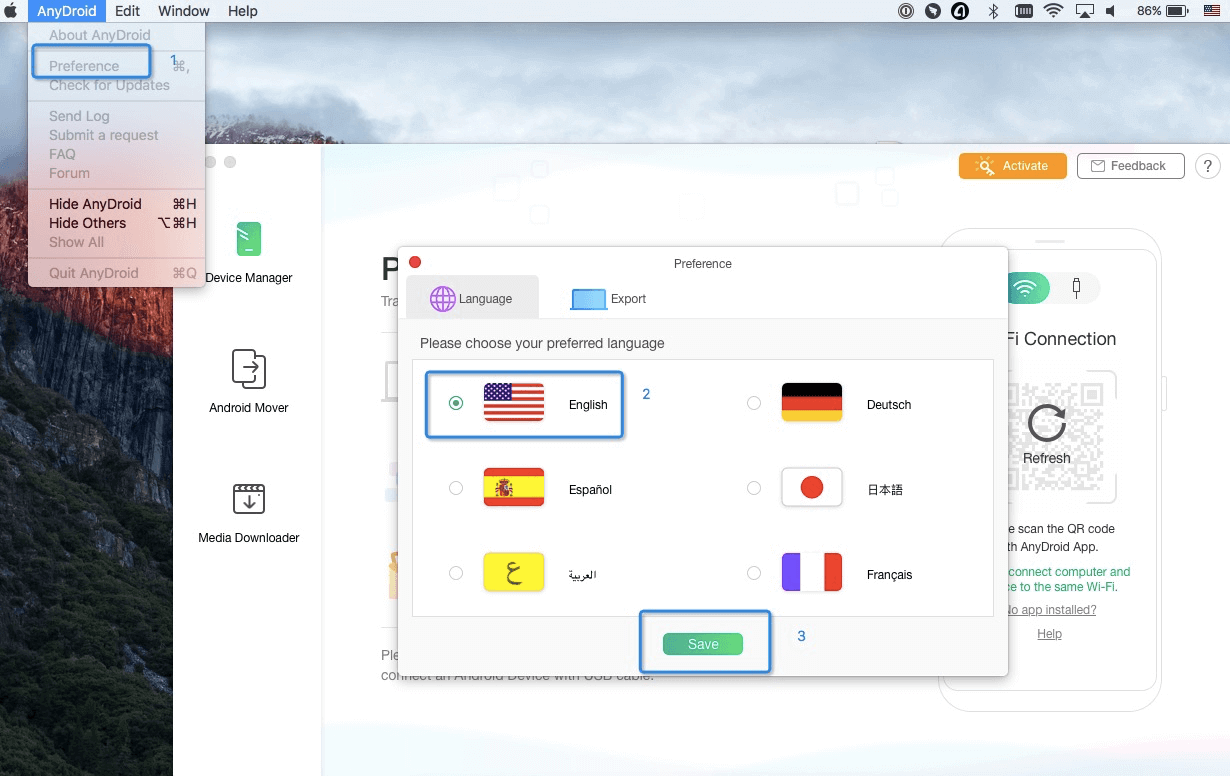
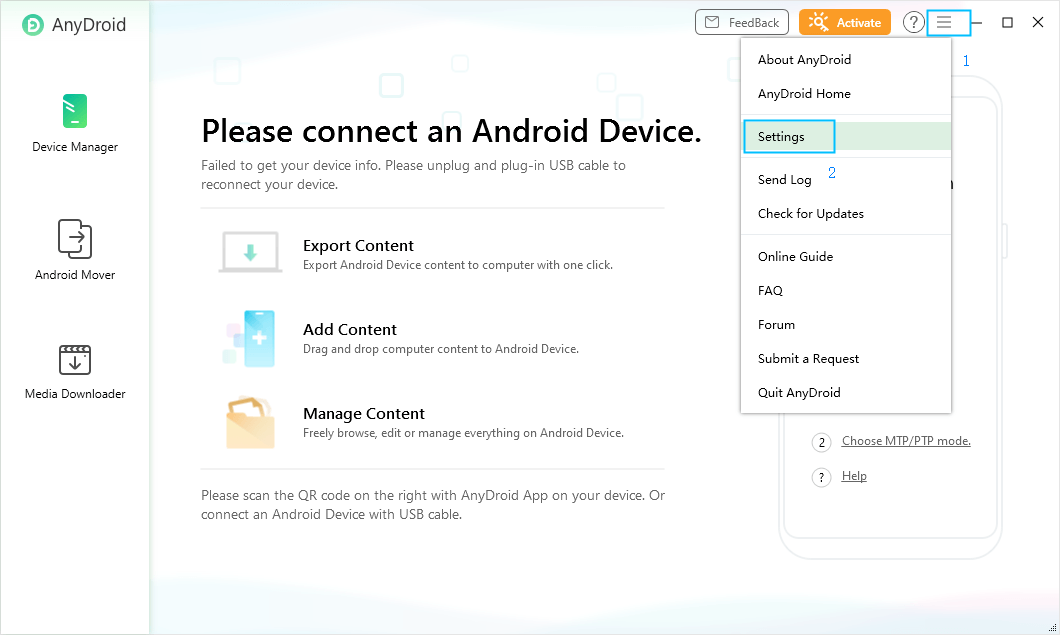
To make our global users have a better user experience, AnyDroid currently supports 6 languages (English, Japanese, German, French, Spanish and Arabic). Please simply follow the guide below to switch your preferred language.
For Mac:
Open AnyDroid > Click the Menu tab on the upper left of the screen > Click Preference - Language > Choose your preferred language > Click Getting Started.
For Windows:
Open AnyDroid > Click the Menu tab on the upper right of its interface > Click Settings – Language > Choose your preferred language > Click Getting Started.
How to change the export path on AnyDroid?
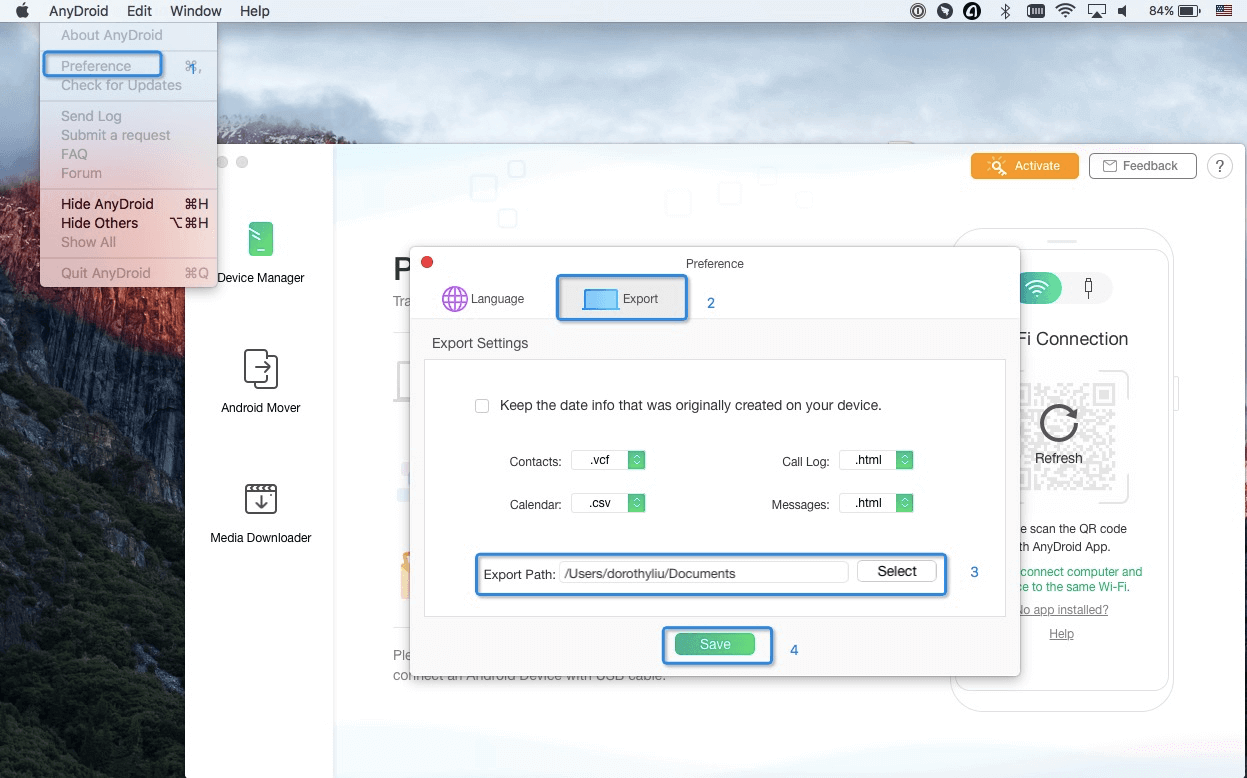
How to change the export path on AnyDroid? Please follow the steps below to make it:
Open AnyDroid > Click the menu tab > Click Preference (Mac) or Settings (Windows) > Click Export > Select your preferred path > Click Save.
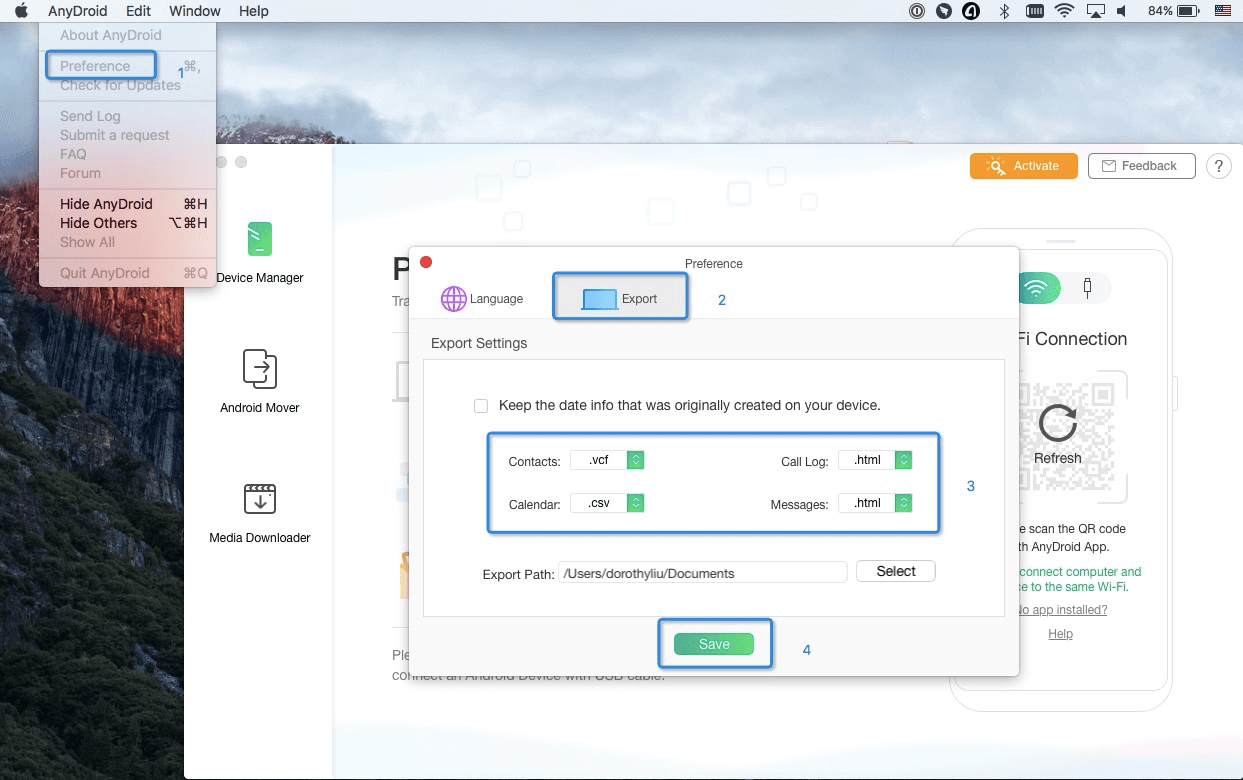
Which type of data can I set for the output format in AnyDroid?
When transferring data from Android device to computer, AnyDroid currently can support to set the output format for the following data types: Call Log, Contacts, Messages and Calendar. Please refer to the screenshot below to set the output format based on your needs.
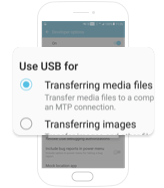
How to Open MTP Mode on Your Phone?
To open MTP mode on your phone, please refer to the detailed instructions below:
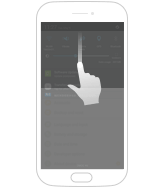
1. Please slide your finger from the top edge of the screen to open the “Notifications”.
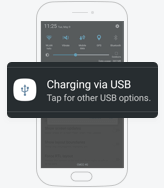
2. Click on “Charging via USB” Option in “Notifications”.
3. Choose “ Transferring media files” option.
-
What to do if AnyDroid fails to detect my Android device after I plug it in?
For most occasions, AnyDroid can detect your device automatically once your Android device is connected to your computer. But if AnyDroid fails to recognize your device after a long time, you can refer to troubleshooting steps below to fix the issue:
1. Please download the latest version of AnyDroid.
2. Please check if you have enabled USB debugging option in Settings on your Android device.
3. Please check whether your USB cable is loose. If it is, please reconnect it. If USB cable is broken, please give new one a try.
4. Please make sure your Android device can be detected by your computer.
5. Check whether you have the latest version of USB Driver and ADB Driver on your computer and device. If not, download and update them from Android device official website.
6. If problem persists, please contact our Support Team for further diagnosis.
What to do if AnyDroid fails to detect device within Wi-Fi connection?
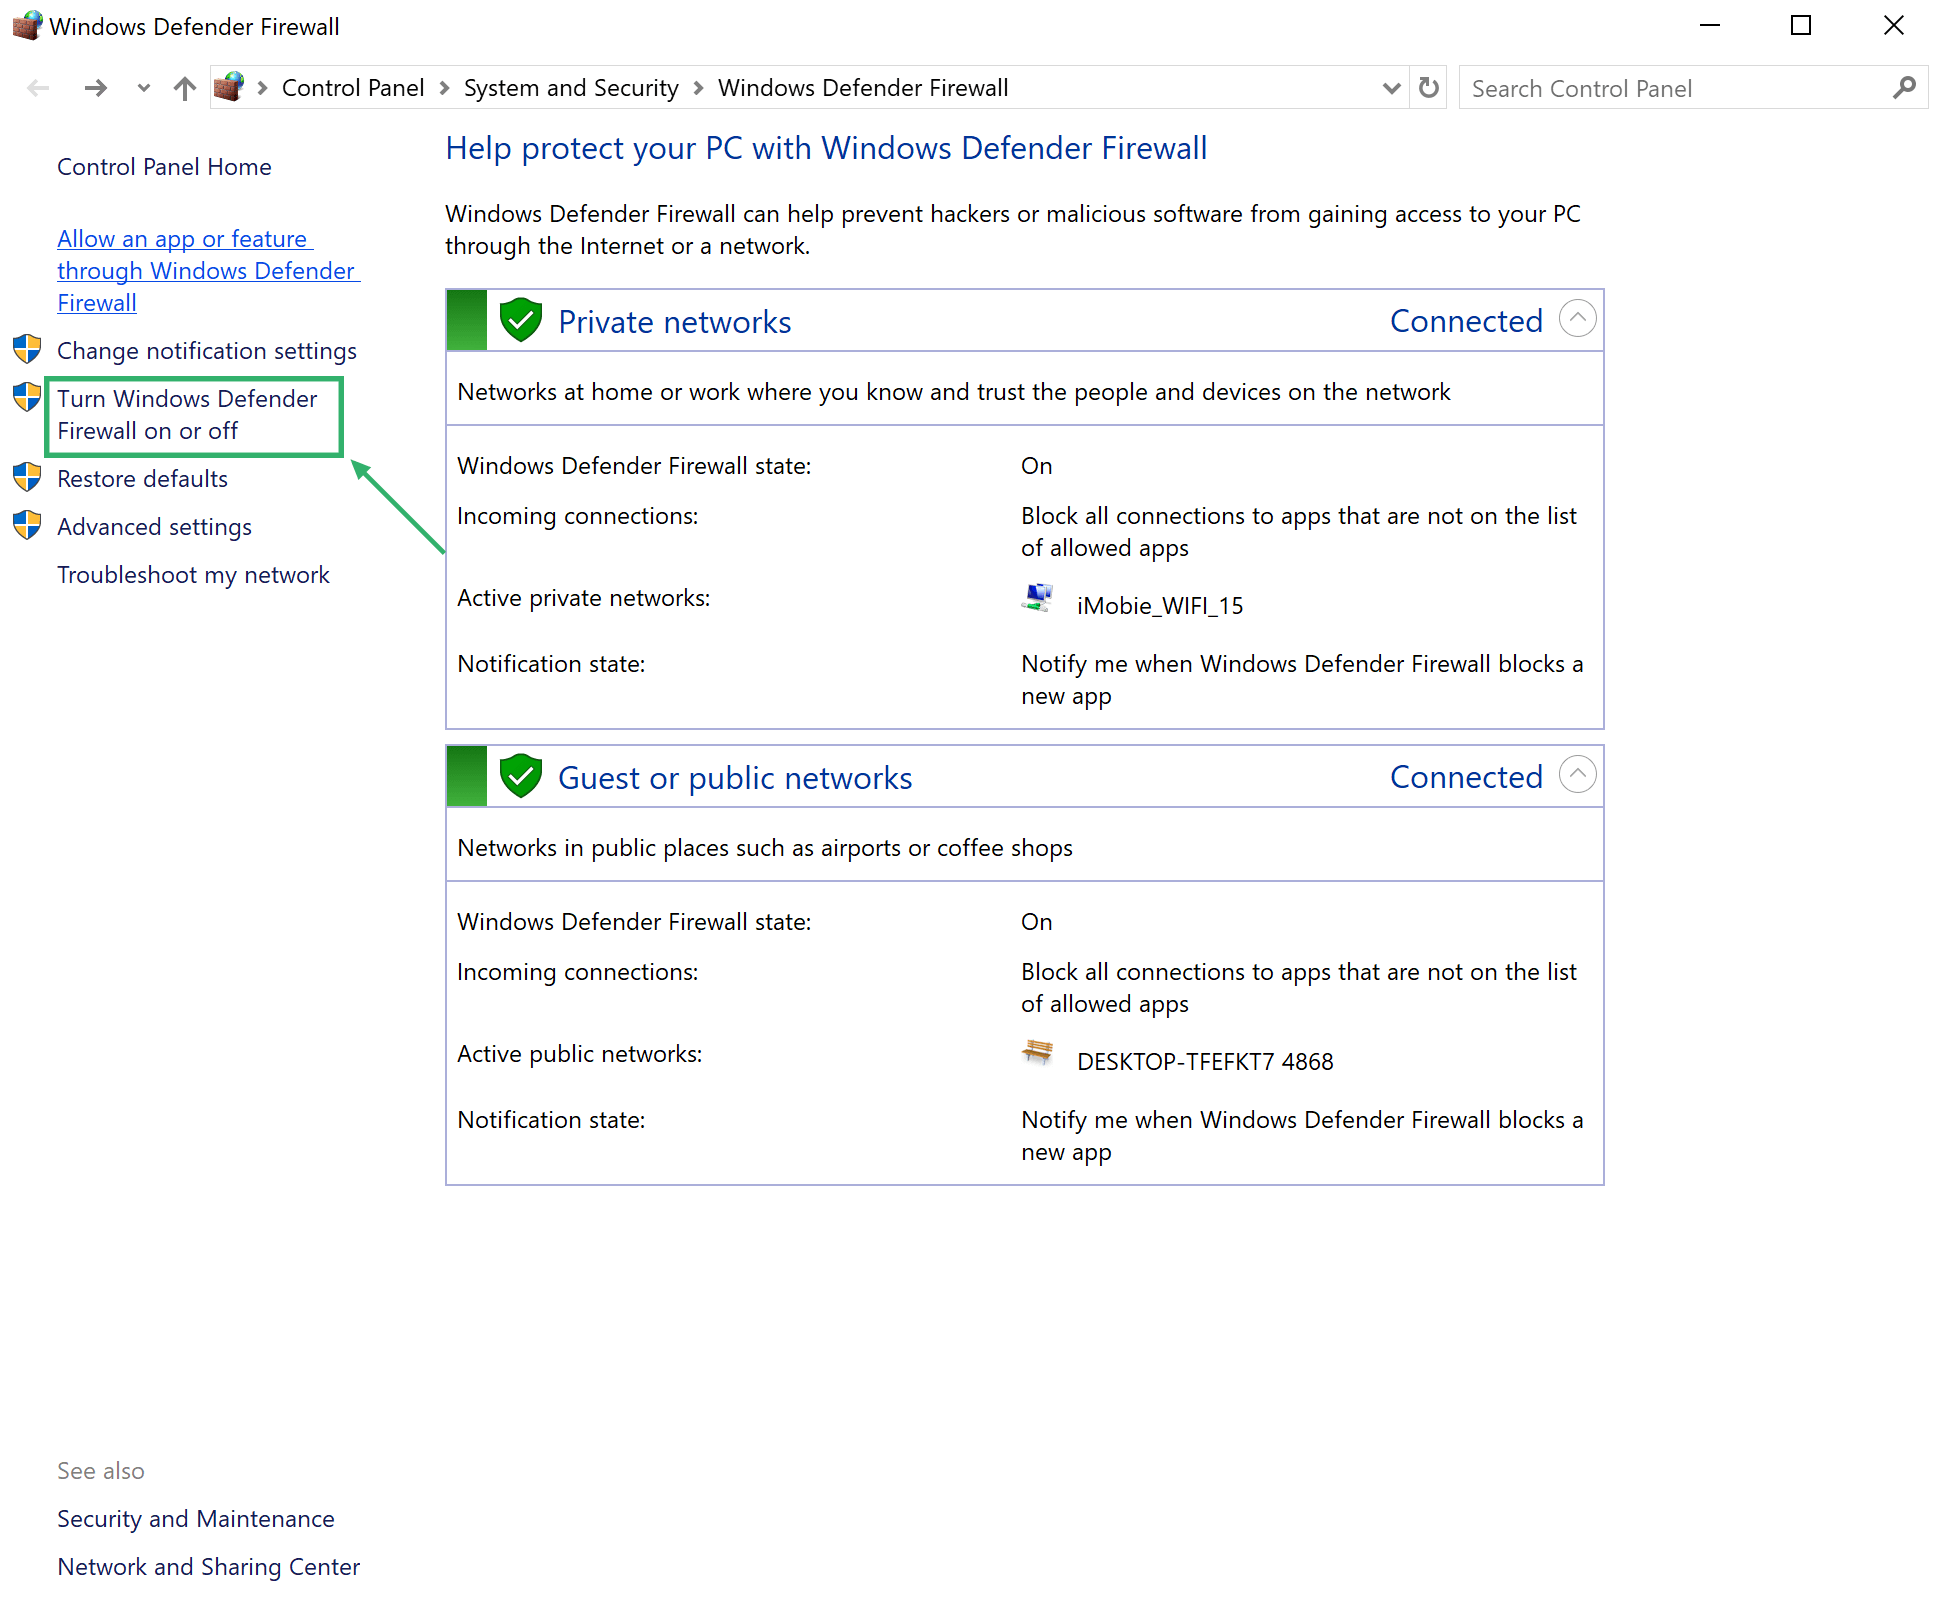
Now, AnyDroid supports to detect your Android device directly within Wi-Fi connection even without USB cable. Some customers may feedback that they fail to scan QR code to make their Android devices detectable. This issue may be caused for that they have turned on Defender Firewall option on computers, while their computers connect to Local Area Network but their Android devices connect to Hotspot Network. If you encounter such issue, please refer to the detailed instructions to tackle this issue.
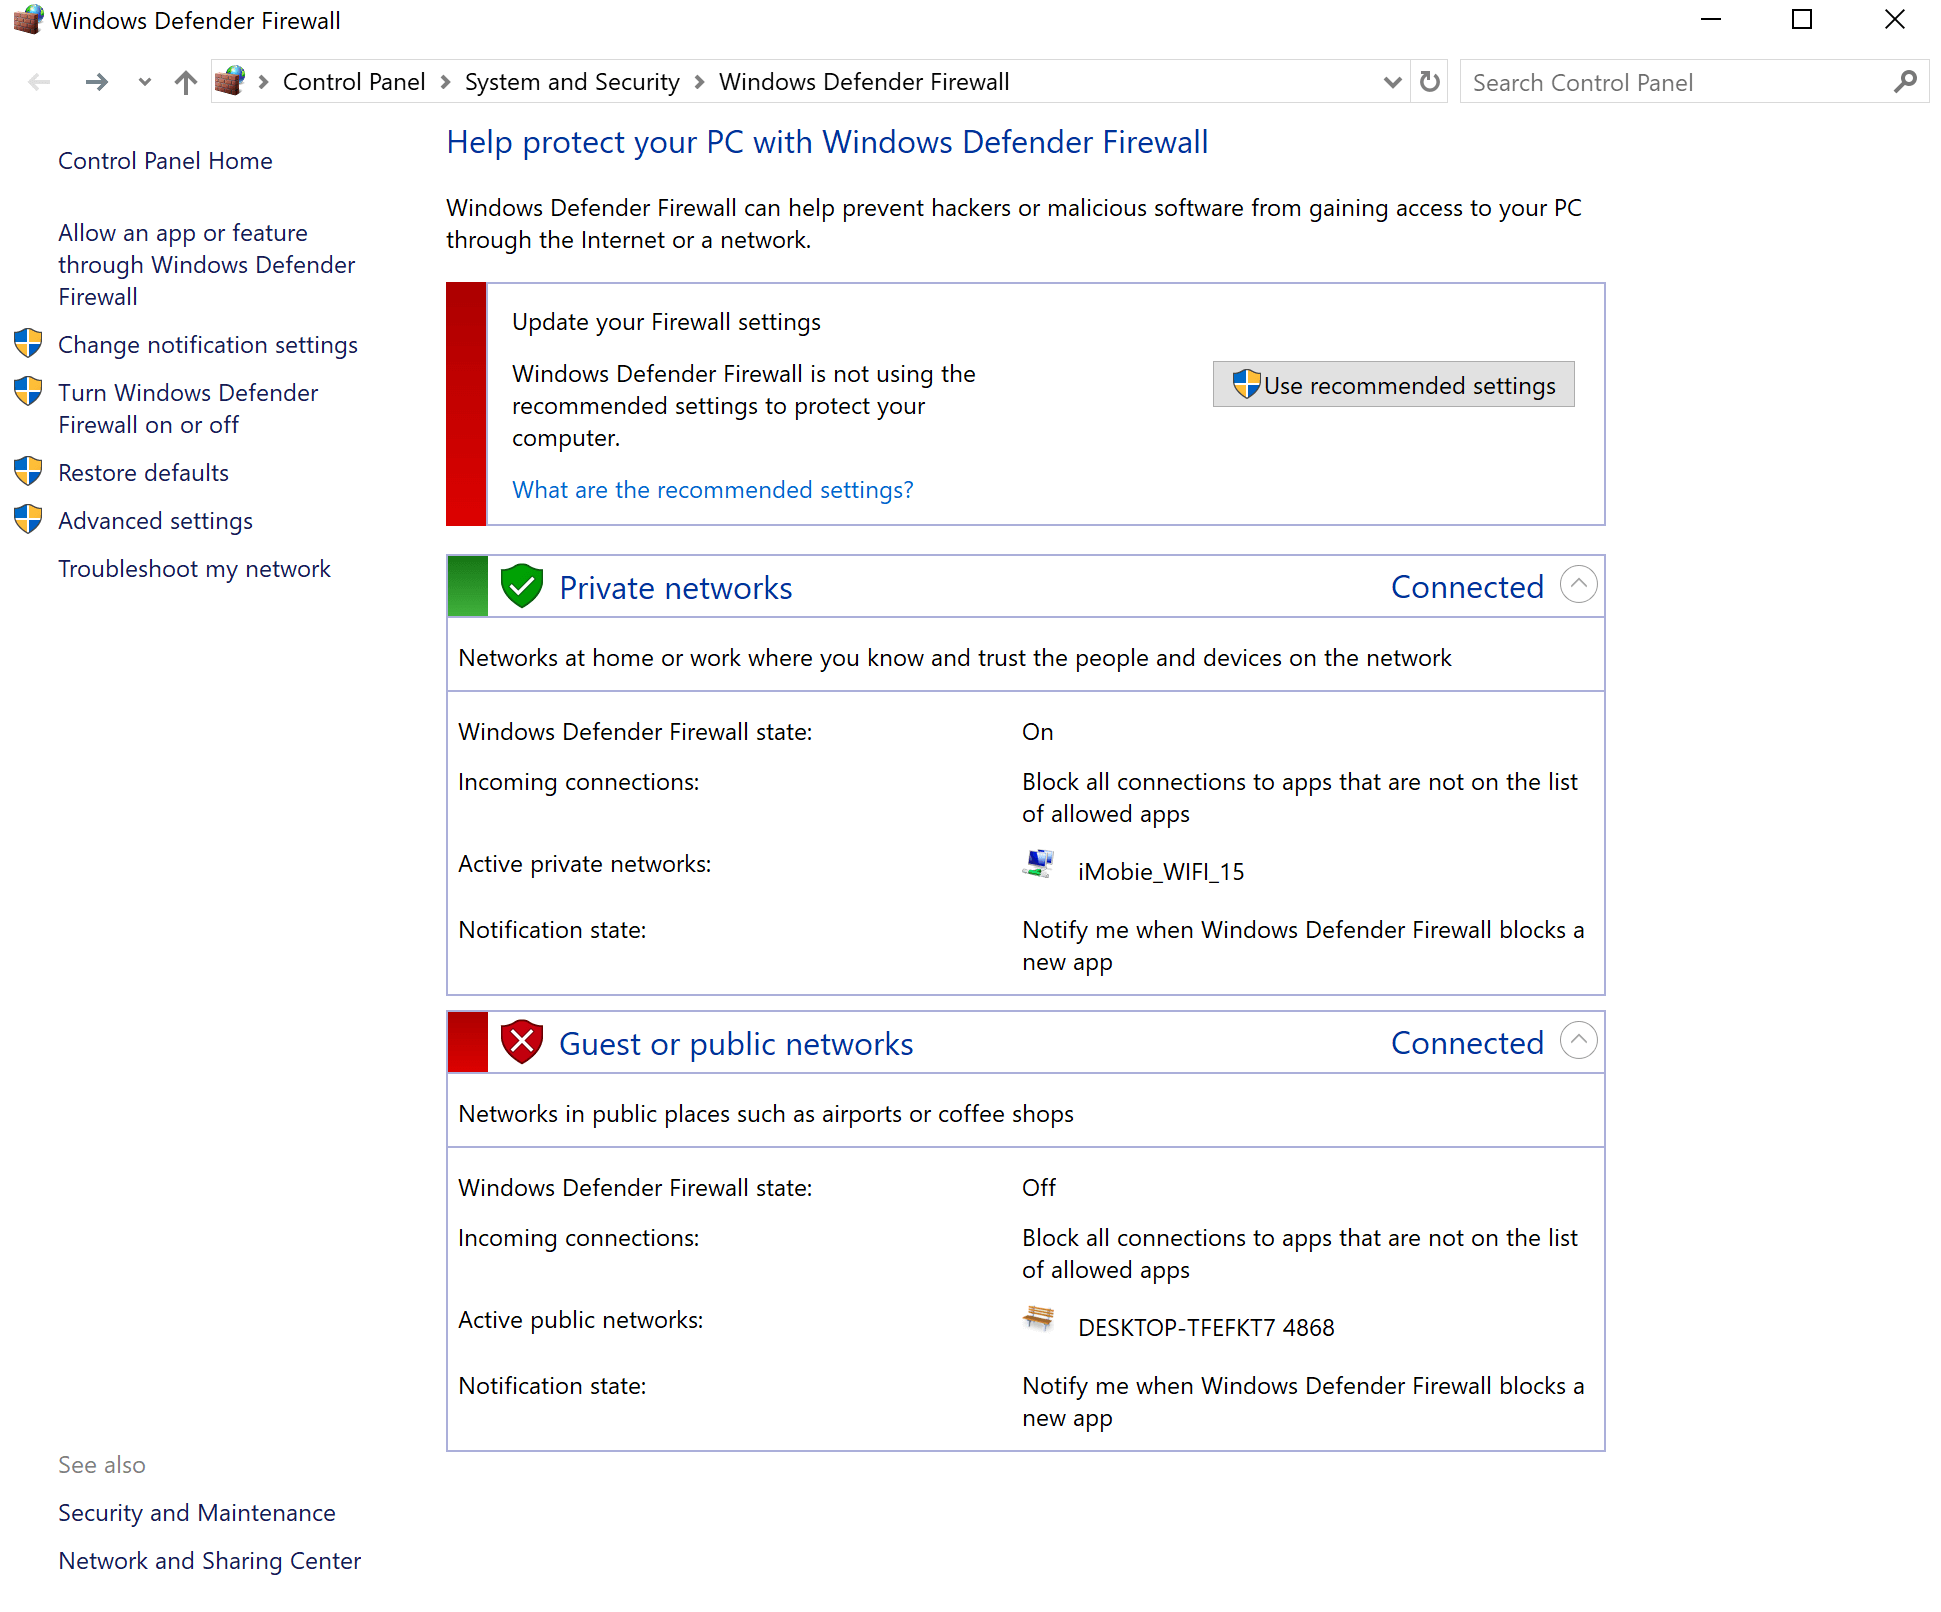
1. Choose Control Panel > System and Security > Windows Defender Firewall > Click Guest or Public Networks option > Turn Windows Defender Firewall off.
2. After you turn Guest or Public Networks Defender Firewall off, you can use your Android device to scan the QR code normally. After that, you can make your device detectable by AnyDroid with Wi-Fi connection.
How to switch one device to another one on AnyDroid?
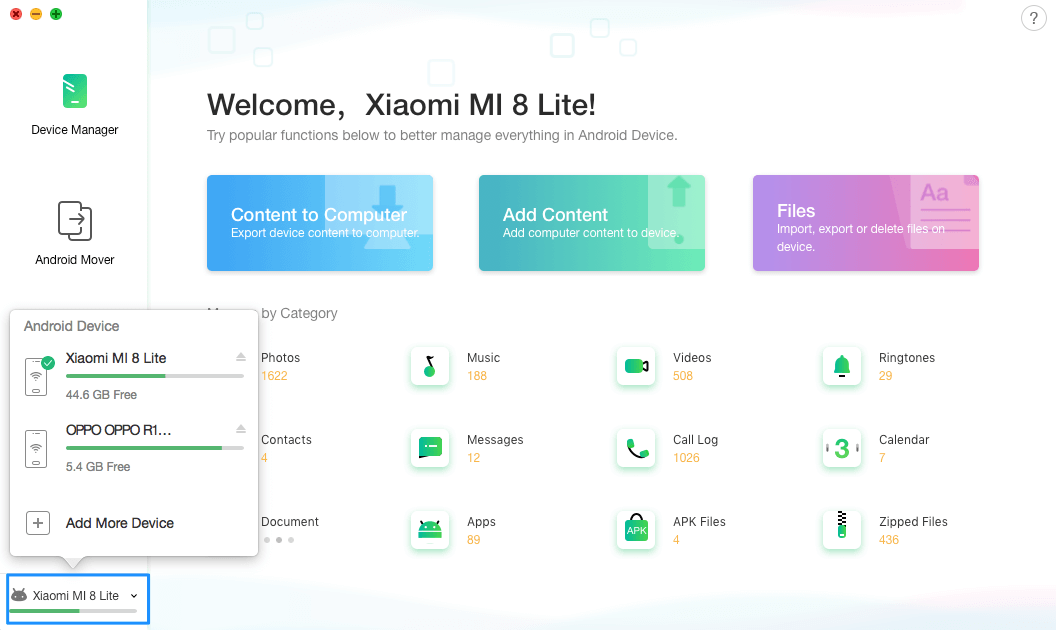
If you want to switch one device to another one as the target device when using AnyDroid, please click the name of the device you prefer from the drop-down menu in the lower left corner.
How to connect your Android device to Windows computer via Wi-Fi?
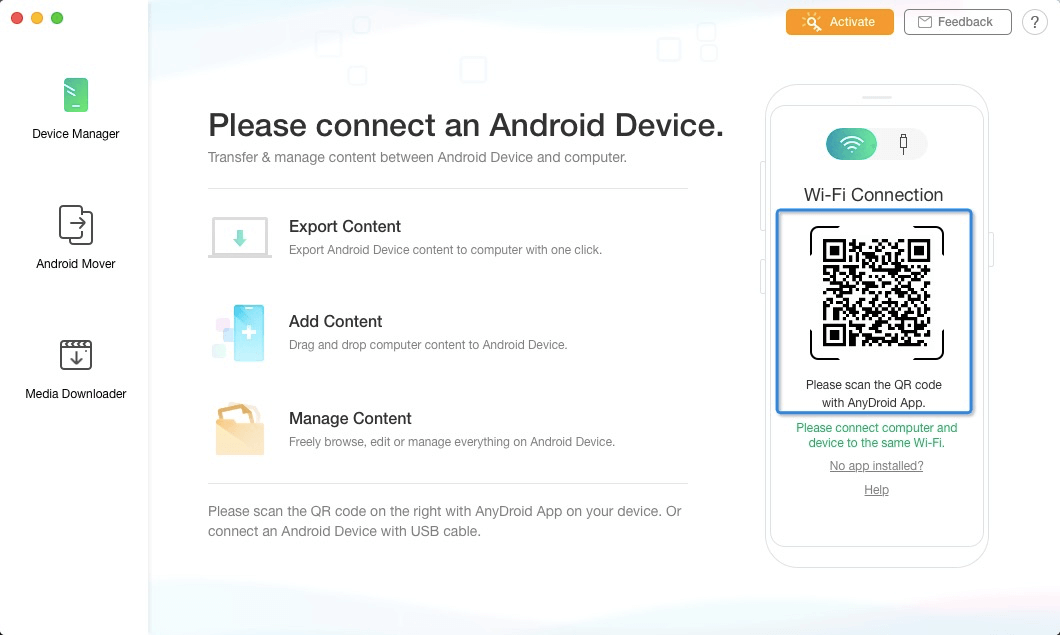
Usually, users can use USB cable to connect android device to computer on AnyDroid. However, if your computer is windows OS, you also can connect your Android device to Windows computer via Wi-Fi. Please follow the steps below to connect Android device directly within Wi-Fi connection even without USB cable.
1. Please make sure that your Android device and computer connect to the same Wi-Fi.
2. Please open AnyDroid on your computer.
3. Please open AnyDroid app on your Android device and tap Connect to Computer button to scan QR code on AnyDroid.
How to Connect Phone with AnyDroid via USB Cable?
To connect phone with AnyDroid via USB cable, please refer to the detailed instructions below:
1. Please connect phone to computer with a workable USB cable.
2. Once your computer detects your phone, it will install USB driver on your computer automatically.
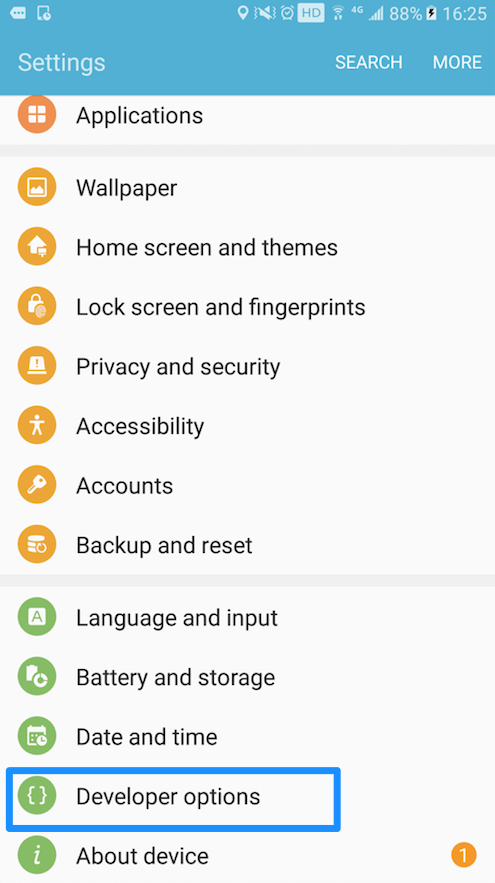
3. Turn on USB debugging option on phone to let computer detect phone. Open phone > Go Settings > Click Developer options.
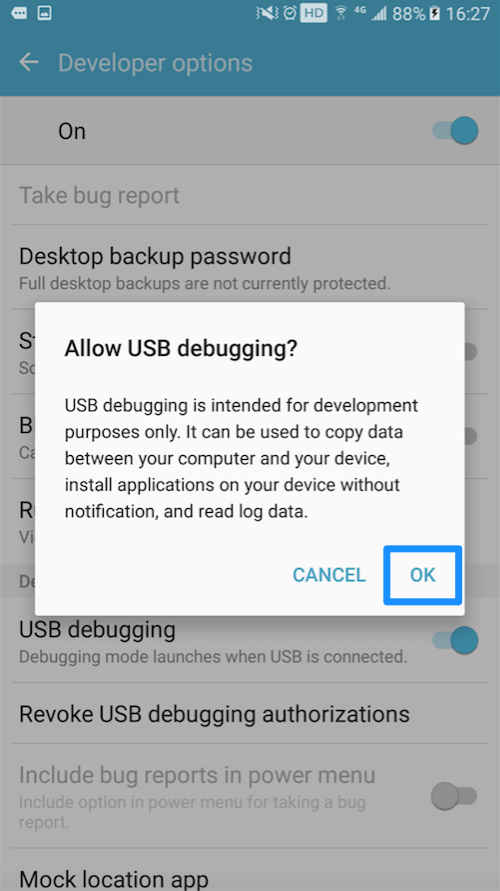
4. You will get the messages below on the interface of mobile when you choose to turn on USB debugging option. Then please click “OK” to allow USB debugging. After that, your phone will be detected via AnyDroid.
-
How to keep the original date of photos when exporting them from Android device to computer?
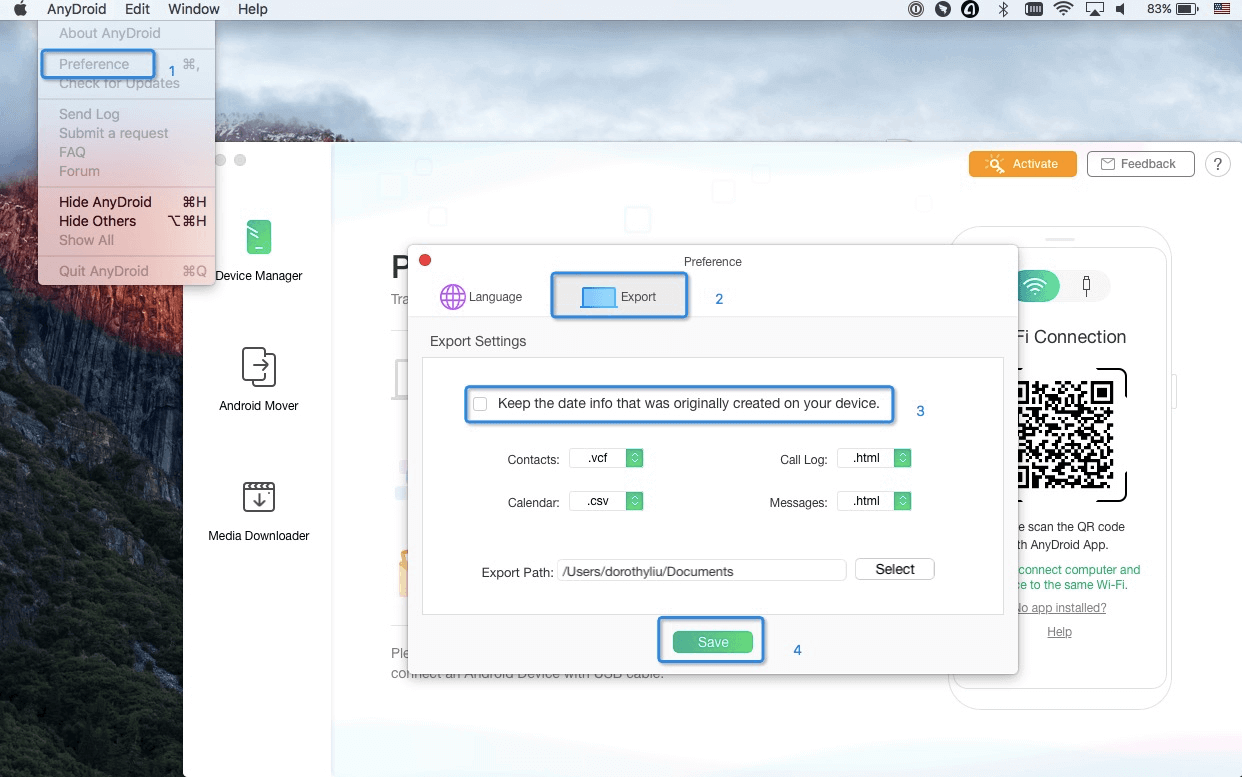
How to keep the original date of the photos when exporting them from Android device to computer? Please kindly follow the steps below to make it.
Open AnyDroid > Click the menu tab > Click Preference (Mac) or Settings (Windows) > Click Export > Choose “Keep the date info that was originally created on your device.” > Click Save.
How to delete the unwanted AnyDroid photo folder on your Android device?
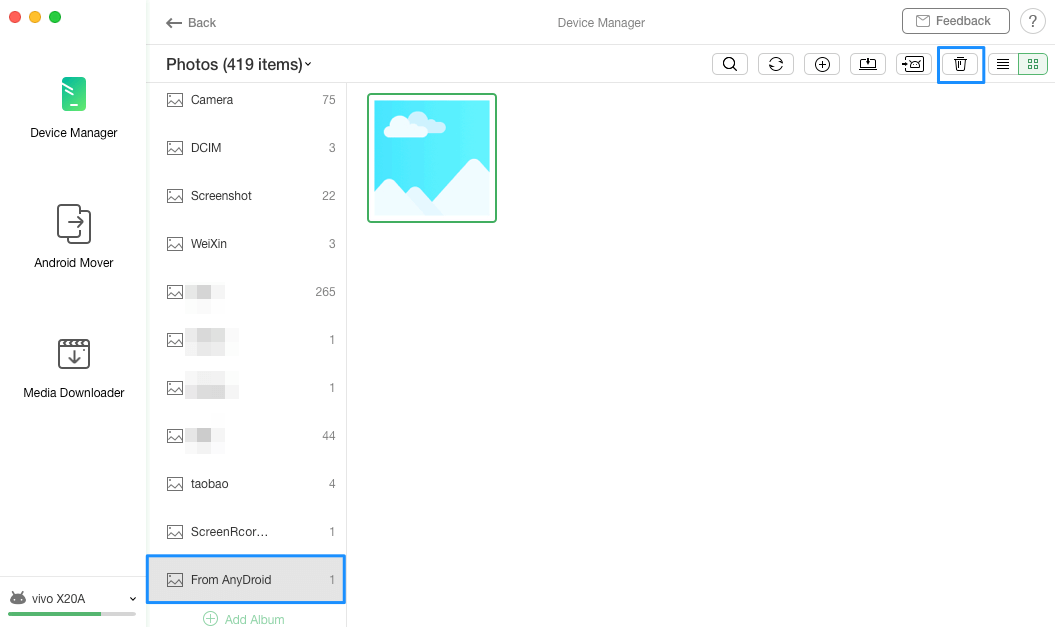
Some users find that AnyDroid creates a photo album on the Android device when importing photos from computer to device. And this whole album can’t be deleted on device directly. But you can delete the photos in the album one by one on device. If you want to delete the unwanted photo folder named From AnyDroid on AnyDroid, please kindly refer to the detailed steps below:
1. Open AnyDroid > Connect your device to computer > Click Photo Library > Click the albums “From AnyDroid” > Choose all the photos > Click Delete.
2. Please click the Refresh button to check whether the album is deleted successfully.
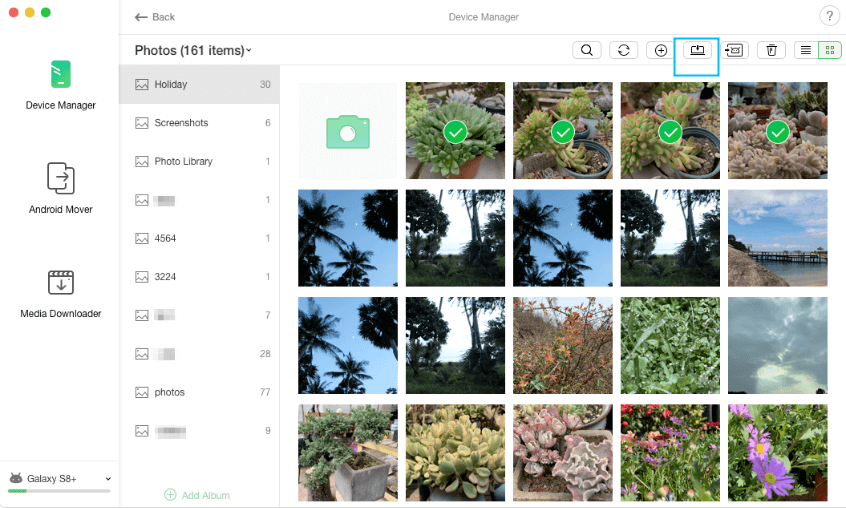
How to transfer photos from Android device to flash drive?
To transfer photos from Android device to a flash drive, please refer to the instructions below to complete it.
1. Plug in a flash drive to the computer.
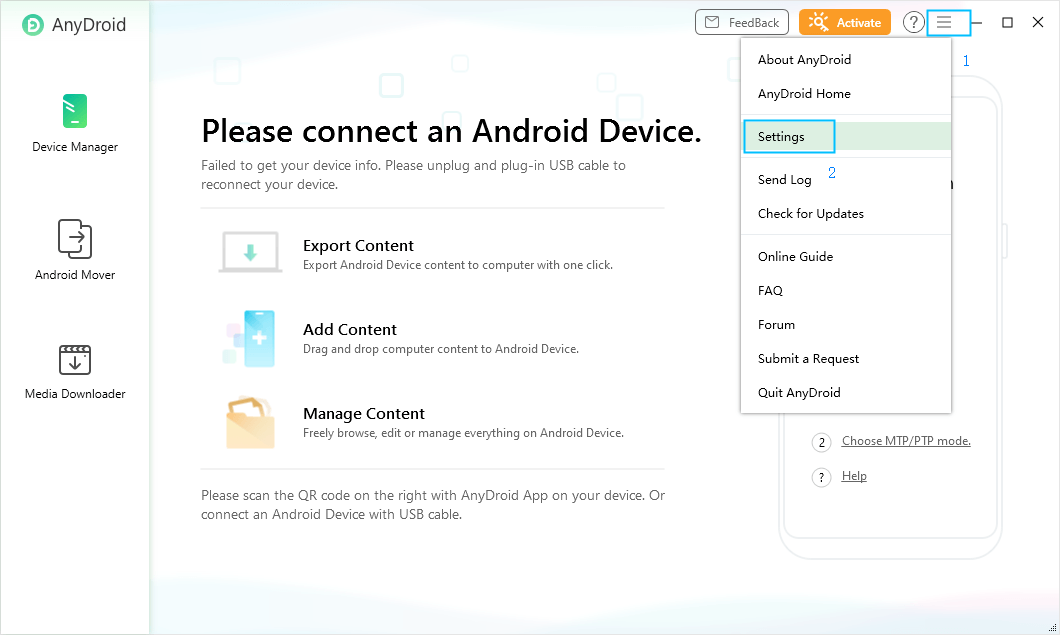
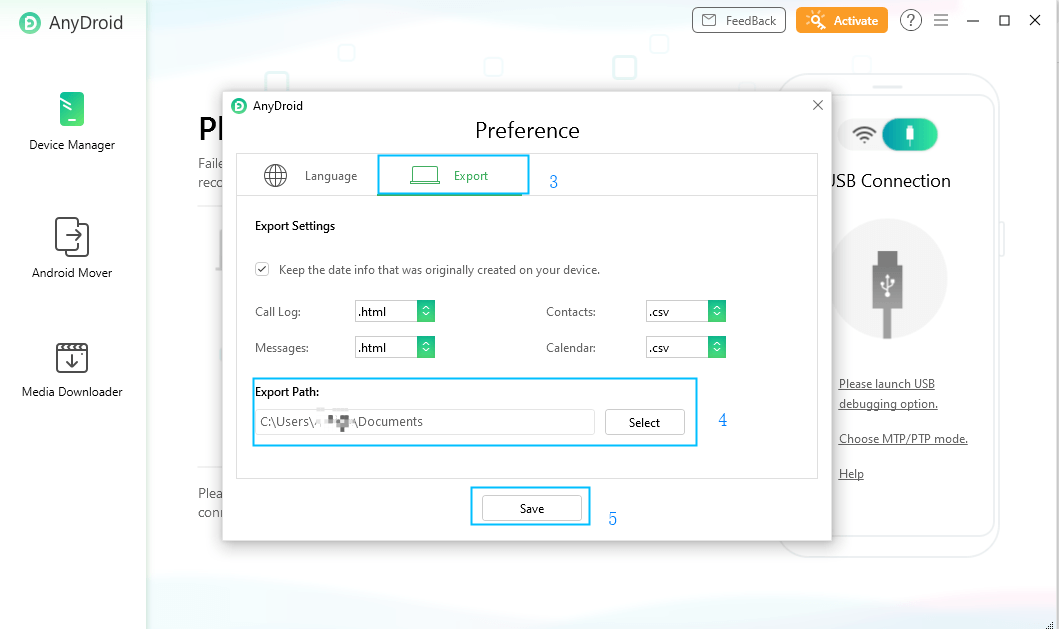
2. Open AnyDroid > Click Settings button in the menu tab > Export > Choose the export path as the path of the flash drive > Save.
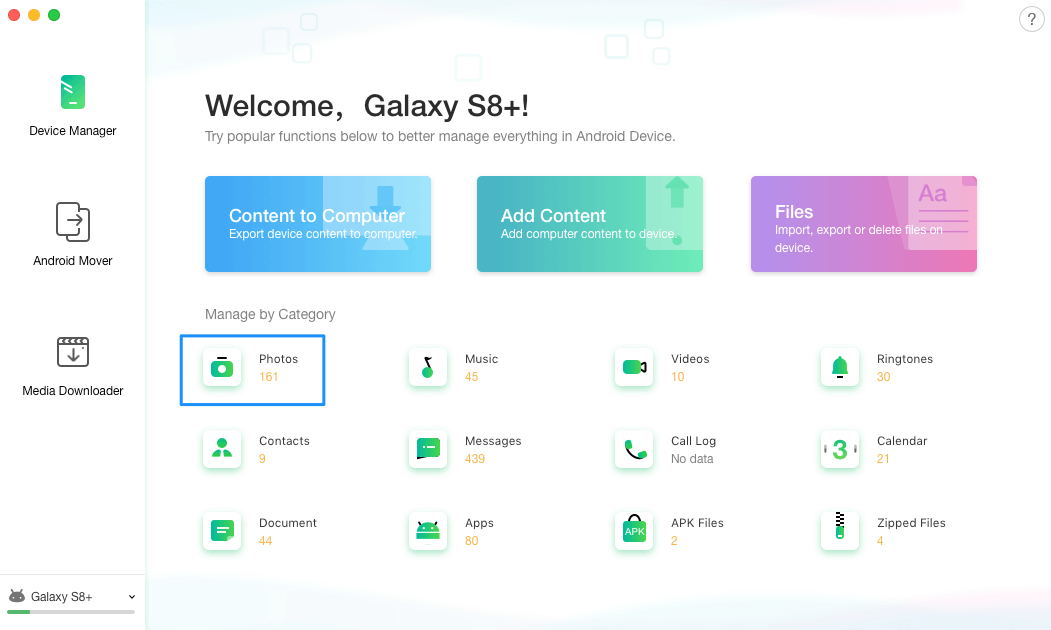
3. Connect the device via Wi-Fi or USB cable > Click Device Manager > Click Photos Category.
4. Select the desired photos > Click To Computer button.
-
Why AnyDroid fails to detect messages/contacts/call log/calendar on your Android device?
Recently, we get feedbacks from some users that AnyDroid can’t load their messages/contacts/call log/calendar on Android device. Hence we prepare this article to solve the issue. (take SAMSUNG for example)
If AnyDroid can’t load their messages/contacts/call log/calendar on Android device, you may see the interface as blow:
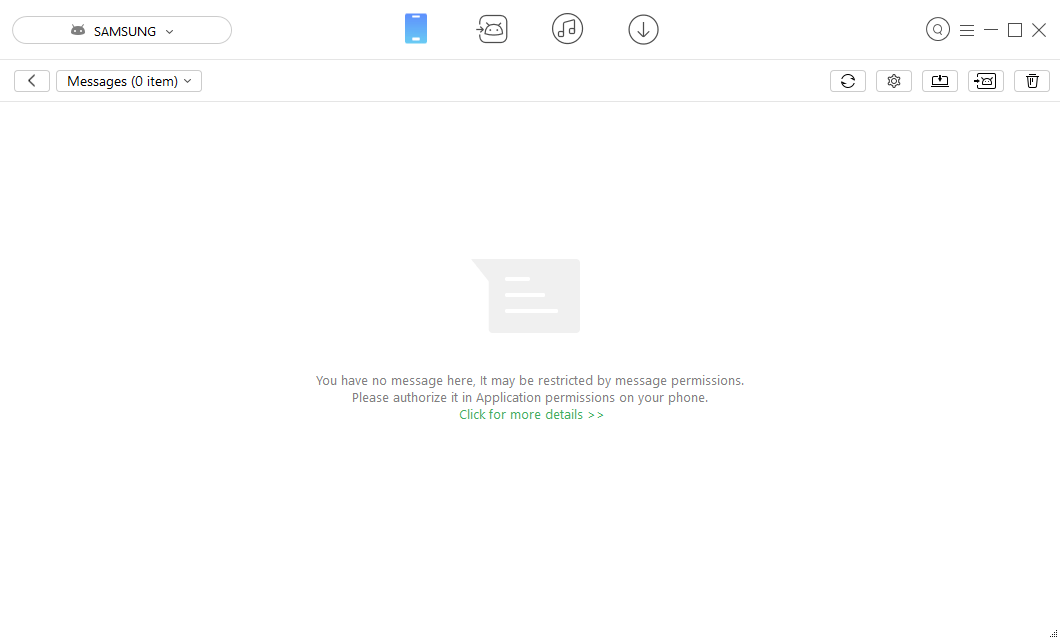
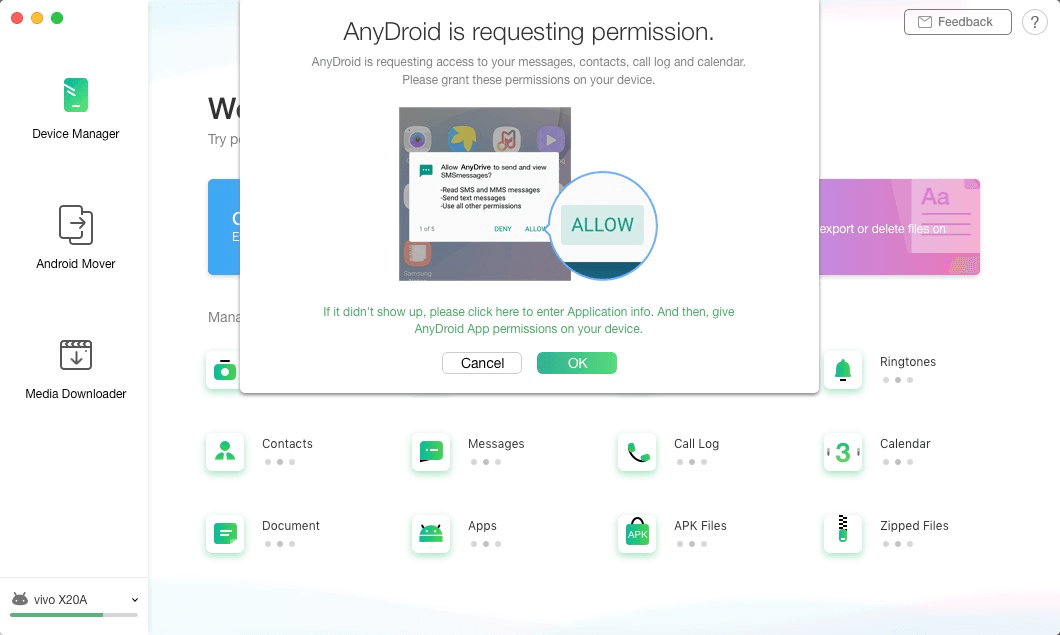
This issue is caused by that you disable the permissions of accessing the data (messages/contact/call log/calendar) on your device. To fix it, please click for more details to follow the instructions to grant these permissions of AnyDroid app on your Android device. Then AnyDroid can detect your messages/contacts/call log/calendar normally.
How to transfer messages from Android device to computer with AnyDroid?
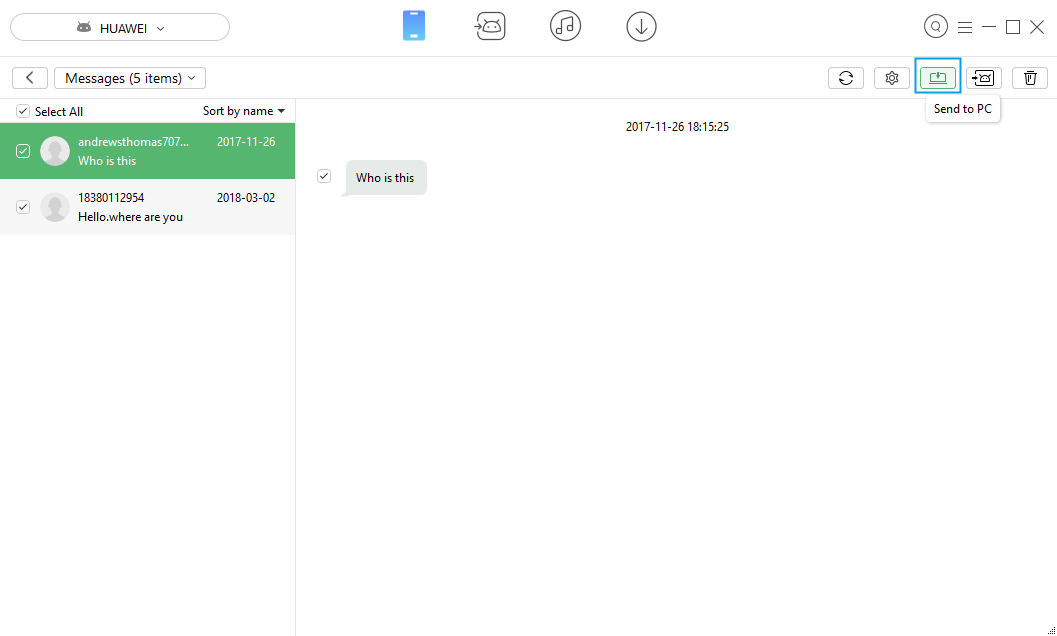
How to transfer message from Android device to computer with AnyDroid? Please follow the detailed steps below to make it.
1. Open AnyDroid > Connect your device to computer > Click Messages.
2. Choose the messages that you want to transfer > Click “Send to PC” button in the upper right corner to transfer your messages to computer.
Why AnyDroid Needs Contact Permission during Transferring Other Files?
If you confuse why AnyDroid needs contact permission during transferring other files, you will get more info about this issue with below post.
1. To export data to computer smoothly and quickly, we designed AnyDroid for Android to load device data in advance (on your computer) when you connect phone to computer. This is the only reason for AnyDroid needs contact permission during transfer other files.
2. The transfer process does not apply any intermediate cloud services. You are the only person who can access your data, which is definitely safe.
3. iMobie promise that we never keep or collect your any private & sensitive data. Please use AnyDroid at ease.
4. Meanwhile, if you still worry about this issue, please turn off all permissions after complete the operation.
If you have any questions or problems, please do not hesitate to contact us.
-
How to add a new calendar to your Android device with AnyDroid?
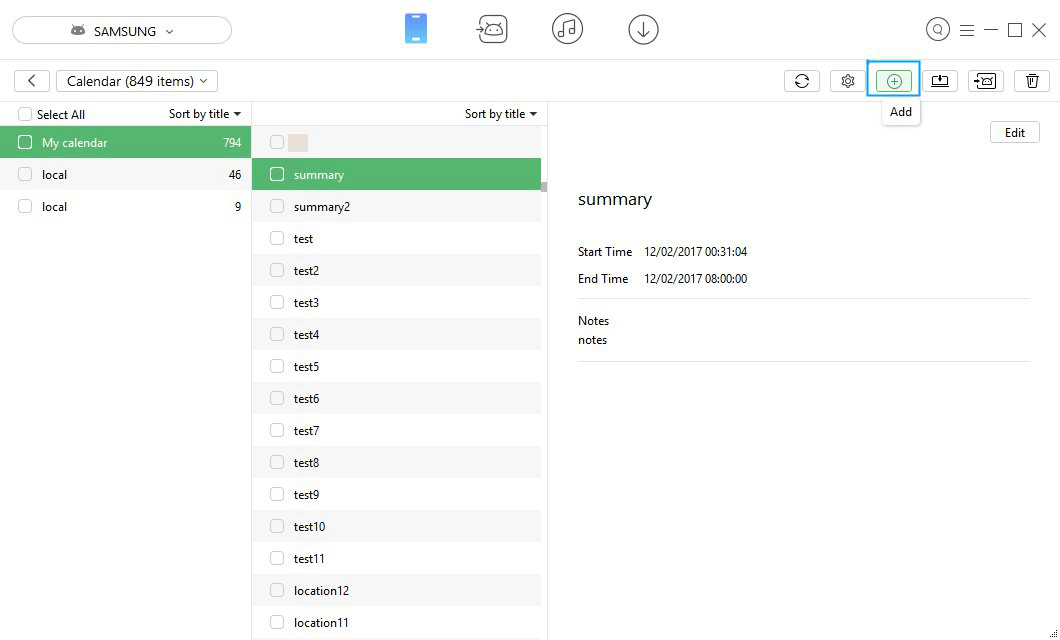
How to add a new calendar to your Android device with AnyDroid? Please follow the detailed steps below to make it.
1. Open AnyDroid > Connect your device to computer > Click Calendar.
2. Click “Add” button in the upper right corner > Type the detailed info of the calendar > Click Save.
How to transfer call log from Android device to computer with AnyDroid?
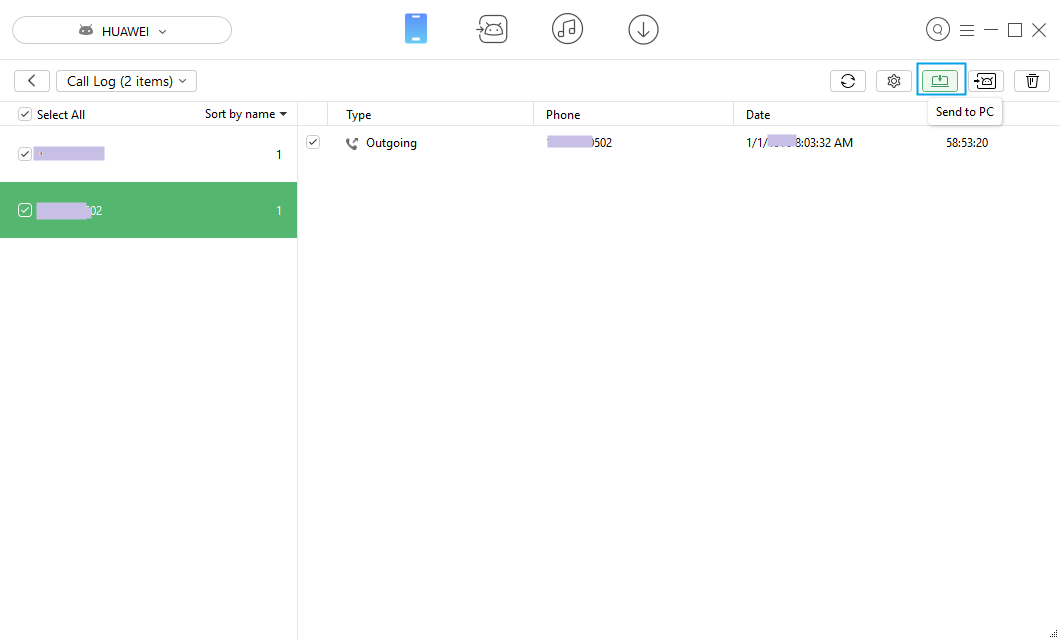
How to transfer call log from Android device to computer with AnyDroid? Please follow the detailed steps below to make it.
1. Open AnyDroid > Connect your device to computer > Click call log.
2. Choose the call log you want to transfer > Click “Send to PC” button in the upper right corner.
-
How to send the log file via AnyDroid?
If you meet the technical problems about AnyDroid, to help us make better analysis and find a solution for you soon, please send the log file to iMobie Support Team.
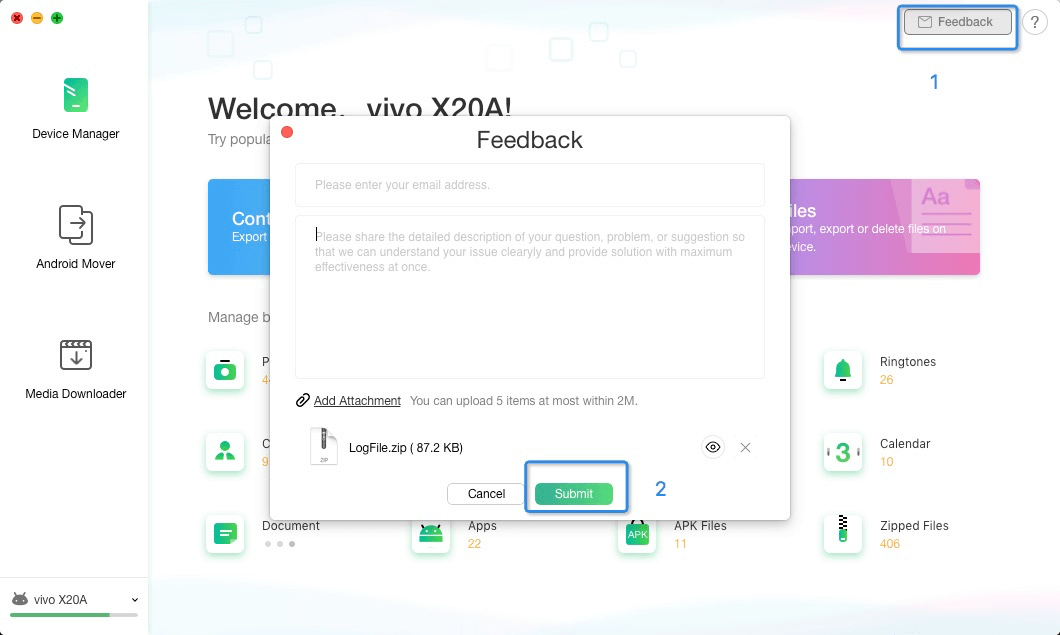
For Mac:
Open AnyDroid > Click Feedback on the upper right of the interface > Click Submit > Send the zip file to us as attachment via mail.
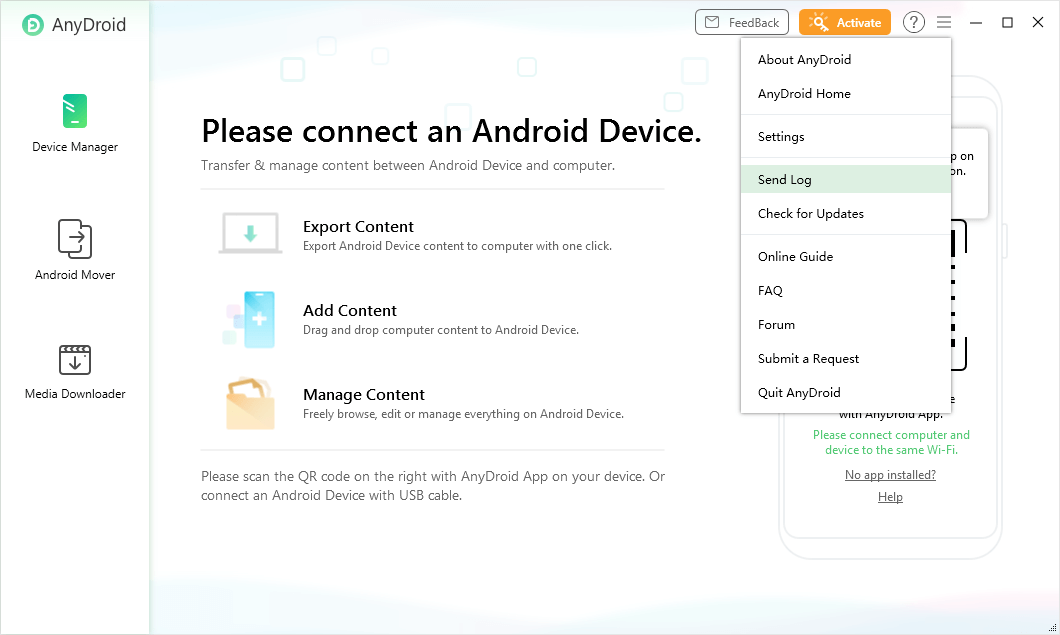
For Windows:
Open AnyDroid > Click AnyDroid on the upper right of the Menu tab > Click Send Log to Us from the drop-down menu > Send the zip file to us as attachment via mail.
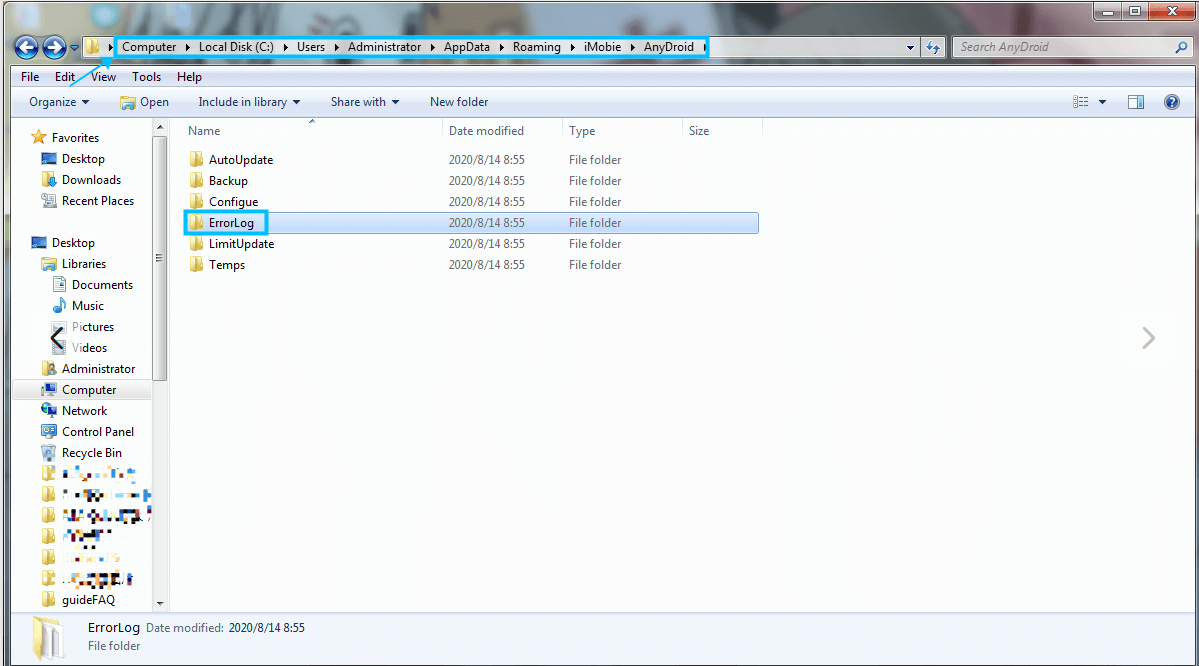
If you cannot send log directly, please find error log and send it to us from this path:
Mac: /Users/Your computer name/Library/Application Support/com.imobie.AnyDroid /AnyDroid /LogsFolder

Windows: C: User\Your computer name\AppData\Roaming\iMobie\AnyDroid\Errorlog
