How to Transfer Photos from iPhone to Dropbox
This article shows how you can transfer photos from iPhone to Dropbox, so they can be downloaded later should you ever lose the ones on your iPhone, iPad or iPod.
Everybody loves snapping away pictures on their iPhone, whether it is a party, vacation or something unexpected and spectacular that has happened. It is a simple truth – pictures taken on iPhone are treasured and it is a great loss if they are destroyed or damaged.
There are times when you accidentally delete photos from your iPhone and wish you had a backup copy of the same. Similarly, you may be excited about a new iOS version, and when you update your current one, there is some data loss which causes loss or damage of your iPhone photos.
Luckily, there are online cloud storage facilities where you can save your pictures and access them for years to come. Services such as Dropbox, Google Drive, and Apple Cloud are great for storing any data on your iPhone, including your precious photos. Today you will get to know how to transfer photos from iPhone to Dropbox without losing any quality using two simple methods. Being iOS devices, the methods described below are applicable to transferring photos from iPad and iPod too.
Method 1: Transfer Photos from iPhone to Dropbox via Dropbox Mobile App
You can transfer photos from iPhone to Dropbox using a feature called Camera Upload. This is one way in which you can be sure that you photos will be available should you ever need them, and the process is automatic, making it easy and convenient to use.
Step 1. Enable the Camera Upload feature on your iPhone. To make this, go to Dropbox app on iPhone > tap on Settings > followed by Camera Upload.
Step 2. After enabling Camera Upload, switch on Background Uploading. This ensures that you do not need to open Dropbox every time you need to store your images or videos. In the beginning, you may opt to disable the “Use Cellular Data” option. This ensures that uploads are automatically done when you are connected to a Wi-Fi network.
Method 2: Transfer Photos from iPhone to Dropbox Using a Computer
It is possible to upload photos from iPhone/iPad to Dropbox using your computer.
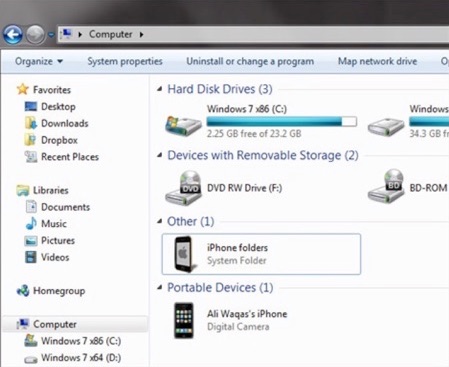
Step 1. Connect iPhone to computer via USB cable > use the explorer to find the folder where you store images that you want to upload > export the folder to computer.

Transfer Photos from iPhone to Dropbox Using a Computer
Step 2. Go to Dropbox website and log in your account > go to Files > create a new folder for the images that you want to upload from the transferred images on the computer, or open the existing Photos folder > select all the images that you want to upload and then send them to your Dropbox account.

Transfer Photos from iPhone to Dropbox Using a Computer
The Bottom Line
It is a great tragedy for somebody to lose important pictures taken on their mobile devices. Using the Dropbox App, you can easily transfer photos from iPhone, iPad or iPod to Dropbox. Do as the methods offered above to transfer photos from iDevice to Dropbox.

Joy Taylor


Member of iMobie team as well as an Apple fan, love to help more users solve various types of iOS & Android related issues.
Screenify
AnyEnhancer
FocuSee
Vozard
AnyMiro
AnyMirror


