Redmi Note 8 FRP Bypass [4 Ways]
There are 4 ways to bypass Redmi Note 8 FRP. The article covers each one in detail, along with supportive images. Moreover, we recommend using DroidKit— a reliable FRP bypass tool for Android smartphones.
DroidKit – Redmi Note 8 FRP Bypass 1-Click
If you are locked by FRP, don’t panic. Free download DroidKit – Complete Android Toolkit to bypass Google account/FRP in no time. It is easy to operate and supports Android 6 and above versions.
FRP appears when the factory reset Redmi Note 8, preventing a fresh start. Lost Google account credentials might make this security feature, which protects your device from illegal access, difficult to use. Many Redmi Note 8 customers have this issue. FRP protects your device, but it might make it difficult to regain access to your phone. Whether you acquired a used phone or forgot your account info, circumventing FRP is essential. This guide will explain FRP, its problems, and the best ways to avoid it. Our tested solutions will help you with Redmi Note 8 FRP bypass swiftly and securely.
What is FRP? Is it possible to remove the Google FRP lock?
FRP stands for Factory Reset Prevention and is a security feature on Android smartphones like the Redmi Note 8. Setting up your smartphone with Google activates FRP. This primarily means the device is protected against unauthorized access if lost or stolen. If someone resets your phone without your consent, they’ll need your Google account credentials. This security safeguard might be problematic if you forget your account information or acquire a used phone tied to the previous owner’s Google account. However, the FRP lock can be bypassed. Let’s explore 4 ways for Redmi Note 8 FRP bypass:
Method 1: Redmi Note 8 FRP Bypass Using DroidKit [5 Mins & 100% Success]
Finding a reliable and straightforward solution is essential when you’re locked out of your Redmi Note 8 due to forgotten Google account details. DroidKit is a sophisticated FRP bypass tool for Xiaomi and other Android smartphones. DroidKit’s simple UI lets you recover full device access without technical expertise. DroidKit makes it easy to circumvent the FRP lock and use your smartphone again, whether you lost your Google account or need to create one.
Android customers choose DroidKit due to its high success rate and device compatibility. How DroidKit helps:
- Follow simple on-screen instructions to bypass FRP in just minutes, with no waiting or technical expertise required.
- Offers customized FRP bypass solutions for different Android systems, ensuring a successful bypass.
- Supports all Xiaomi, Redmi, Samsung, OPPO, and POCO devices running Android 6 and above.
- It ensures that your device is not damaged and that there is no risk of data leaks, making it a safe and reliable option.
Free Download * 100% Clean & Safe
Here are the steps you need to follow:
Step 1. Download, install, and launch DroidKit on your PC or Mac, and choose the FRP Bypass option from the UI.
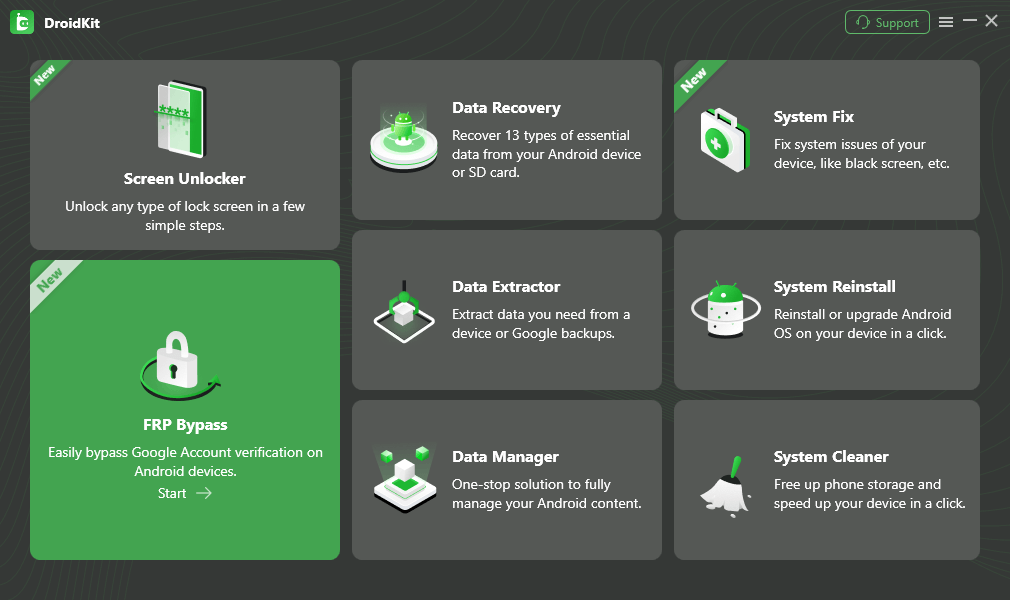
Choose FRP Bypass Mode
Step 2. Next, connect your Xiaomi/Redmi device to your computer via a USB cord and choose the “Start” button.
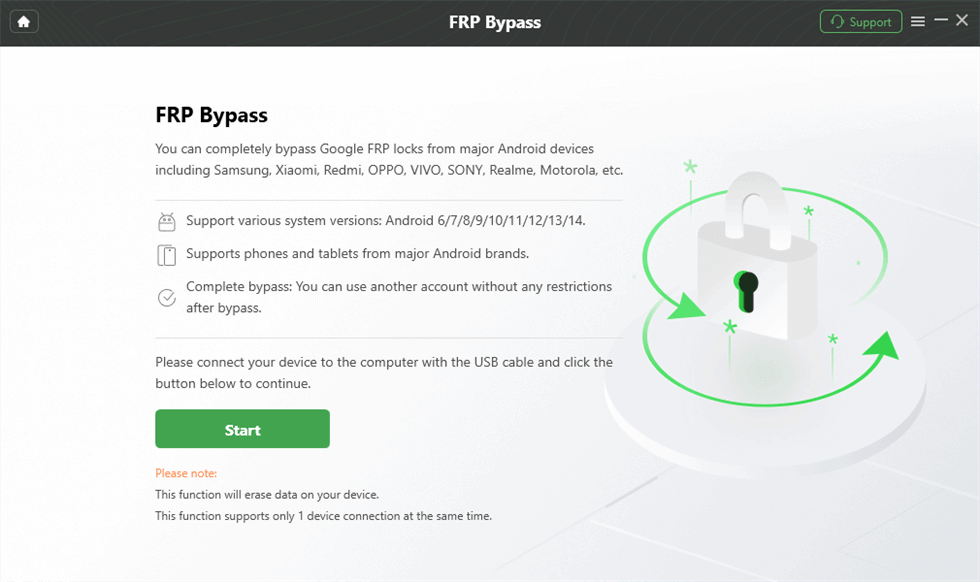
Connect Device and Click Start
Step 3. Now, DroidKit will prompt you to choose your smartphone brand. Click Redmi to continue.
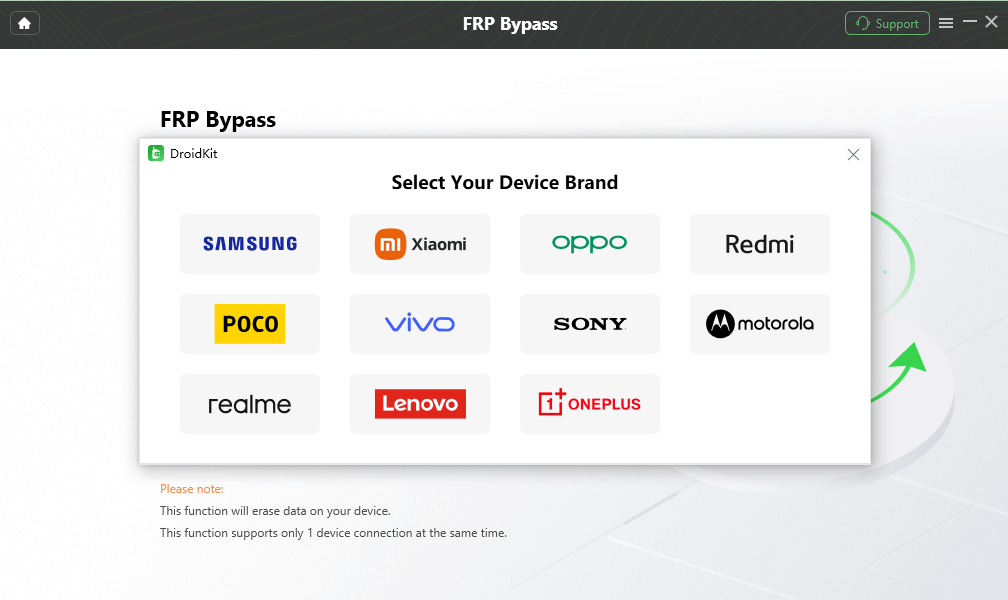
Choose Device Brand
Step 4. After you choose Redmi as your device brand, the tool will begin creating the configuration file for your Android smartphone. Once ready, choose Start to Bypass.
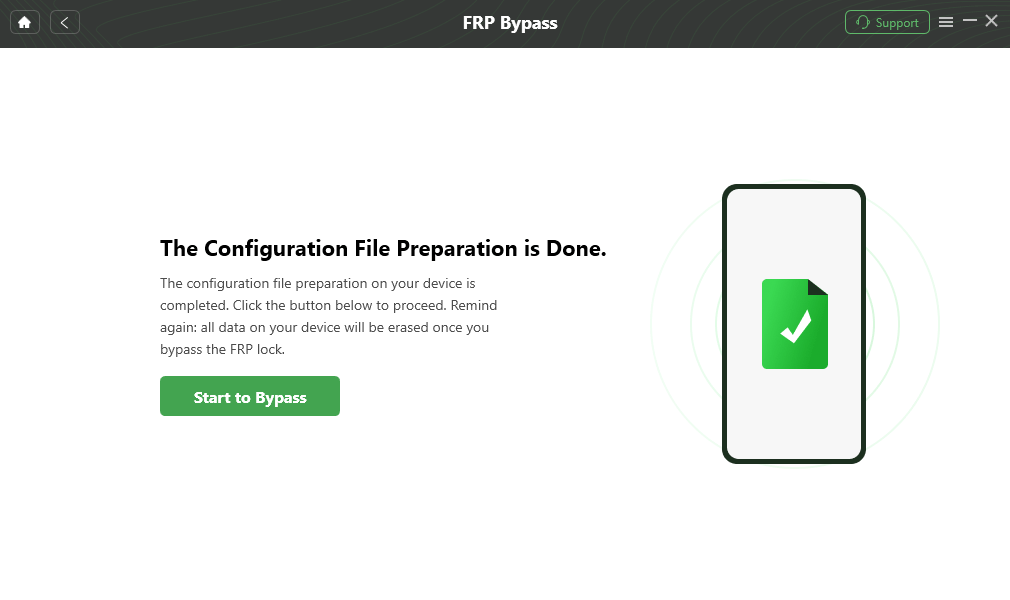
Click Start to Bypass
Step 5. Now select the system version of your Android device and click the “Next” button.
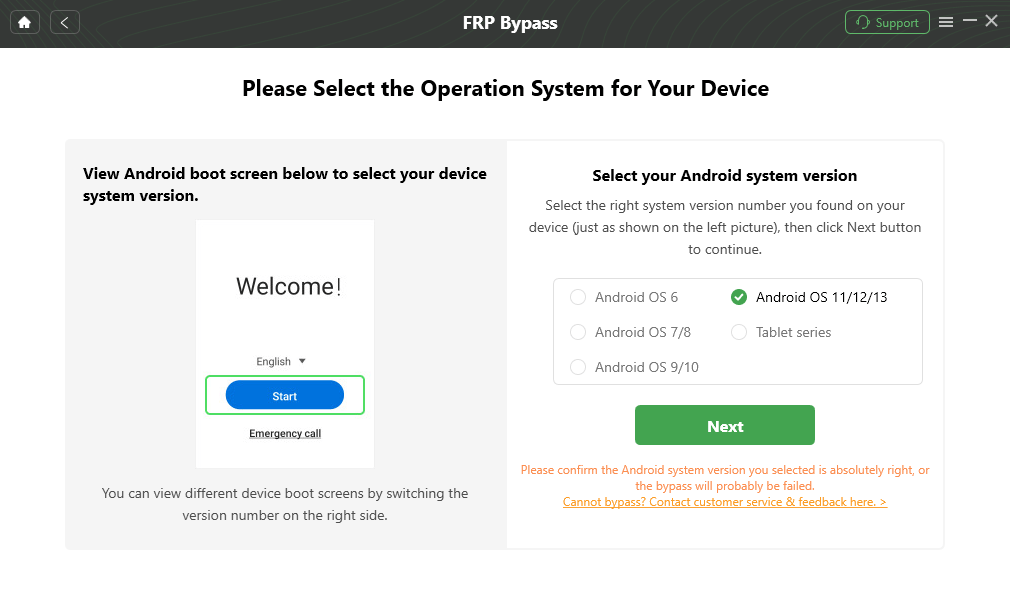
Choose System Version
1. Different Android versions have different boot screens. DroidKit provides 5 boot screens for your reference.
2. Please confirm that the Android system version you selected is right, or the bypass will probably fail.
3. The tablet series option supports Android 9 and later versions for tablets, while for Android 8 and earlier versions, it is recommended to use Android 6 or Android 7/8.
Step 6. Go to the “Enter your current password” interface and follow the on-screen instructions to complete the settings. After entering the factory mode, click the “Reset” button.
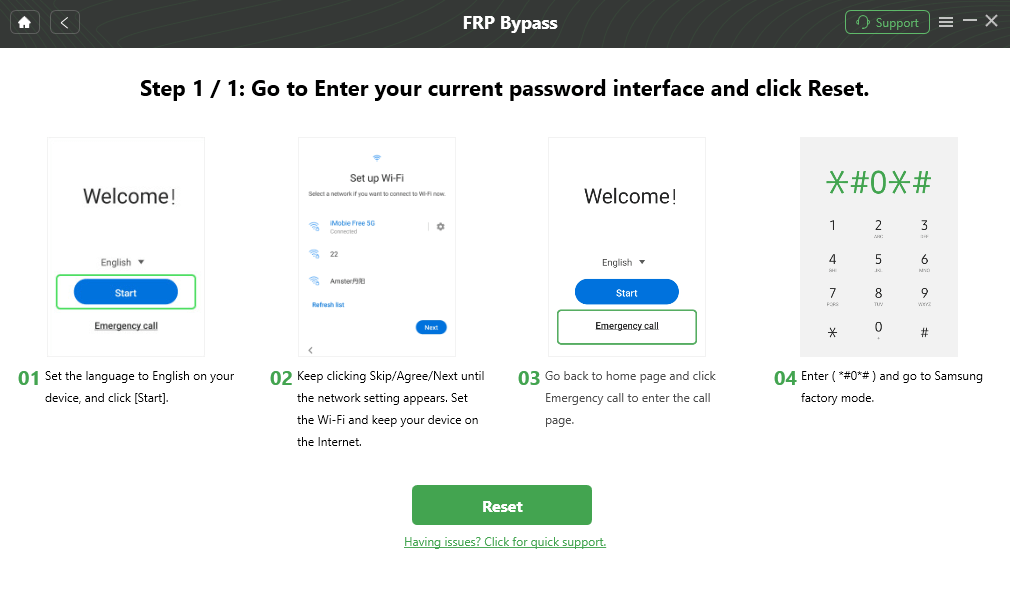
Go to Enter your Current Password Interface and Click Reset
The steps for each device brand may differ, so please refer to the instructions displayed on the application screen to successfully complete the operation.
Step 7. After clicking the reset button, DroidKit will start bypassing the FRP lock on your Android device. Once the process is completed, you will see the below interface.
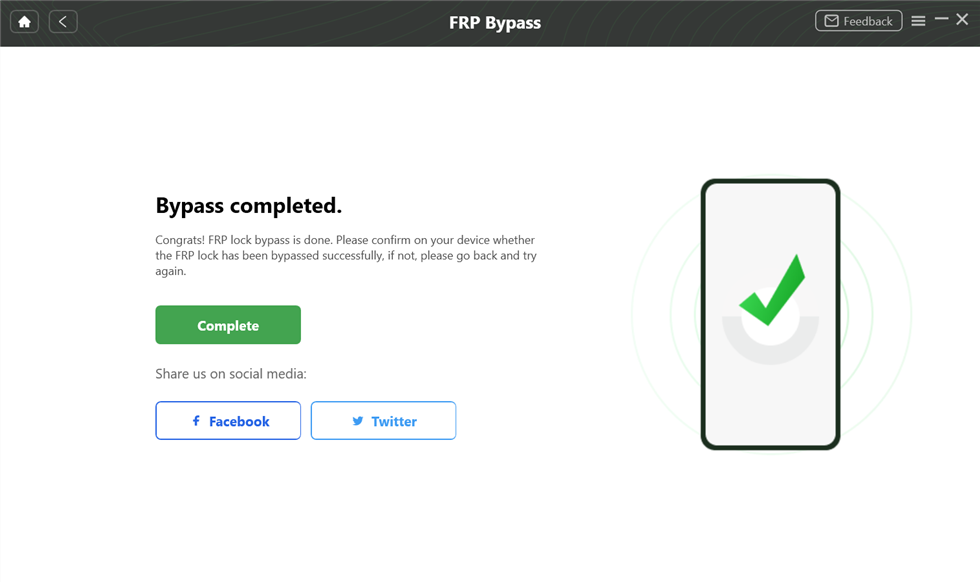
FRP Bypass Complete
Method 2: Bypass FRP on Redmi Note 8 via Google Assistant
If you don’t have a computer, don’t worry! You can still bypass FRP on Redmi smartphones. Voice recognition and Google keyboard are two built-in capabilities that can be used as an excellent Redmi FRP bypass tool. Follow these steps to bypass Xiaomi FRP right now:
Step 1. First, go to network settings. Next, click “Add Network” at the bottom of the screen. In the SSID area, type any random text. Then, long-press the text to select it. Next, hit the share button and send it to your Gmail account.
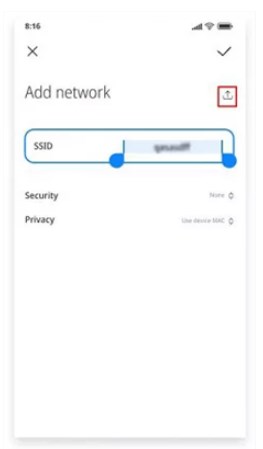
Add Network
Step 3. Next, choose “Notifications > Additional Settings.” In the upper right corner, click the three-dot symbol and choose “Help and Feedback.”
Step 4. In the search results, look for “Delete and disable apps on Android.” Next, choose “Tap to go to Application Settings.” Now, go to “Settings > Additional Settings > Accessibility > Accessibility Menu” to activate the Accessibility Menu shortcut.
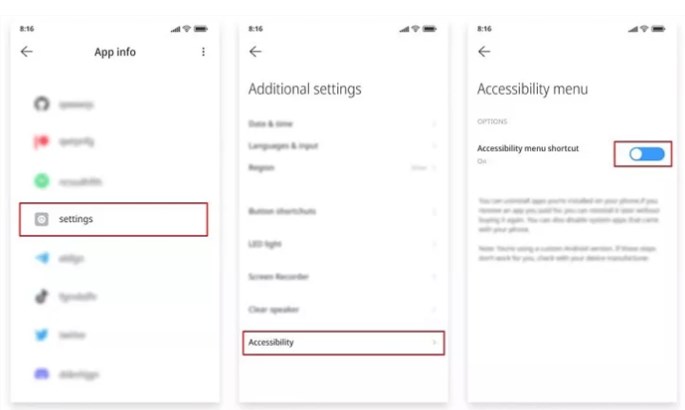
activate the Accessibility Menu shortcut
Step 5. Return to the app information screen by hitting the back button several times. Next, click More and then “Show System”. Select Android setup, then hit “Disable” and disable the app. Then, hit force stop and OK.
Step 6. Return to the “App information” page and choose Carrier Services. Next, select Disable and Disable app, then “Force to Stop,” and finally, “OK.”
Note: Press the back button and the following icon to return to the network connection screen. Click the person symbol in the bottom right corner of the screen to get to the Checking for Updates page and then Google Assistant > Settings.
Step 7. To reach the Google Play Services App information page, repeat the steps above many times. Then, choose to activate Google Play Services. Return to the Checking for Updates page and wait for the process to finish. As the procedure concludes, choose more and accept.
Step 8. When the Setup Complete screen displays, you can disable Xiaomi’s Google Account Verification.
While this approach is beneficial if you do not have computer access, it has certain limitations.
- It might not work with all Redmi smartphones, including the Mi A3.
- This solution simply disables the Google app, which you can use for other purposes.
- It does not entirely remove the FRP lock, so you can still have trouble upgrading your device or conducting a factory reset.
Method 3: Bypass Redmi Note 8 FRP Using ADB
ADB stands for Android Debug Bridge. It is an excellent technique for a computer to interact with an Android smartphone. Depending on the OS version, you can use one of many instructions to remove the Google FRP lock. Follow the methods below to bypass FRP on Redmi Note 8 using ADB.
Step 1. First, download the ADB setup file. Now, extract the toolkit files to a folder on your computer.
Step 2. Next, launch adb.setup.exe and hit Y to accept the prompt. This will allow you to install the ADB drivers.
Step 3. After installing the ADB drivers, enter Y once again. It will close the command window.
Step 4. Next, switch on your Android phone and connect it to your personal computer via a USB cord. Also, confirm that your USB debugging mode is enabled.
Step 5. Then, while holding down the Shift key, right-click on an empty area in the ADB folder. Now, choose the Open command window here. To erase the FRP, execute the following lines one by one at the command prompt. Then, hit enter after each line. The code for CMD is provided below.
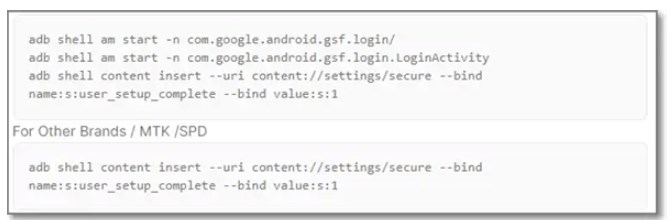
The code for CMD
Method 4: Bypass Redmi Note 8 FRP Without PC
If you do not want to utilize a third-party tool to overcome Redmi FRP, you can do it straight from your phone without needing a PC. However, this procedure is difficult and time-consuming. Here’s how to approach it:
Step 1. Once you factory reset your device, turn it on and connect to Wi-Fi.
Step 2. When you reach the Google Account Verification page, open your keyboard and choose “Options” followed by “More.” From the “More” menu, choose “Type Email or Phone > Privacy Policy.”
Step 3. When the Privacy Policy appears, scroll to point 13 and click the email address.
Step 4. Tap on “Messages > New Message” and share the YouTube link. Open YouTube, go to “Settings > YouTube Terms of Service,” and then follow the steps to launch Chrome.
Step 5. To download the FRP Bypass APK, open Chrome and enter the URL https://tiny.cc/frptools. Launch FRP Bypass APK, then open the Google search engine and speak “Share Me” into the microphone.
Step 6. Open Share Me, select “Receive,” and create a QR code. Next, Share Me and Activity Launcher can be downloaded from the Play Store on another Android device. Launch Share Me, choose “Send > Android,” then link both devices using the QR code on the first device.
Step 7. Install and run Activity Launcher on the first device, then choose “Android Setup > Copy Google Account.” Launch Google on the second device and link it to the first by saying “Open Setup My Device” into the microphone.
How to avoid triggering FRP lock again?
Even though you have unlocked FRP, you can still get locked in again. You can also deactivate Redmi FRP.
You can easily do this by disconnecting the Google account from your device. You will no longer need to circumvent Redmi FRP. Here are the steps you can take to deactivate Redmi Note 8 FRP:
Step 1. Go to your Android device’s menu and choose Settings.
Step 2. Scroll down the page and choose “Accounts & Sync.”
Step 3. Tap the Google account to remove it.
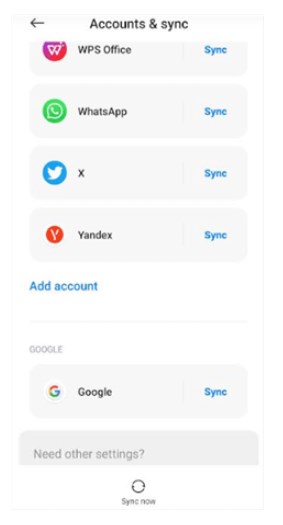
Tap the Google account
Solved “Redmi Note 8 FRP Bypass”
Bypassing the Redmi Note 8 FRP lock is challenging yet achievable with the appropriate tools and approaches. DroidKit is the most effective and user-friendly technique presented. It makes restoring device access quickly and safely easy without technical issues.
DroidKit is the best FRP bypass tool for Xiaomi, Redmi, and other Android smartphones because of its high success rate, extensive compatibility, and 100% safety. DroidKit can let you reset your Google account or get back in control of your phone quickly.
Free Download * 100% Clean & Safe
Redmi Note 8 FRP Bypass FAQs
1. How do I know if my Redmi Note 8 is locked by FRP?
If your Redmi Note 8 is FRP-locked, a screen will ask for your Google account credentials following a factory reset. This screen shows during setup, blocking phone access without login data.
2. Can I bypass FRP by simply resetting it?
Resetting your Redmi Note 8 won’t remove FRP. The FRP lock remains after a factory reset, and the device’s Google account data needs to be opened. It requires specialized tools or procedures to circumvent.
3. How do I recover the locked Google account information?
Retrieve your locked Google account details via Google Account Recovery. Enter your account email or phone number and follow the instructions. You might need to authenticate your identity by phone, email, or security questions to reset your password and restore access.

Senior writer of the iMobie team as well as an Apple fan, love to help more users solve various types of iOS & Android-related issues.
Product-related questions? Contact Our Support Team to Get Quick Solution >
