How to Bypass Google FRP Lock On Any Android 6 & 7
In this article, you are going to learn about Google FRP bypass Android 6 – 14. This guide will cover various methods with their step-by-step instructions. You will also get to discover a complete solution and an ultimate toolkit to bypass the FRP lock.
Have you reset your Android device and got stuck in the FRP lock? Do you want to remove it and use your phone again? This issue is very common among Android users. They perform a factory reset without knowing they would get stuck in this security feature. But the question is, how do you bypass it and access your phone again? Well, this article is going to tell you all about it. We will explore various methods for FRP bypass Android 6 – 14. But before we jump to the methods, let’s understand what FRP lock is and what it does.
Part 1: What is FRP/Factory Reset Protection?
FRP/Factory Reset Protection is a new security feature introduced in Android devices. It helps prevent unauthorized users from accessing your device. This feature gets enabled by default when you register a Google account on your device.
Android users reset their devices for many reasons. But they don’t know they can get in trouble if they don’t remember their Google account credentials. So, when you turn on your device after a factory reset, the FRP lock will be shown on the screen. To unlock it, you must enter the Google account details linked to your device.
This lock keeps your data safe if your device gets lost or stolen. Nobody can access it unless they have your Google account credentials. However, it can be a trouble if you forget your Google account details. But don’t worry! There are ways for FRP bypass Android 6.
Part 2: Which Android Version does FRP Lock Apply to?
FRP Lock applies to Android devices running version 5.1 (Lollipop) and above. It is automatically turned on if your device runs Android 5.1 or later versions. Google added this feature to boost security and protect your personal data from unauthorized access.
The FRP Lock works the same way on Android 6 and even on the latest Android version 14. After a factory reset, it will ask for your Google account credentials. You could be locked out of your device if you can’t remember them.
If you are stuck in that situation, read the next part. We will explore how Android 7 FRP bypass can be done.
Part 3: How To Bypass Google FRP Lock On Any Android 6 – 14?
There are various ways to bypass Google FRP lock on Android 6 – 14. In this section, we will walk you through four of the common methods. Let’s start with the best one!
Method 1. Bypass Google FRP Lock Using Droidkit (Easy & Effective)
DroidKit is one of the most reliable and effective ways to do FRP bypass Android 6 – 14. This powerful tool supports 20,000+ Android phone models. The best part is that you don’t need to be a tech expert to use DroidKit. The user interface is so simple and easy that anyone, even beginners, can use it.
Apart from bypassing FRP lock, DroidKit also offers many other features:
- Support Samsung, Xiaomi, Redmi, POCO, OPPO, Motorola, Lenovo, VIVO, Realme, SONY and OnePlus
- Set up Android devices with new Google account
- Support screen unlocking, data management, data recovery, etc.
- Protected by SSL-256 encryption, 100% secure
Now you don’t need to visit mobile operators. You have the solution to every Android-related issue just a click away.
Free Download * 100% Clean & Safe
Let’s move forward and explore the steps of using DroidKit to bypass the FRP lock in Android phones.
Step 1:First, download and install the DroidKit software on your computer, launch it, and select “FRP Bypass” on the screen. Then click “Start” and proceed.
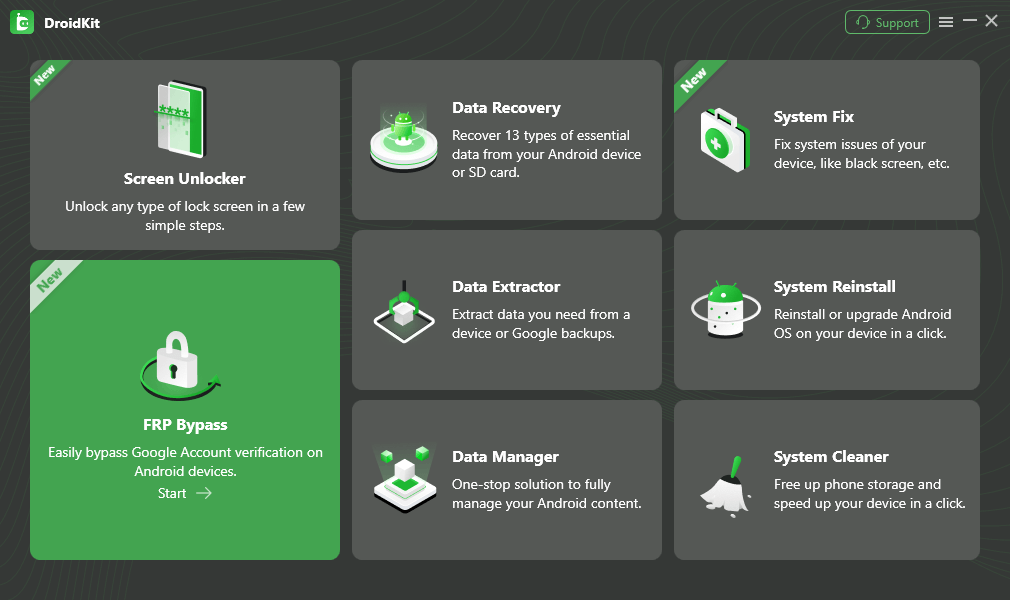
Choose FRP Bypass Mode
Step 2:Next, connect your Android device to your PC via a USB cable. DroidKit will start recognizing it. Once done, click the “Start” button and select your device brand.
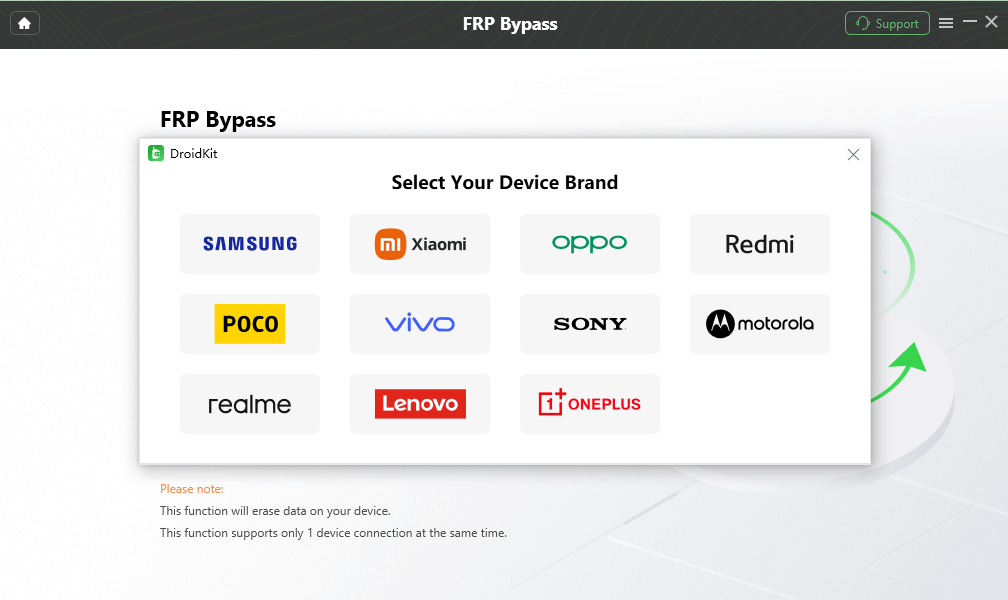
Choose Device Brand
Step 3:After selecting the device brand, DroidKit will start preparing the configuration file for your device. Once the process is completed, click “Start to Bypass” and proceed.
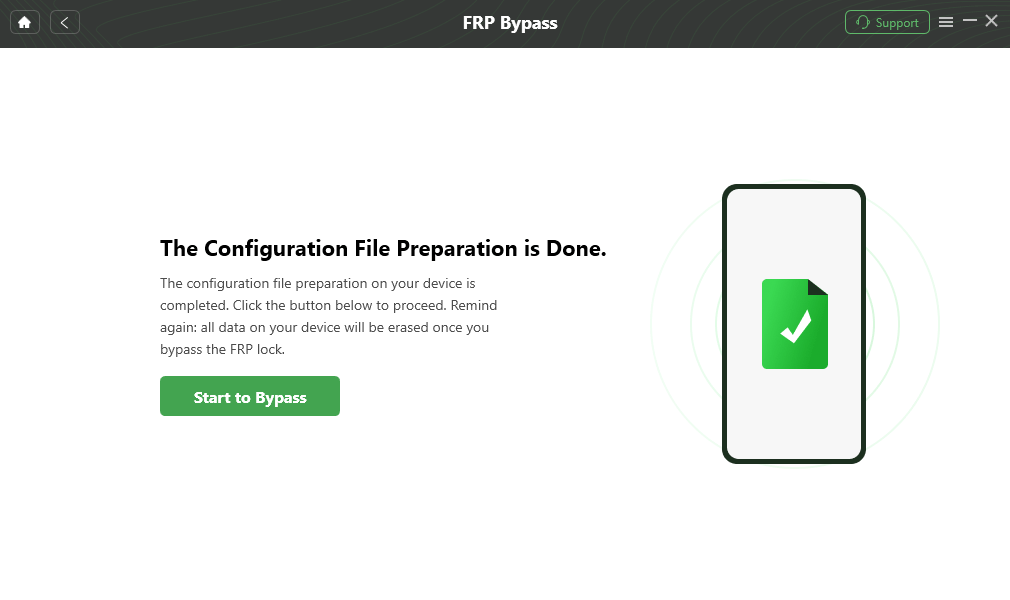
Click Start to Bypass
Step 4:Now select the system version of your Android device and click the “Next” button.
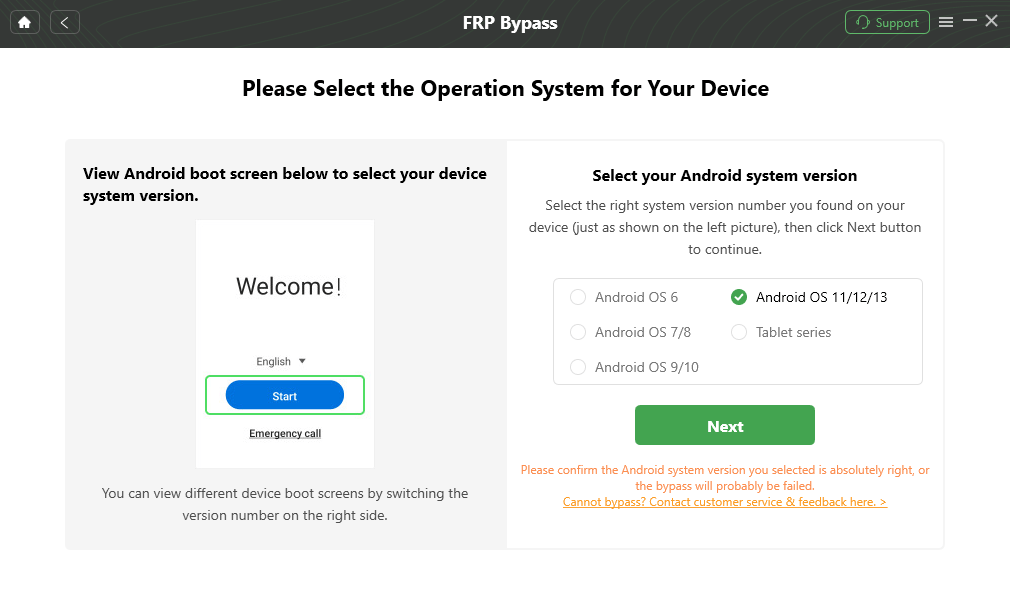
Choose System Version
The boot screen varies from the Android version. DroidKit provides five boot-screen views for reference.
Step 5:Go to the “Enter your current password” interface and follow the on-screen instructions to complete the settings. After entering the factory mode, click the “Reset” button.
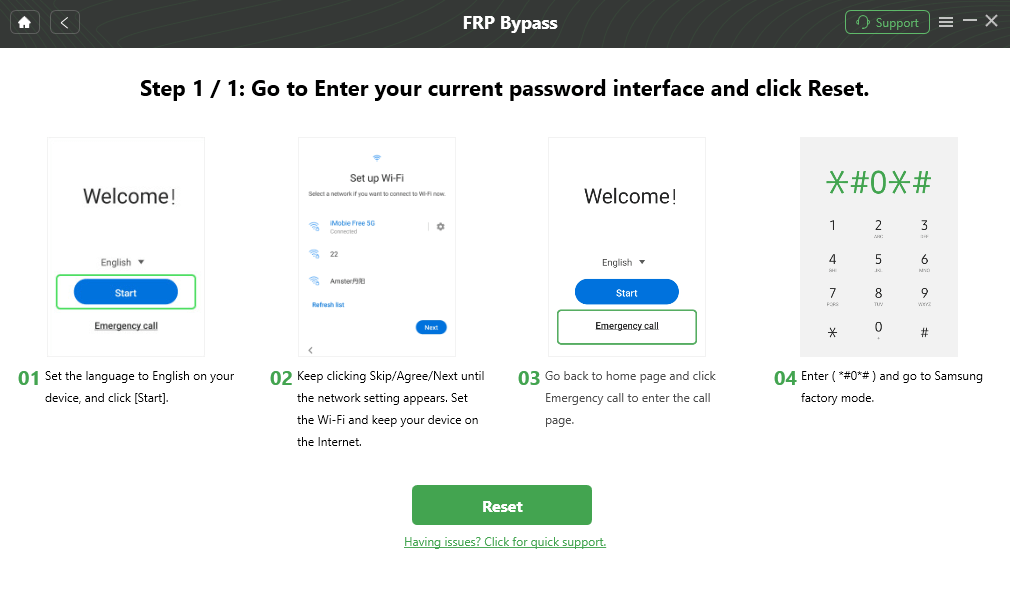
enter factory mode
Step 6:After clicking the reset button, DroidKit will start bypassing the FRP lock on your Android device. Once the process is completed, you will see the below interface.
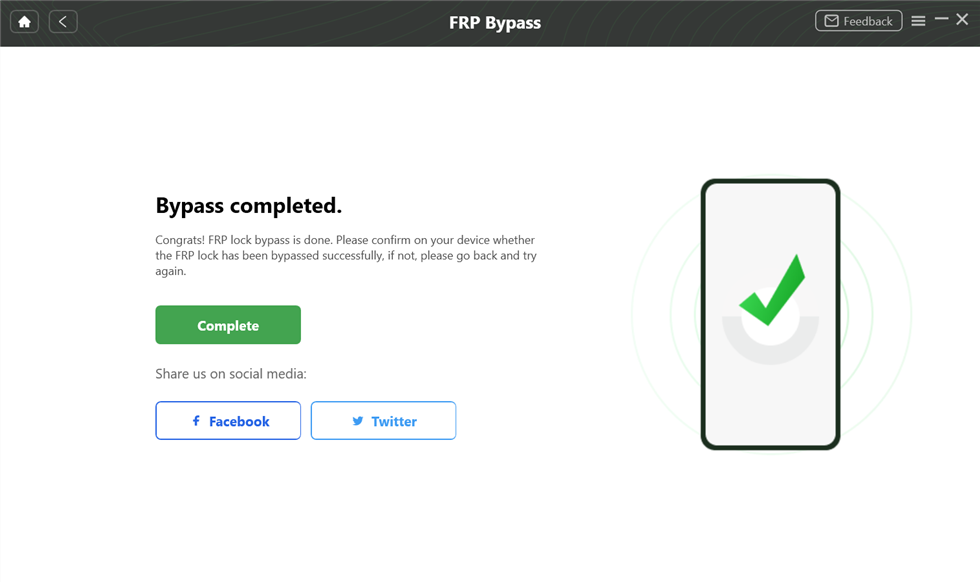
frp bypass android 6 – 14 completed
Did you see how easy it is to bypass the FRP lock using DroidKit? With just a few clicks, you can access your phone’s complete features and make it functional again. Let’s move forward and explore another method.
Method 2. Bypass Google FRP Lock Using Google Account Recovery Option
Platforms that require registration also offer an account recovery option. This option helps you recover your account in case you forget the email or password.
So, if you have access to your Google ID but forget the password, you can recover your account. However, this method is only helpful if you know the details of the backup account linked to it. Here is how you can use the Google account recovery option to do FRP bypass Android 6 – 14:
Step 1:Go to the FRP lock screen, where you are supposed to enter the Google account details.
Step 2:If you can’t remember your password or email, click the “Forgot Password” or “Forgot Email” option.
Step 3:Next, follow the on-screen instructions to recover your Google account. You may need to provide a recovery email or phone number linked to your account.
If you don’t remember the recovery email or cannot perform this method, you can try DroidKit or go for the next method.
Method 3. Bypass Google FRP Lock via Google Keyboard
Google keyboard is another way to perform FRP bypass Android 6 – 14. This method can work for almost all Android devices. However, it can be quite tricky and involve daunting steps. Plus, it is only effective if done correctly.
Here is how to bypass the FRP lock using the Google keyboard:
Step 1: Go to the help & feedback page
- Turn on your Android device.
- Follow the startup on-screen instructions and connect it to a WiFi network.
- At the FRP lock screen, click the text box, and the keyboard will appear on the screen.
- Tap and hold the “@” button, and wait until it takes you to the “Settings” menu of your Android device.
- Click “Google Keyboard Settings” and then on the three dots on the top right of the screen.
- Select “Help & Feedback” from the options to proceed.
Step 2: Enable the device developer mode
- On the screen, click “Using Google Keyboard.” Then, tap and hold any text on the page and open Websearch.
- Type “Settings” in the search bar to open the Settings menu.
- Scroll down and click “About Phone.”
- Find the Build Number of your Android device and tap 7 times on it to activate the Developer options.
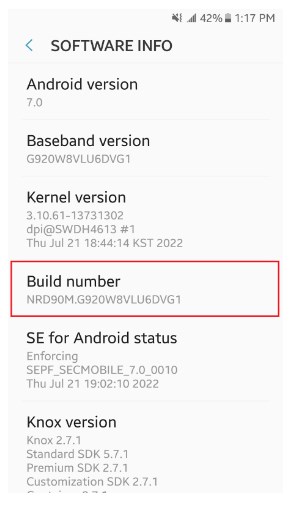
Tap the Build number 7 times
- After you activate the developer options, go back to the previous menu and open it.
Step 3: Enable OEM unlocking
- In the About phone menu, click “Developer options.”
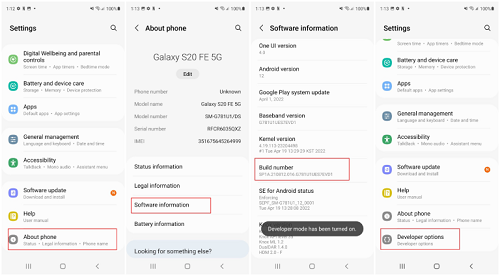
Click on Developer options
- Next, find the OEM unlocking option and enable the toggle.
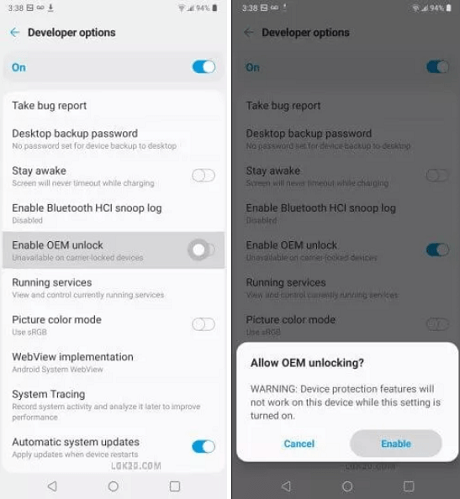
Enable OEM Unlocking
- Return to the main menu and press and hold the “Power” button to reboot your Android device.
- Once you restart your device, you will see “Add your account” instead of “Verify your account.”
However, if you find this method difficult to follow, you can try DroidKit or explore the next method.
Method 4. Bypass Google FRP Lock Using Odin
Odin is also a powerful tool for bypassing the FRP lock of Android devices. It flashes the firmware version of a device to do the job.
However, the downside of Odin is that it only works for Samsung devices. Although the process is quite tricky, it will remove the FRP lock. Before we jump into the process, make sure that your device has the following files:
- Latest Samsung USB drivers.
- Combination firmware for your relevant Android device.
- Odin Software
If you have these files, you can follow the instructions given below:
Step 1:Power off your Samsung device, then Press and hold the “Volume Down + Power” buttons together. After a few seconds, you will enter the download mode.
Step 2:Connect your Samsung device to your computer via a USB cable. Then, launch the Odin Software on your PC.
Step 3:In the Odin Software interface, select AP, CP, CSC, and the combination firmware file you downloaded earlier.
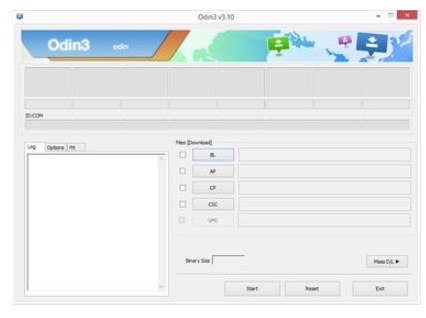
Selecting relevant files
Step 4:After selecting the files, click the “Start” button, and Odin will start the installation process. Wait until the process is complete.
Step 5:Now, your Samsung device will reboot into Factory Binary Mode. Here, go to “Settings” > “Security.” Find the “Reactivation Lock” option and disable it.
Step 6:Once you disable the Reactivation Lock, reboot your Samsung device. This time, the FRP lock will be removed, and the device will reboot normally.
However, this method may not work at times. Also, it is not suitable for the latest Android models and can be a risk if not performed correctly. So, go for DroidKit if you are using the Android model between 6 – 14.
Part 4: How to Prevent Being Locked by FRP in the Future?
To prevent getting stuck with FRP (Factory Reset Protection) in the future, follow these tips:
Keep Your Google Account Information Safe:
Remember your Google account username and password. Use a password manager to store them securely.
Update Your Account Information:
Regularly update your account recovery details, such as backup emails and phone numbers. This helps if you lose access to your account.
Use a Backup Google Account:
Add a secondary Google account to your device. This can be useful if you have trouble with your primary account.
Disable FRP Before Selling your Device:
If you plan to sell or give away your phone, remove your Google account from the device and perform a factory reset.
Keep Your Device Updated:
Ensure your device’s software is up-to-date. Updates can improve security and prevent potential issues.
FRP Bypass Android 6 Faqs
Q. Can DroidKit bypass FRP lock on all Android versions?
Yes almost! DroidKit supports FRP bypass Android 6 – 14.
Q. What is Samsung FRP unlock?
It is a process to bypass the Factory Reset Protection lock specifically on Samsung devices. FRP is a security feature that requires Google account credentials after a factory reset. Unlocking it involves using tools or methods to remove this restriction if you forget your account details.
Q. What is the Google FRP code?
There is no specific “Google FRP code.” The FRP feature does not use a code but requires you to sign in with the Google account that was previously linked to the device.
Conclusion
Wrapping it up! This article explores how to unlock the Google FRP lock on Android phones from version 6 to 14. We’ve highlighted three methods: DroidKit, Google account recovery option, Google Keyboard, and Odin. Each method has its own steps; FRP bypass Android 6 – 14 can be straightforward with the right tools.
Among these methods, DroidKit is the simplest and most effective. It is easy to use and works well across different Android versions. If you need a quick and reliable way to bypass Google FRP, try DroidKit today to regain access in just seconds.
Free Download * 100% Clean & Safe

Senior writer of the iMobie team as well as an Apple fan, love to help more users solve various types of iOS & Android-related issues.
Product-related questions? Contact Our Support Team to Get Quick Solution >
