How to Fix the Unfortunately Settings Has Stopped Error on Android Phones
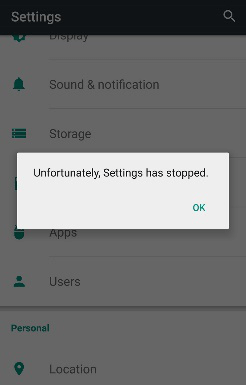
Have you ever received a pop-up window on your Android phone, indicating ‘Unfortunately, Settings has stopped’? Although it is not easy to figure out the causes behind the issue, you can easily address it by yourself. Take a few minutes to read this post and learn how to get rid of it with ease.
Common Android Issues & Fixes
Network Issues & Fixes
Communications Issues & Fixes
Connection Issues & Fixes
Hardware Issues & Fixes
It is not uncommon for Android users to run into difficulties with the Settings app regardless of the model of the Android phone they are using. The ‘Unfortunately Settings has stopped’ error can pop up on your screen for a number of reasons that are usually related to the overloaded RAM or update compatibility issues.
Although finding the cause of the problem can be difficult, resolving the issue is usually not a time-consuming task. However, if you were experimenting with different custom ROMs the solution to this error may require you to update to a more stable ROM version.
Let’s take a look at how you can fix the ‘Unfortunately Settings Has Stopped’ error on an Android phone.

Unfortunately Settings Has Stopped
The first thing you should do when the ‘Unfortunately Settings Has Stopped’ appears on your screen is to restart the device. In some cases, this can be enough to fix the problem and enable you to continue using your smartphone normally.
In case the issue persists after you restarted your phone, you should try one of these 5 methods.
Clear the RAM
Having too many apps running in the background will clog the phone’s RAM, and cause it to malfunction. In case, your device has a memory usage widget you can use it to check if its RAM is overloaded.
Closing all apps will also help clear up the smartphone’s RAM, and you should also keep in mind that live wallpapers and animations can slow your phone down.
The process of clearing the RAM varies from one Android device to another, so for instance, if you are using a Samsung Galaxy Note 3 you can clear RAM by holding the Home button until you gain access to the Recent Apps window.
You should then locate the Task Manager, open the RAM tab, and tap on the Clear RAM option. Make sure to check the exact steps of clearing the RAM for the Android model you have before taking any further steps.
Delete Data and Cache
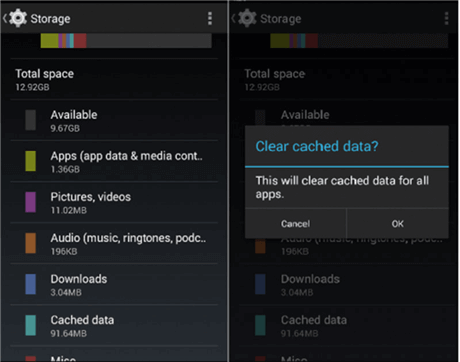
Most Android devices enable their users to clear cache and data in two different ways. You can either perform this task from the Storage or Apps & Notification menus that are located in the Settings app.

Delete Data and Cache
Accessing the Storage menu and then opening the Internal Storage window will enable you to delete all cached files on your device. On the other hand, the Apps & Notification window enables you to choose the apps from which you want to delete data and cache.
It is also worth pointing out that clearing the cache of the Google Play Services app may fix the ‘Unfortunately Settings Has Stopped’ error. You should restart your Android phone after clearing the data and cache from all the apps that could potentially be the reason why the error occurred in order to ensure that the unwanted files are removed.
Check If the Google Play App Is Working
In case clearing the data and cache of the Google Play Services app didn’t produce the results you were expecting you should try uninstalling the updates for this app.
Step 1. Head over to the Apps & Notification menu that is located in the Settings app and find the Google Play app. After you tap on the app you will access the same window you accessed while clearing the app’s data and cache.
Step 2. You will see a three-dot icon in the upper left corner of this window, tap on the icon, and then tap on the Uninstall Update option.
When done, you should restart your phone and check if the ‘Unfortunately Settings Has Stopped’ is still popping up. If uninstalling the app’s updates didn’t fix the issue you should try installing them again.
Step 3. Open the Google Play Services app and tap on the hamburger icon in the upper left corner. Scroll down to the bottom of the menu and tap on the Play Store or Build version option and the app will inform you if there are any available updates. Simply follow on-screen instructions to update the Google Play Services app and restart the device after the update to check if the problem was resolved.
Run the Phone in Safe Mode
Third-party apps that are installed on your Android phone can be the reason why the ‘Unfortunately Settings Has Stopped’ keeps showing up. Accessing the device’s Safe Mode will enable you to determine if the issue was caused by an app you installed on your phone since this mode disables all third-party apps.

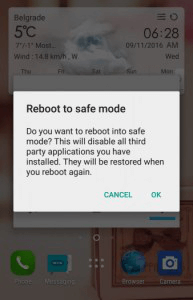
Run the Phone in Safe Mode
Step 1. To gain access to the Safe Mode you should press and hold the phone’s Power button until the Power Off, Restart and Screenshot options are displayed on the screen. You should then tap and hold the Power Off icon and wait until the ‘Reboot to Safe Mode’ prompt pops up on the screen. Tap OK and the device will start in Safe Mode.
While in the Safe Mode you should check if the ‘Unfortunately Settings Has Stopped’ issue occurs. In case your device runs normally, it is likely that a third-party app you installed is causing the problem. Simply uninstall that app to fix the problem.
Reset the Device to Factory Settings
If you fail to solve the issue with other methods we described, then you should reset your Android phone to factory settings. Create a backup of all data beforehand because the reset is going to permanently delete all files and app settings.

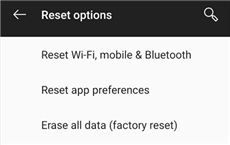
Reset the Android Device to Factory Settings
The exact steps of resetting an Android phone to factory settings depend on the model. However, on most devices, you can perform this task by launching the Settings app and heading over to the Backup & Reset menu.
You should then choose the Factory Reset option from the menu and follow the on-screen instructions to complete the process. The ‘Unfortunately Settings Has Stopped’ error should be fixed after the reset.
The Bottom Line
Low memory and software compatibility issues are the most common reasons why the ‘Unfortunately Settings Has Stopped’ error occurs. Fortunately, fixing this problem doesn’t take a lot of time, as you just have to make sure that the device has enough RAM or empty its cache.
In addition, check if the Google Play Services app is functioning properly may help you fix this issue. We hope that this article has helped you get rid of the ‘Unfortunately Settings Has Stopped’ problem. Leave a comment and share your experiences with us.
Product-related questions? Contact Our Support Team to Get Quick Solution >

