How to Transfer Photos from Motorola Phone to Computer
Do you find it difficult transferring photos from your Motorola phone to a computer? Say no more now that you are on this page. This post will walk you through the 7 stress-free ways to transfer photos from Motorola to any computer operating system without diminishing the quality.
Joy Taylor | Last Updated: Aug. 13, 2024
1870 words|6minute
Whether you want to view your photos on a larger screen, manage storage consumed by photos, or need a safe place to keep your images for future reference in case you are selling your device, then transferring them to a computer is the best thing to do. There are multiple techniques you could apply to get this done. While some require wired connection, others don’t. In this post, we will describe the 7 easy ways to transfer photos from Motorola to a computer. Stick around and continue reading!
How to Transfer Photos from Motorola to PC with DroidKit
To start with, we recommend using a professional data transfer software to move your photos from your Motorola phone to a computer. Having sourced the internet for the best software for this operation, DroidKit is the most preferred choice. With this software, you can migrate several gigabytes of photos from your Android phone to your PC/Mac conveniently.
This software boasts of the highest photo transfer rate as it guarantees the safe transfer of your photos to your computer with zero quality loss. DroidKit also handles other types of data transfer. It allows you to move data such as calendar, contacts, messages, videos, and many more. Users of all levels are welcomed to use this software. Thanks to the simplified interface that allows you to move your data between both devices without any technical skill.
DroidKit – Transfer Android Files to PC in 1 click
- Instant transfer of over 100 GB of photo files from your Motorola phone to your PC.
- Support to move over 13+ Motorola files, including photos, videos, music, and several others.
- Only need to click buttons. No root requirement. As simple as possible.
- Android 6-13 is supported.
Free Download 100% Clean & Safe
Step 1. Free download DroidKit on your computer > Click on Data Manager.
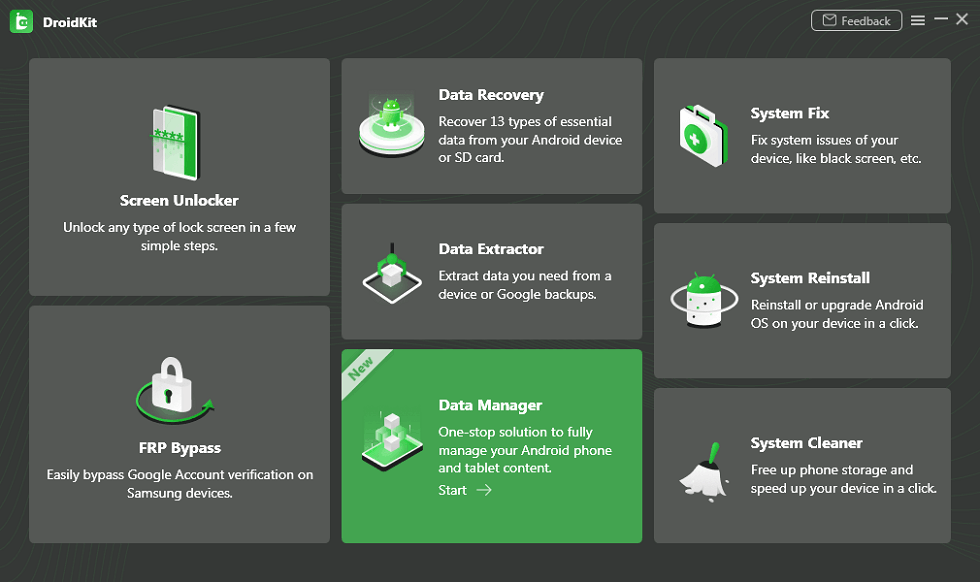
Choose Data Manager
Step 2. Connect your Android phone to the computer via a USB cable > Choose any data category you’d like to transfer.
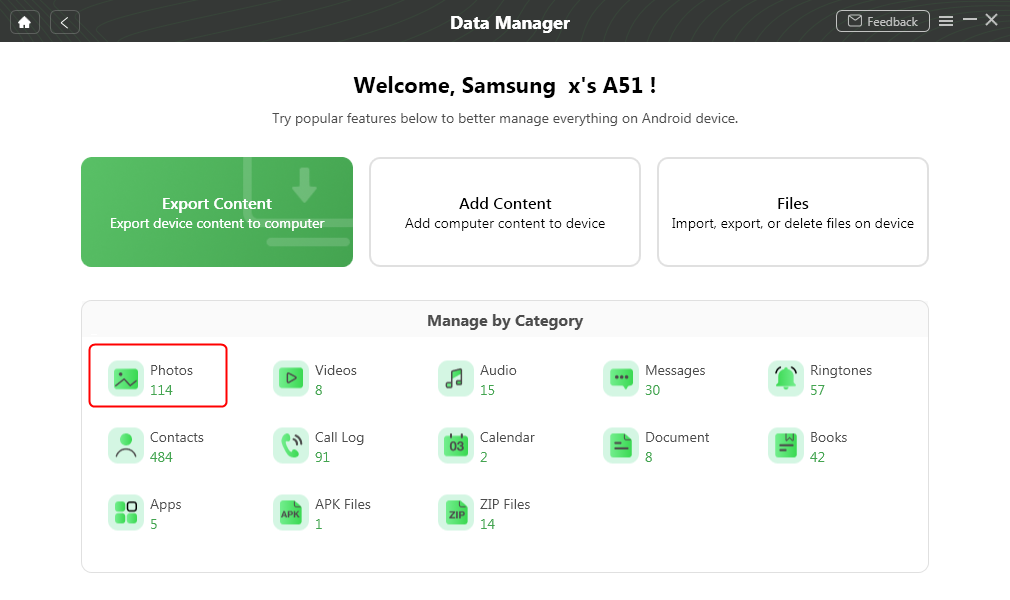
Select Photos to Manage
Step 3. Select the photos you want to transfer and select all photos at once > Click on the To PC button on the top right corner to transfer photos from your Android phone to your computer now.
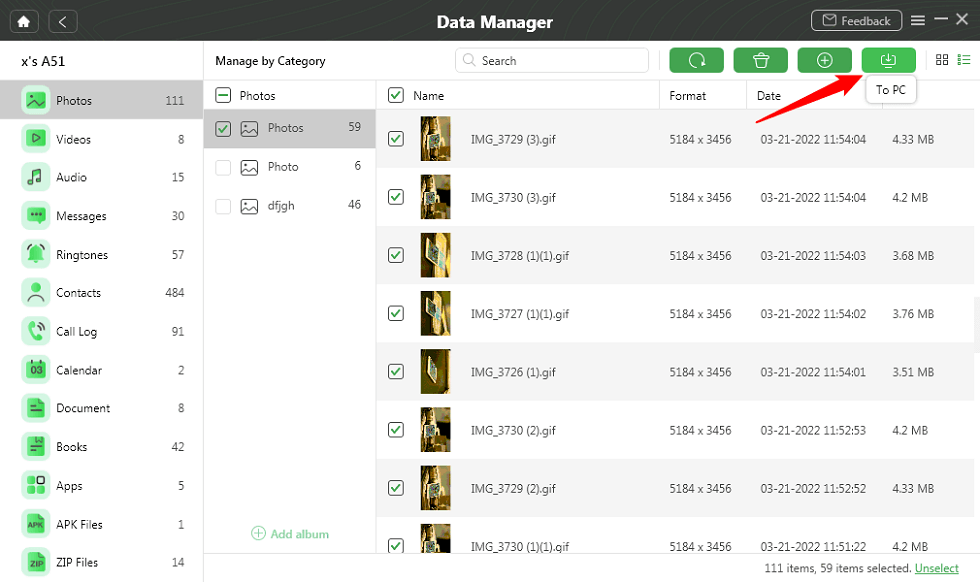
Transfer Photos to PC
How to Transfer Photos from Motorola to Computer via USB
For folks who don’t want to install a third-party software to transfer photos from their Motorola phone to a computer, you can leverage the pre-installed file transfer option on your PC to complete the data migration. However, you must have a certified USB cable to establish a connection between both devices. Once that’s ready, then you can follow these steps to transfer photos from your Motorola phone to your computer:
Step 1: Firstly, you have to establish a connection between your Motorola phone and the computer. To do that, plug the USB cable to the required ports.
Step 2: Unlock your Motorola phone, then swipe down and hit the notification icon to make adjustments to how the USB connection would work. On the subsequent screen, select MTP so your device can transfer data to the computer.
Step 3: Next, head to the lower left corner of your computer screen and enter This Computer in the search bar. Navigate to the left sidebar, and select your Motorola device from the options displayed. On the subsequent interface, click on Internal Storage > DCIM.
Step 4: Select your desired photos from the images displayed. Once done, right click and select Copy. Afterwards, create a folder on your computer. Launch the folder, right-click on anywhere and select Paste from the options displayed to import the images.
Limitations
- Transfer of large sized data can take several hours or days before completion.
- Data quality isn’t guaranteed when using this approach to move your photos from Motorola to a computer.
Copy Photos from Motorola to Computer Using Motorola Phone Tools
Motorola Phone Tools is a program loaded with handy features that you can choose from to customize your Motorola device. This program supports operations such as data restoration and backup, photo editor, video editor and more. You can also use it for photo transfer as it allows you to migrate data from your internal storage to a computer (Windows to be precise) without hassles.
Using the Motorola Phone Tools for your photo transfer isn’t difficult. Just follow the steps down here:
Step 1: Install Motorola Phone Tools via the official website. Alternatively, you can extract the program from a CD and install it on your computer.
Step 2: Grab the Motorola phone and connect it to your computer with the help of a USB cable or better yet a Bluetooth. Having done that, select Transfer Files on the left sidebar, then choose Pictures from options underneath the drop-down menu.
Step 3: Choose a folder where you want to paste the selected photos, and click Transfer to Computer to move them there.
Move Photos from Moto G to PC via Bluetooth
Bluetooth is a well-known technology integrated into all mobile phones and computers to help establish a wireless connection between devices to exchange data such as documents, music, and more. It’s also pretty cool to share photos from your Motorola phone to a computer.
To send your favorite photos from your Motorola phone to a computer, follow these steps:
- Launch the Settings panel on your Motorola phone by tapping on the cogwheel icon.
- Select Bluetooth and toggle the corresponding icon to enable it. Kindly ensure the Bluetooth is visible for pairing.
- Next, head to the lower left corner of your computer screen and enter Bluetooth in the quick taskbar.
- Click on the corresponding icon and turn on Bluetooth.
- Afterwards, pair your phone to your computer and enter the pairing code if required.
- Now, grab your Motorola phone, head to Gallery, and select the images to export to your computer.
- Once done, click on the Share icon and select Bluetooth as your preferred mode of sharing the images.
- Lastly, a prompt will come up on your computer showing that a file is coming. Accept the file transfer and Bluetooth will move the images to your computer straight away.
Limitations
- Very slow picture transfer process.
- Both the mobile phone and computer must be in proximity to avoid disconnection while transferring your photos.
How to Download Photos from Moto to Computer with Google Drive
Google Drive is also useful for the successful migration of your photo files from your Motorola Phone to a computer. This is possible because Google Drive is a universal storage media that lets you export your valuable data off your internal storage and then import on another device at your convenience.
To use this approach, you must fulfil the following prerequisites:
- Make sure you have a Google Account.
- Ensure you are connected to a stable internet network.
Once you’ve satisfied the conditions above, here is the guide to follow to transfer photos from your Motorola Phone to a computer:
Step 1: Launch the latest version of Google Drive on your Motorola phone and sign in your Google Account. Tap on the + at the lower right corner.
Step 2: Select Update > Photos/Videos, choose the images you want to move to your computer and click on UPLOAD.
Step 3: Now, launch Google Drive on your computer and log into your profile.
Step 4: Select the images you will like to send to your computer, then click on the Download icon at the top of your screen. Wait patiently for the images to finish transferring to your computer.
How to Transfer Photos from Motorola Phone to Chromebook
Although moving your photos from your Motorola phone to a Chromebook computer also follows the same approach as above, there’s another unique method you can employ to get this done. You just have to ensure you have the same Google Account logged in on your Motorola phone and Chromebook computer.
To do this, check the stepwise guide down here:
Step 1: Proceed to the lower right corner of your screen and click on the Time icon. Tag on the cogwheel icon and select Connected Devices on the left sidebar of the subsequent interface.
Step 2: Navigate to the right-hand side and click on Setup beside the Android phone icon. Follow the onscreen guide to complete the set up.
Afterward, Chromebook will display the Android devices that are connected to your Google Account. Select your Motorola phone and move to the next step.
Step 3: Click on the icon beside Recent Photos to proceed further. Once done, navigate to Settings on your phone and select Google from the options displayed.
Step 4: Next, click on Devices and sharing and choose Chromebook on the subsequent interface.
Now, toggle the slider next to Photos and Media icon.
How to Transfer Photos from Motorola Phone to Flash Drive
Transferring your photos from your Motorola phone to a flash drive is no big deal. There are several ways to go about this, but this post will focus on the OTG adaptor approach.
Follow these steps to transfer photos from your Motorola phone to a flash drive:
- Grab your phone and unlock it if you have screen lock activated on it.
- Connect the flash drive to the phone. To do this, ensure the flash drive to the large side of the OTG adaptor and the opposite end to your Motorola phone. Here is a pictorial representation of this statement.
- Next, you will receive a notification that an external device has been connected to your phone. Click on the notification and select Transfer Files.
- Head to the File Manager panel on your phone and select Internal Storage from the options displayed.
- Locate the DCIM folder, click on it and select the images you want to transfer.
- Click on the three dots at the upper right corner of your screen and hit the Copy icon.
- Now, launch the flash drive on panel and paste the copied images.
Final Words
Transferring photos from your Motorola phone to a computer just got easier now that you have this comprehensive guide at your disposal. Here, we’ve outlined the 7 ways to move photos from Motorola to a computer. Choose and apply the one that’s easiest for you. However, our most preferred solution is DroidKit. The software ensures the successful migration of data from your Motorola phone to a computer without compromising the quality. You should install and try it out now.
Joy Taylor
Senior writer of the iMobie team as well as an Apple fan, love to help more users solve various types of iOS & Android-related issues.
 Screenify
 AnyEnhancer
 FocuSee
 Vozard
 AnyMiro
 AnyMirror