3 Ways to Transfer Photos from Android to Windows 10
Transferring photos from Android to Windows 10 is not difficult. However, most of people only know one way to do it. In this article, we have listed 3 methods to help you solve this issue. Please keep reading and learn more on it.
As the most popular operating system in the world, Windows possesses a huge number of users. As a result, there must be a great number of people who are both Windows computer and Android users. Here in this guide, we will focus on how to transfer photos from Android to Windows 10. We have listed several options, you could choose any one of them according to your needs.
Transfer Photos from Android to Windows 10 via AnyDroid
The first method we’d like to recommend is AnyDroid. This software is developed for Android users to better manage their phones. No matter users need to transfer, sync, or edit files on their mobile phones, AnyDroid could always be a good helper. Here are the reasons why we choose AnyDroid.
- Easy Operation. Users could transfer photos as well as other files from Android to PC within one click. The whole process is as easy as winking.
- Fast Transferring Speed. One issue that troubled users most is that when transferring thousands of photos it takes too many times to finish the transferring process. However, AnyDroid supports users to transfer more than 500 photos in one minute, you don’t need to worry about spending too much time again.
- Safe and Secure. All data and files you have transferred through AnyDroid are 100% safe. You don’t need to worry about data missing or information leakage using AnyDroid.
Now please download AnyDroid now, and follow the step-by-step guide below to see how to transfer photos from Android to Windows 10 via AnyDroid.
Step 1. Run AnyDroid on your Windows 10 computer. Connect your Android phone to it. You can connect your mobile phone to computer both via USB cable and Wi-Fi.
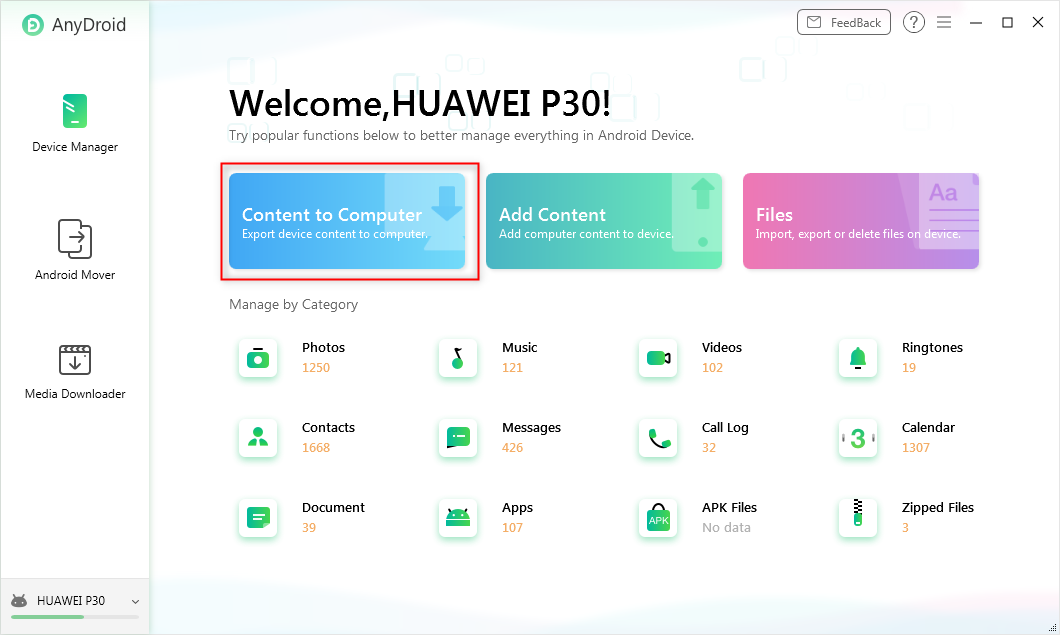
Step 2. When AnyDroid has detected your Android, click Content to Computer button.

AnyDroid Export Content
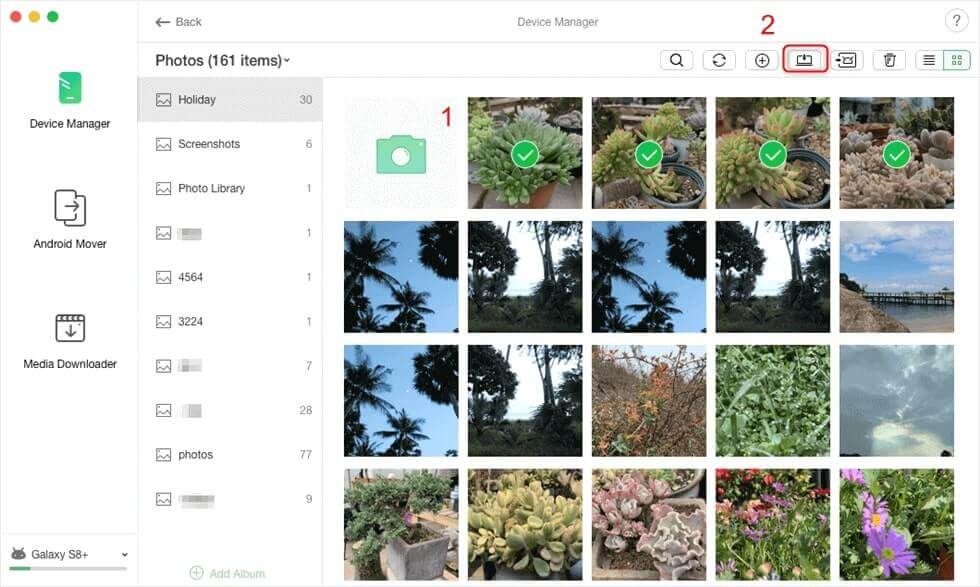
Step 3. Select Photos you want to transfer, then click To PC button. You could also select the export path according to your needs.

Select Photos to Transfer to PC
Step 4. Waiting for the transferring process to finish. The time it spends is based on the size of your content.
Transfer Photos from Android to Windows 10 via Photos
Photos is a photo managing app for Windows users. Both Windows 8 and Windows 10 users can take this app to transfer photos and videos from Android to PC. But this app only supports transferring camera roll photos from Android to Windows 10. If you want to transfer all photos, please refer to Part 1.
Step 1. Connect your Android phone to PC with a USB cable, make sure your Android is on and unlocked.
Step 2. Click the Start button and choose Photos.
Step 3. Select Import > From a USB device, then follow the instructions. You can pick the items you want to import and select where to save them.
Transfer Photos from Android to Windows 10 via File Explorer
This is the most common method for Android users to transfer photos to Windows 10. But you need to open different albums to find what you want.
Step 1. Connect your Android to Windows 10 computer, remember to put your phone in MTP mode.
Step 2. Open File Explorer on your computer, find your Android and find internal storage or SD card, then open it.
Step 3. Choose DCIM folder, open Camera. Here you could see all your photo albums, find the photos you want to transfer from these albums. Copy and paste these pictures to your Windows 10.
The Bottom Line
That’s all about how to transfer Android photos to Windows 10. Hope you could solve your problem after reading this article. Besides these three methods we introduced in this post, there are still lots of available options for users, if you have any other advice, please share with us in the comment.

Joy Taylor


Member of iMobie team as well as an Apple fan, love to help more users solve various types of iOS & Android related issues.
Screenify
AnyEnhancer
FocuSee
Vozard
AnyMiro
AnyMirror


