The Most Annoying iTunes 12 Sync Issues You’ll Meet and Solutions
If you meet iTunes sync problems after updating to iOS 12/12.0.1, you can follow this tutorial and have a try to fix your problem.
Common iTunes Issues
iTunes Sync issue
iTunes Connect Problem
iTunes Backup and Restore
iTunes Music issue
If you meet iTunes sync problems after updating to iOS 12/12.0.1, you can also follow this tutorial and have a try to fix your problem. And we also provide you with some common iOS 12 update problems and related solutions, which may be helpful if you plan to install iOS 12 on your iPhone, iPad or iPod touch.
Although it has been a long time since the official release of iTunes 12, there is still a variety of iTunes 12 sync issues encountered by Apple users, such as can’t find the sidebar, “Other” increased after syncing files with iTunes 12, the device cannot be detected by iTunes 12, Apps won’t update when tap Update in the App Store, etc. If you still have problems with iTunes 12, maybe you can get the solution here!
To smoothly solve the iTunes 12 sync issues, we have summarized the most commonly encountered iTunes 12 problems you may meet. Plus, we have also offered the corresponding solution for each issue. Now, just follow this post to fix the related problem with ease.
Question 1. How to Bring Back the Sidebar in iTunes12
Compared with iTunes 11, the biggest difference noticed by an iOS user would be the missing sidebar, which enables users to view and manage the playlists, music, devices, and other contents in the iTunes library. To bring back the sidebar in iTunes 12, here will give you a solution to get a more familiar look on iTunes 12.
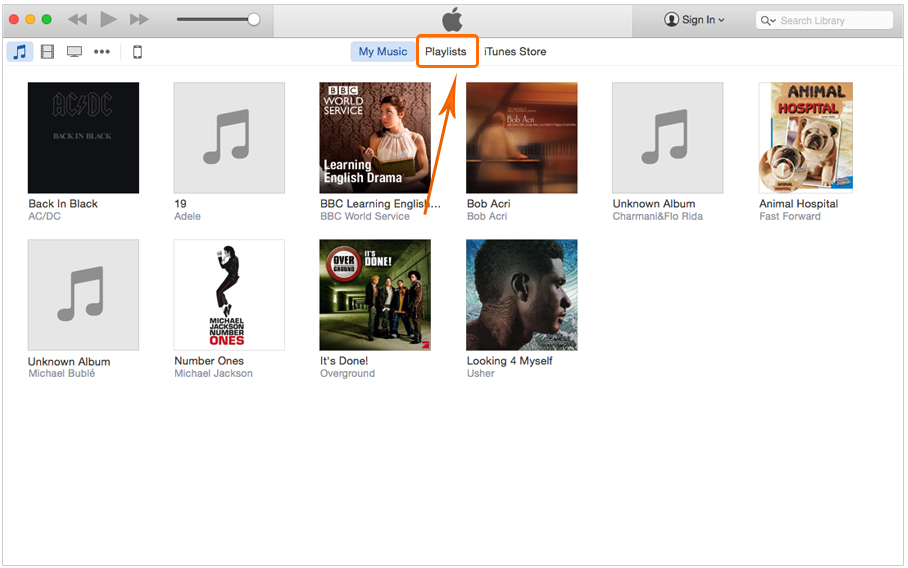
Get the Sidebar in iTunes 12
Solution:
- Open iTunes 12 on your Mac/PC.
- Select a media kind, like music, movie, TV shows, etc.
- Switch to the Playlist button in the navigation bar at the top of the window on the iTunes 12 interface.
Note:
- Apps, Tones, and Internet Radio have no playlist button.
- If you left the Playlist view, the sidebar will disappear from iTunes again. So, switch to Playlists view when necessary.
Question 2. How to Fix Music Syncing Issues with iTunes and iOS 8
“I was so happy when I no longer had to sync my device with iTunes because it has NEVER worked well for someone with an iPhone and a Windows PC.”
Since the release of iOS 8 and iTunes 12, a large number of users have encountered a problem when syncing music with iTunes. There is no music ever getting transferred even after several time attempts. You can figure it out with the potential solutions as follows:

Fix Music Sync Issue with iTunes12 and iOS 8
- Make sure that you don’t have iTunes Match enabled in Settings > Music.
- Plugin your iPhone, iPad, or iPod running iOS 8 or higher and launch iTunes.
- Click your device icon at the top of the iTunes window.
- Select Music in the side navigation panel.
- Uncheck Sync Music option in the right panel and then click Apply or Sync.
- Once the sync is complete, recheck the box for Sync Music and hit Apply or Sync again.
- Unplug your iPhone or iPad and see if your music is back.
Question 3. iTunes Gets Stuck on the “Waiting for items to copy”
Syncing music is one of the frequently-used features for iTunes users. However, since the launch of iTunes 12, it is difficult to sync items without troubles. One common problem is that iTunes gets stuck on the “Waiting for items to copy” or “Waiting for changes to be made” step and this can take hours. There are several causes of this issue. iMobie has collected some methods in order to fix this headache for you. Follow the detail instruction below:
Solution 1:
In some cases, the duplicate purchased or bad items file can cause problems. If you know which file that is, you can remove it and potentially get the sync to work. Please refer to question 8 for the detailed steps.
Solution 2:
Restoring the device is one of the solutions to this issue. To do this, please make sure you have backed up your device to avoid losing import files or data.
Click the device icon in the iTunes navigation bar > then click Summary > Click Back Up Now option in the right panel > after complete the backup > click Restore iPhone (or iPad, or iPod).
This can take a long time if you have one of those new-fangled 128 GB iPhone and want to put lots of music and videos on it.
Solution 3:
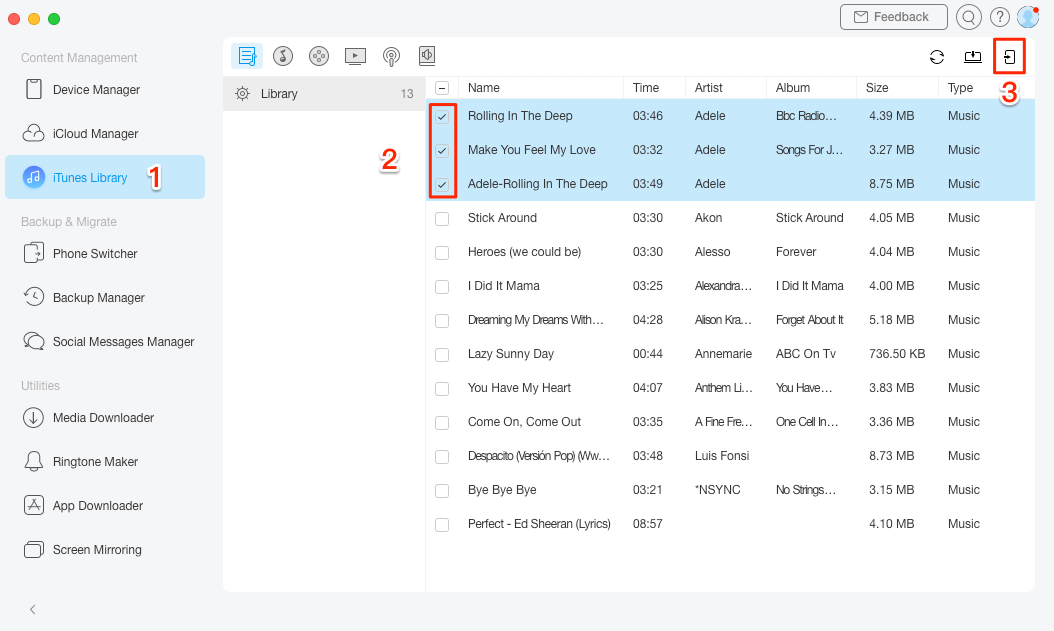
Transfer Videos from iTunes to iPhone with AnyTrans
When it comes to syncing music from iTunes to iPhone, iTunes is always complicated and time-consuming. If the two methods mentioned above don’t deal with the problem, fortunately, some iOS contents transfer tools like iMobie AnyTrans make it possible. It provides you with a pretty simply way to transfer & manage iPhone/iPad/iPod music and playlist.
Far more than an iPhone music transfer tool, AnyTrans introduce an effective method to transfer almost every iOS content between any iOS device or any PC/Mac in three-ways (device-to device, device to computer, computer to device). Here we list some posts to help you manage iPhone music/photos/contacts leisurely.
Question 4. How to Copy Playlists to iPhone, iPad or iPod with iTunes 12
“I am a huge Apple fan, BUT what in the world were they thinking with the latest iTunes 12 update? I am computer literate but why have they made it so hard to see your music, devices, and playlists at the same time like in the previous versions? It has taken me over 2 hours to update a playlist.”
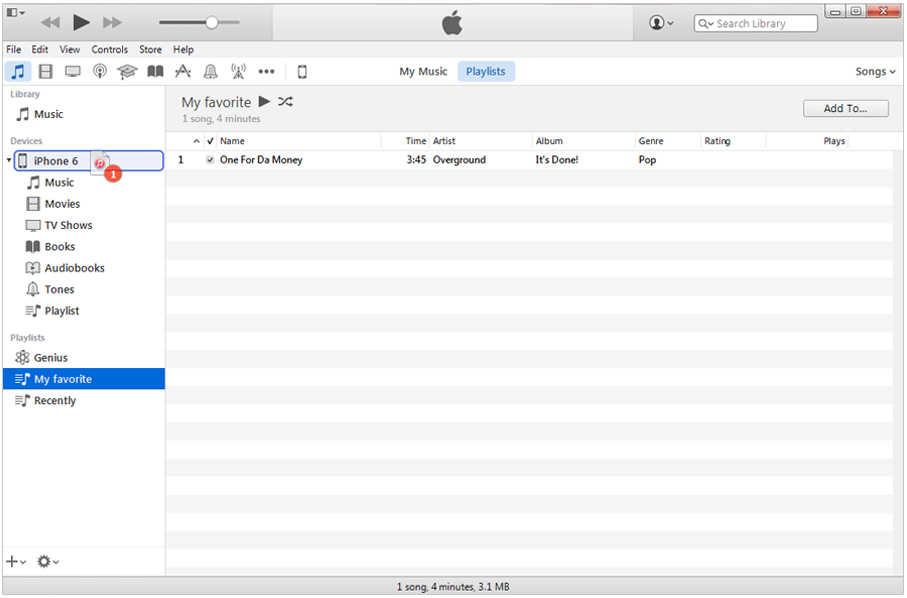
Copy Playlist to iPhone/iPad/iPod with iTunes 12
Solution 1:
- Connect your device to the computer and launch iTunes.
- Select your device icon at the top of iTunes windows.
- Select the Music option on the left pane.
- Ensure the Sync Music check-box is selected on the right pane.
- In the Playlists section, check the playlists you wish to sync with your iOS device.
- Select Sync or Apply and your playlist should sync.
Solution 2:
- Connect your device to the computer and launch iTunes.
- Ensure the Sync Music check-box is selected under device icon.
- Choose the music icon located at the upper-left portion of the iTunes window, then choose the Playlists tab at the top center portion of the screen.
- In the left pane, select the playlist(s) you wish to sync.
- Drag them to your device listed in the “Devices” section. They will then sync to your device.
Question 5. Cannot Sync Album Art to iOS Device Correctly
Some iOS users have experienced that album art doesn’t sync to iOS devices, or that certain songs or albums display the incorrect artwork. There are two quick tips to solve this problem.
Solution 1:
- Connect the iOS device to iTunes > select device icon in iTunes > choose Music in the left pane > uncheck Sync Music option in the right pane > click the Apply or Sync button in the lower right corner
- Go back to enable the Sync Music option > click Apply or Sync again
Solution 2:
There is another issue where album art won’t sync if the artwork is larger than 10MB. So if you’re having problems with iOS devices not displaying album art for specific tracks or albums, follow the tip below:
- Select one of tracks in iTunes and right click it > choose Get Info from the drop down menu
- The info window will show you the file size and the pixel size of the artwork. If the artwork is larger than 10M, try making the size smaller.
Question 6. How to Edit Album Art
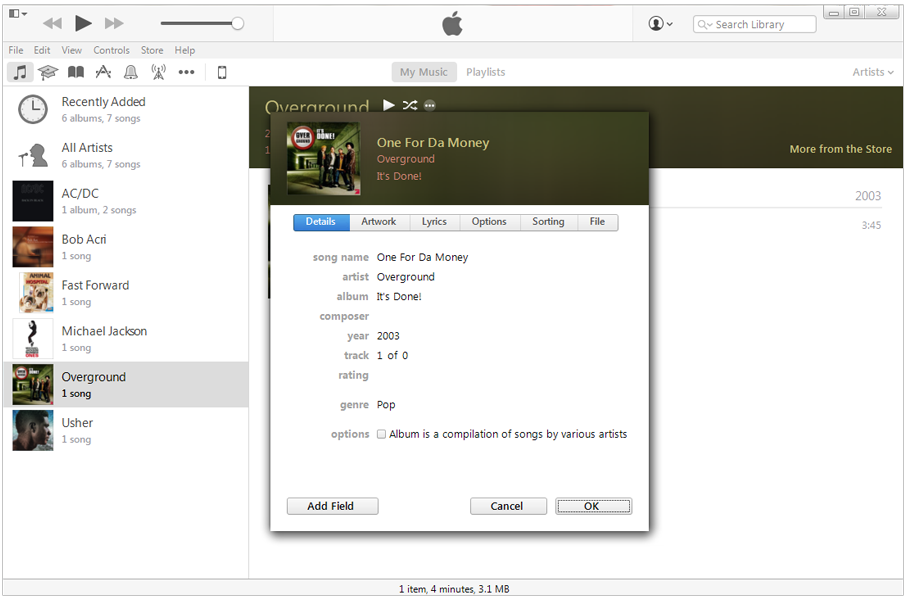
How to Edit Album Art
iTunes 12 has changed the Info window. You may feel a little confused about how to edit album art with the new designed iTunes. Here is the easy and quick way to achieve it.
Solution:
Right click the album artwork and click Get Info option > on the artwork tab, tap the image, use Backspace or Ctrl + X > Or tab the image at the top left of Get info, use Backspace or Delete > Replace the album art as you want.
Question 7. How to Drag & Drop Music to the Device with iTunes 12
“Why can’t I drag and drop content I own to the device I own with iTunes 12?” Drag & Drop option definitely brings much convenience for iOS users. However, this option is not intuitive in iTunes 12. If you feel dizzy about this option as well, here is the solution for you.
Solution:
- Open iTunes and connect your device > click Playlists tab to change to the Playlists view.
- You can see Devices listed on the left sidebar > drag and drop media into the destination device.
Question 8. How to Delete Duplicated Songs in iTunes
The duplicate contents make your iTunes in a mess. Even worse, it will prevent you from syncing. If you’re looking for solution to fix it, you come to the right place. Follow the steps below to solve this issue.
Solution 1:
If you subscribe to iTunes Match, there is a chance that you have experienced an issue with duplicate content on your iPhone/iPad/iPod. The reason is that iTunes Match doesn’t simply replace music already on your iDevice but instead adds music to your device. There is an easy way to remedy this situation.
- Turn iTunes Match off on your device.
- Delete all of the music on your Device (This will remove all stored music on your iOS device).
- Go back to turn iTunes Match on. Now, all duplicate songs will be gone.
- Open the Music app to check. Instead of seeing the same song twice, you should see a cloud icon, which indicates you can download the music from iTunes in iCloud directly onto your device.
Solution 2:
- Open iTunes and connect your device to it > click Music option > click View on the sidebar.
- Click Show Duplicate Items from the drop-down menu and then all the duplicated songs will show there.
- Right click or control click the duplicated songs > click Delete from the drop-down menu > done.
Note: When you first connect your iOS device after clearing your duplicates, you may see this dialog:
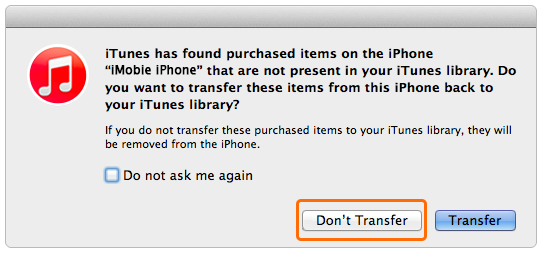
If you see this dialog, it’s really important that you click the Don’t Transfer button! If you do transfer the purchases back, you’ll be recreating your duplicates.
Question 9. Where is the Music Video
In iTunes 11, you are able to view your music video option very easily. That button is missing in iTunes 12. So where are the music videos hiding? Actually, they’re still in your Music library. Follow the steps below to get to them easily.
Solution:
Enter the Music library > click Playlists in the navigation bar > an entry for Music Videos is near the top of the sidebar.
Question 10. Why “Other” Data Increased after iTunes 12 Sync
Many iOS users would experience this “Other” problem after iTunes sync, especially in iTunes 12. It is an annoying problem because “Other” takes up tons of space in its capacity bar, which results in failure when sync something. Now, try to use the solutions below to get success for iTunes 12 sync.

Other Increased
Solution 1:
Unlock your iOS device > delete old text messages, photos, music, browse caches, etc, to free more space > use iTunes to sync again.
Make sure you have a backup with related files on the device before deleting, because some info may be lost if sync again after deleting.
Solution 2:
Unlock your iOS device > go to Setting > click the General icon > tap the Reset button.
Solution 3:
While trying the two solutions above, you will find the “Other” storage will be back again if sync contents with iTunes the next time.
To completely get rid of “Other”, the third-party content transfer tool like AnyTrans could get this task. It brings a convenient way for users to manage and transfer almost all your iDevice content. In addition, it is available to transfer files from device to device, to computer, to iTunes library, and the reverse can also happen, which has also made up for the shortcomings of iTunes.
To learn more about “Other”, please refer to What is the Other and How to Remove it >
Question 11. iPhone/iPad/iPod Touch Cannot be Recognized in iTunes
For Windows users
Solution 1:
- Uninstall iTunes 12, Apple Mobile Device Support, and Apple Application Support and reinstall iTunes 12.
- Restart Windows.
Solution 2:
- Reboot both Windows and iOS Devices.
- Make sure you have installed all the required updates for your computer, including the latest version of iTunes.
- Unlock the device to confirm your iOS device trusting your computer.
- Check the USB cable (Please confirm that the 30-pin to USB cable or Lightning Connector to USB cable is free of debris and not damaged. If another cable is available, test with that cable instead.)
- Verify Apple Mobile Device Support, Apple Mobile Device Driver are installed.
In Step 3, if the trust alert pops up repeatedly from your device, please confirm you have installed iTunes on your computer. To get rid of this alert, you need to reset the lockdown folder.
For Mac OS X users
Solution 1:
- Confirm your device has been trusted to your Mac.
- Restart both Mac and iOS devices.
- Make sure your Mac meets the minimum system requirements for your iOS device.
- Install software updates on your Mac, including iTunes.
- Check USB connections (iOS devices need USB 2.0 to work properly).
- Disconnect other USB drives and connect your device directly to a USB port on Mac.
- Try another USB cable.
Solution 2:
- Uninstall iTunes 12, Apple Mobile Device Support and Apple Application Support and reinstall iTunes 12.
- Reboot Mac OS X.
Question 12. iTunes Wifi Sync with iPad/iPhone not Working for iOS 8 User
iTunes to iPhone
While upgrading to iOS 8, you will find it’s impossible to sync files with iTunes under the circumstance of Wifi mode. For some users, wifi sync will start syncing but can’t get it working again at all. No matter what the wifi sync issues you met, just follow the troubleshooting below to make it work!
Solution:
1. Update iOS Device and iTunes
To update iOS device, please follow: > Setting > General > Software Update > download and install if required > restart iOS device
To update iTunes, please go: > Mac App Store > Update > download and install if required > restart iTunes
If wifi sync is still not working, please continue to Step 2.
2. Forget and rejoin Wifi Networks on iOS Device
Go those steps: > go Setting > click WiFi > tap the networks you connected > click Forget This Network at the top > reconnect the network
3. Forget and Reconnect Wifi Network on Mac/PC
For Mac users, please tab Wifi bars on the top-right corner > open Network Preferences > Advanced > choose target Network Name in Preferred Networks area > click ![]() button> click OK button > rejoin the network
button> click OK button > rejoin the network
For PC users, please go Start menu > Control Panel > Network and Internet > Manage Wireless Networks > Right-click the network connected > Remove network > reconnect the network
If wifi sync is still not working, please continue to the step below.
4. Disable Handoff on iOS Device
Go to Setting > select General > choose Handoff & Suggested Apps > turn off Handoff option
5. Reset Networks on iOS Device
Tab Setting app > choose General > select Reset > click Reset Network Settings > type into the password if needed > confirm the network settings in the popup menu
If you still fail to sync with iTunes over Wi-Fi, you can check, if the Wifi network is not stable, if your iPhone iPad keeps dropping Wi-Fi, whether your computer or iDevice is connected to a VPN, etc.
Question 13. iTunes 12 Crashing When Syncing Apps
“Whenever I attempt to sync my devices with my computer, they run through to the syncing apps step and then iTunes crashes and stops responding. Everything else works fine except for apps. It’s annoying as I have been unable to get all my apps back on my devices since updating to iOS 8.”

iTunes Crash
Solution 1:
- Close iTunes > move the entire library folder from the NAS a local drive
- Hold the shift key down > double click the iTunes icon
- Continue holding the shift key down until the “Choose iTunes Library” pop-up is displayed > click on “Choose Library” and navigate to the library file (iTunes Library.itl) on your local drive > click Open
Solution 2:
- Close iTunes
- Uninstall iTunes 12, Apple Application Support, Apple Mobile Device & Bonjour
- Reinstall iTunes 12
- Reboot computer
Question 14. iTunes 12 Crashing While Syncing to Device
Solution 1:
1. Start iTunes in Safe Mode
Hold down Shift–Control until seeing a reminder ” iTunes is running in safe mode” while opening iTunes > click Continue > check if the problem still shows up.
If the problem still gets on, please refer to Step 2.
2. Create a New User Account
Choose Start > Control Panel > open “Add or remove user accounts” > select “Create a new account” > follow the instructions to set up the account.
Solution 2:
It is really annoying while syncing files to iPhone/iPad/iPod touch. If the solution above is invalid, you can make an attempt to sync files with the third party transfer tool.
To get out of iTunes 12 crash situation, you can choose another efficient way to sync files like iMobie AnyTrans. It saves a large amount of time for you to transfer and manage your certain files, and it also offers a smart way to sync files from device to computer, to device, to iTunes library, and vice versa. With AnyTrans, you’ll be able to restore all your apps, photos, contacts, settings, and other data. It is really a trustworthy and stunning iTunes alternative.
Question 15. iTunes 12 Crash When Trying to Access the iTunes Store
Solution 1:
Go to C:\Program Files (x86)\Common Files\Apple\Apple Application Support > Add the system variables PATH
For Windows 8:
- Drag the Mouse pointer to the Right bottom corner of the screen > click on the Search icon and type: Control Panel
- Tab Control Panel > select System > choose Advanced
- Click Environment Variables > find System Variables > click PATH > tab Edit button > modify PATH by adding the location of the class to the value for PATH
If you do not have the item PATH, you may select to add a new variable and add PATH as the name and the location of the class as the value.
For Windows 7:
- Select Computer from the Start menu > choose System Properties at the top of the navigation bar
- Click Advanced system settings > choose Advanced tab
- Click Environment Variables > select System Variables > find PATH > tab Edit button > modify PATH via adding the location of the class to the value for PATH.
If you do not have the item PATH, you may select to add a new variable and add PATH as the name and the location of the class as the value.
For Mac:
OS X Mavericks 10.9.3 or Later:
- Click Finder in Dock > choose Go > select Utilities
- Open Terminal > type or paste the command on a single line “defaults delete com.apple.SyncServer SyncServicesResetWorldRunOnce”
- Press Return > quit Terminal after the operation has completed (when Terminal returns to the command prompt)
- Reboot the computer
OS X Mountain Lion:
- Click Finder in Dock > choose Go > select Utilities
- Open Terminal > type or paste the command on a single line “/System/Library/Frameworks/SyncServices.framework/Versions/A/Resources/resetsync.pl full”
- Press Return > quit Terminal after the operation has completed (when Terminal returns to the command prompt)
Solution 2:
Uninstall the iTunes 12 > Restart computer > Reinstall iTunes 12
Question 16. Unable to Sync Audiobooks from iTunes to iPhone (with latest iOS 8)
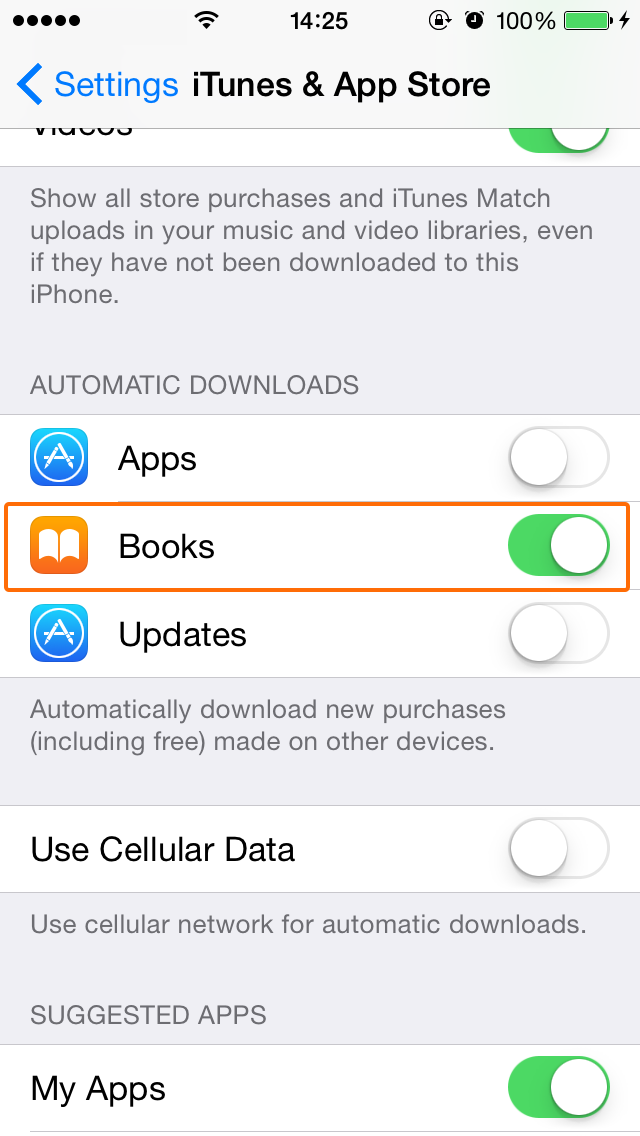
Sync Audiobooks to iPhone with iTunes
Some iOS users tried transferring their audiobooks to the iPhone by iTunes. All the steps are OK and the iPhone has a plenty of space available. However, nothing appears on their iPhone. The file under Books section is grayed out and there is a dotted circle next to it when they click on ‘On this iPhone’.
Solution 1:
- Please make sure to log into the same iTunes account on your iPhone as iTunes.
- Then, get automatic downloads selected for Books on the iPhone via Setting > iTunes & App Store.
- That should sync Books automatically with your iTunes account.
Solution 2:
1. Plug your iPhone into the computer, on iTunes uncheck the ‘Sync Music’ option and press “Sync” or “Apply” tab.
Note: It will remove the music from the iPhone.
2. Then iTunes decides it would go ahead and now sync the audiobooks!
3. Then re-sync music back onto the phone.
Question 17. iTunes Could Not Sync Contacts/Calendar to the iPhone
Because the sync server failed to sync the iPhone, some users could not sync contacts/calendar from iTunes to iPhone. If it is the case, follow the suggestion below to fix the problem.
Solution:
- Disconnect any iPhone, iPad, or iPod from computer.
- Restart the computer.
- To rename the SyncServices folder. In Windows Vista and Windows 7 or Windows 8, the location of SyncServices is C:\Users\[your computer name]\AppData\Roaming\Apple Computer\
- Then connect iPhone to computer and open iTunes > click your device icon > go to Info section and tick the boxes for contacts and calendars> Apply.
To quickly access the AppData folder, click Start, then in the search bar type %appdata% and press the Return key.
Question 18. Unable to Sync Photos to iPhone
“When I want to sync photos with my iPhone, the photos tab in iTunes is not loading, there is that loading circle spinning and nothing happens, could somebody help me?”
Solution 1 (For Mac users):
- Uninstall iPhoto and re-install a new version of iPhoto from Mac App Store.
- Upgrade the OS X to Yosemite or reinstall iTunes 12 would work well.
Solution2:
Since all the other users with Maverics or even lower operation systems are unable to update to the new iPhoto, or some of the users don’t want to be forced into Yosemite. Then, third party software is a lifesaver about this issue. Follow this guide How to Transfer Photos from Computer to iPhone 6 (Plus) >
If you are windows user or Mac users with lower OS X, the following guide will give you an answer:
Easy Way to Transfer Photos from iPhone 4/4s to iPhone 6 (Plus) >
How to export photos from iPhone/iPad/iPod touch >
Question 19. Apps won’t Update When Tap Update in the App Store
Having searched in Apple Community, Macrumors, or other forums, we’ve found the numerous users meet similar problems: the App Store app shows a lot of updates available, but it is invalid at all. Aimed to help users solve this problem, we have collected different solutions that work for most people.
Solution 1:
Open App Store > choose Update > tab the corresponding App > refresh the App info > check the update
Sometimes, there’s a glitch in the App Store app, because after you’ve viewed them once, the App Store will no longer display the update tag.
Solution 2:
Go to Setting > iTunes & App Store > enter Apple ID and Password if sign out > turn Updates under Automatic Downloads > try update manually, or restart your device and turn on the automatic updates again.
Solution 3:
- Delete the problem app
- Go to Setting > iTunes & App Store > sign out Apple ID > restart iOS device
- Log in App Store to re-download the app
Solution 4:
Go to Setting > General > Reset > Reset All Settings
Question 20. Apps won’t Update When Tap Update in the App Store
Many iTunes errors may cause the problem of iPhone iPad could not be restored from backup. To solve this problem, here are 6 solutions for you:
- Restart computer, iTunes and iPhone.
- Make sure your iPhone has trusted your computer.
- Check USB cable and Wi-Fi connection.
- Install the latest iTunes version.
- Contact Apple Support for help.
- Restore from backup with an iTunes alternative.
You can refer to this page to check more info about how to fix iPhone iPad won’t restore problem.
Bonus Tip. The Ultimate Solution for iTunes Errors
Here we’ll introduce a custom-made solution for the users who encountered iTunes problems. AnyFix, an efficient and professional issue-fix tool, supports to fix this problem in just a few clicks. Also, AnyFix can help iOS users to get out of iOS system issues. The following steps will lead to a quick and easy way to fix the iTunes sync issue.
Step 1. Download AnyFix and run it on your computer > Choose the iTunes Repair on the right.
Free Download * 100% Clean & Safe
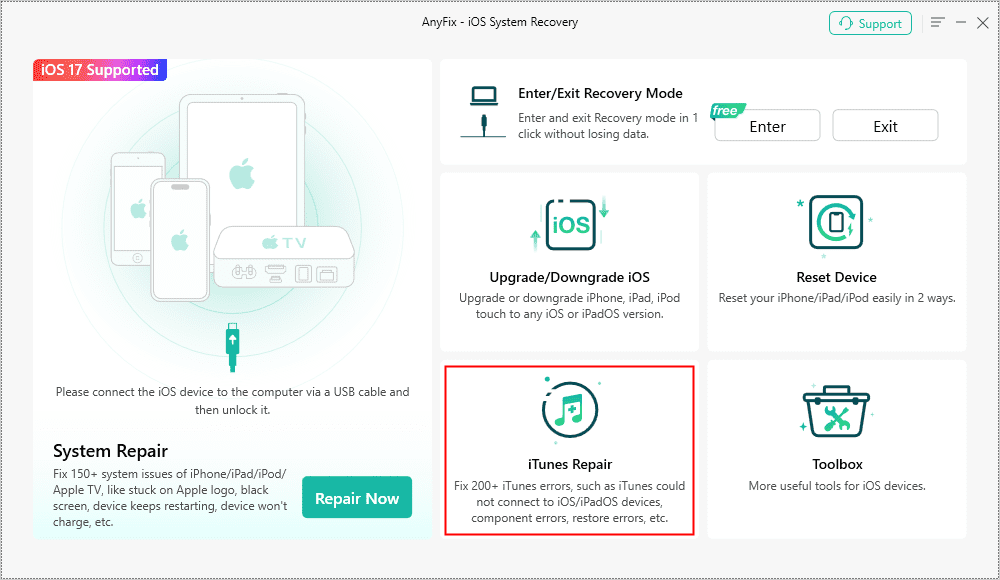
AnyFix iTunes Repair Option
Step 2. Click on the iTunes Sync/CDB Error > tap on Fix Now.
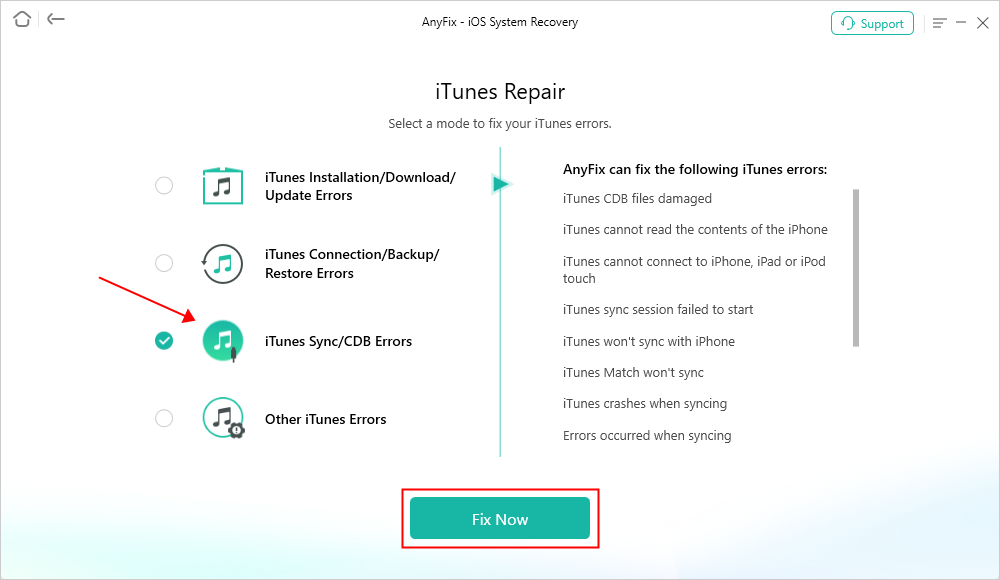
AnyFix iTunes Repair Sync Error
Step 3. Connect your iOS device to the computer with a USB cable > Click on the Fix Now.
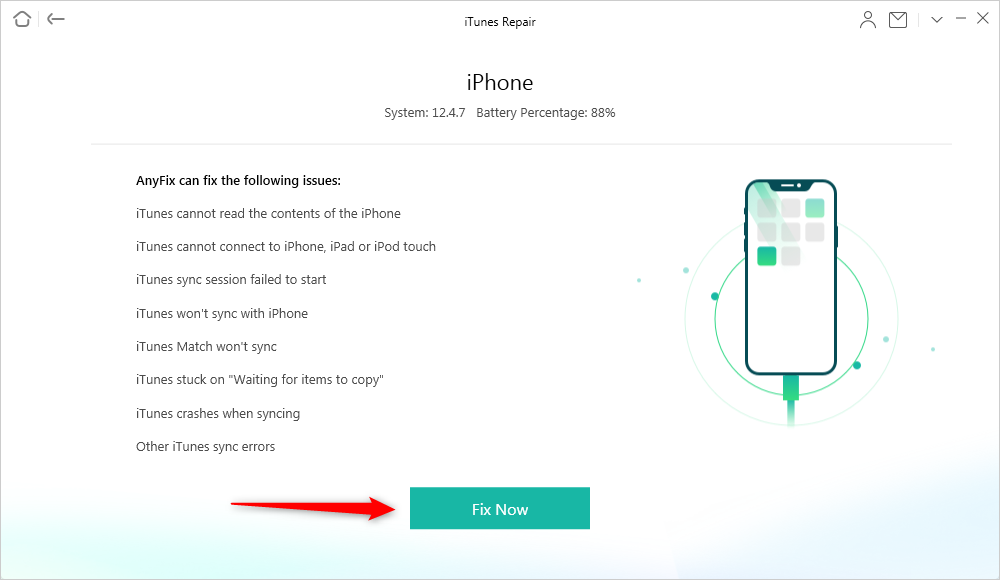
How to Fix iTunes Won’t Add Music to iPhone via AnyFix – Step 3
Step 4. It will take some time to fix this issue. Once it finished the repair journey, you will see the following screen on AnyFix.
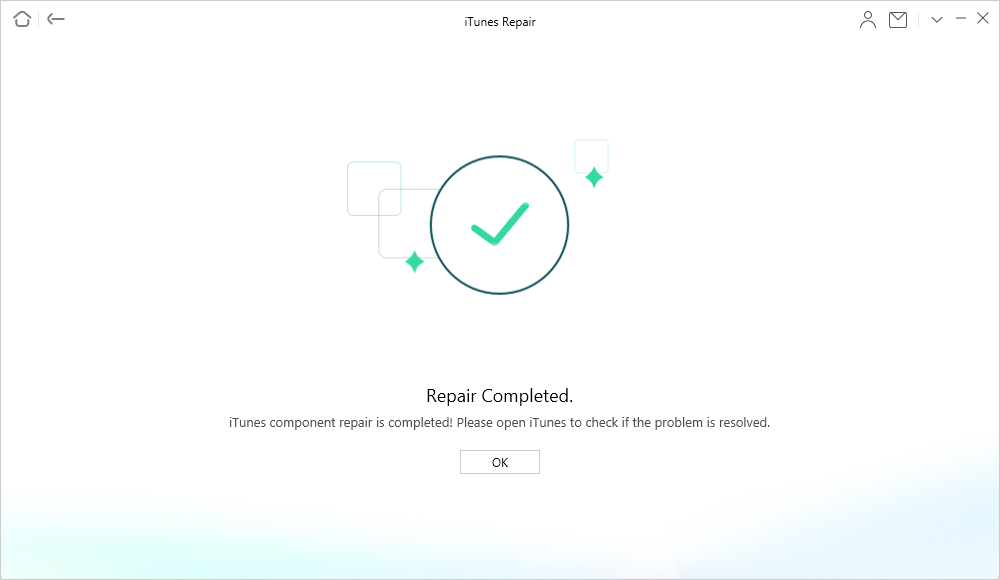
How to Fix iTunes Won’t Add Music to iPhone via AnyFix – Step 4
Product-related questions? Contact Our Support Team to Get Quick Solution >

