How to Screen Record Protected Videos?
Learn how to screen record protected videos. This guide provides detailed steps and tool recommendations to help you easily record and save high-quality video content.
Screenify – All-in-One Screen Recorder
Try Screenify for free to record screen on Windows or Mac. Whether full-screen or partial-screen recording, recording with sound or with camera, Screenify can do it with ease.
100% Clean & Safe
If you’ve ever tried to screen-record on video streaming platforms like Netflix, HULU, Amazon Prime, etc., you will notice the result always turns out to be a black screen. This is because of the Digital Rights Management (DRM) technology used by these platforms to prevent unauthorized copying and distribution of their content. However, there are several tricks you can use to bypass this restriction.
So, in today’s post, we’ll teach you how to screen-record protected videos on any platform on your PC, Mac, Android, or iPhone without requiring any technical skill.
Part 1: What is Screen Protected Video?
Screen-protected videos are videos that utilize DRM systems to prevent unauthorized recording, copying, or distribution. This type of video usually results in black screens, distorted images, or error messages when you attempt to capture its content using a standard screen recording app. The main purpose of screen protection in videos is to ensure that the video content is only accessed and used in ways approved by the copyright holders.
Part 2: Why You Cannot Screen Record Protected Videos
The main reason you cannot screen-record protected videos is due to the DRM systems implemented in them. These DRM systems encrypt the content of the video when you try to use popular screen recorder apps. And even if you try to screen-record protected videos via Chrome browser, the system still prevents such a process.
Part 3: How to Screen Record Protected Videos Without Black Screen on Windows
The best way to record protected videos on Windows without a black screen is through Screenify. Screenify is a free tool that includes many powerful features for recording screen activities on your computer. It allows you to record any type of content, including DRM-protected clear videos up to 4k 60fps. In addition, the software also provides multiple recording modes, such as locked window recording, camera recording, etc. It supports many custom features, such as video clipping, marking tools, watermarks, and more.
Features of Screenify:
- 100% free: Screenify provides comprehensive feature support without paying any fees, suitable for a variety of user groups.
- Cross-platform support: Available for Windows and macOS, users can switch seamlessly between different operating systems.
- Unlimited recording time: The recording function without time limit allows you to easily record long video content.
- Custom watermark: Supports free setting of text watermarks to protect your video copyright.
- Multi-format support: Can record and save in multiple file formats to meet different usage needs.
- High-quality recording: Supports recording videos with 4K resolution and 60FPS, ensuring clear and smooth video quality.
- Multiple recording modes: Including full-screen recording, area recording, locked window recording, etc., to meet the recording needs of different scenarios.
- Simple cropping: After recording, you can easily crop and edit the video to optimize the final output.
Free Download * 100% Clean & Safe
How to Screen Record Protected Videos Without Black Screen on Windows:
Step 1.Download and Install Screenify on Computer.
Step 2.Launch Screenify on your computer, and select Record screen mode.

Select Record Screen Mode
Step 3.Configure Recording Settings aims to configure settings like system audio before recording.
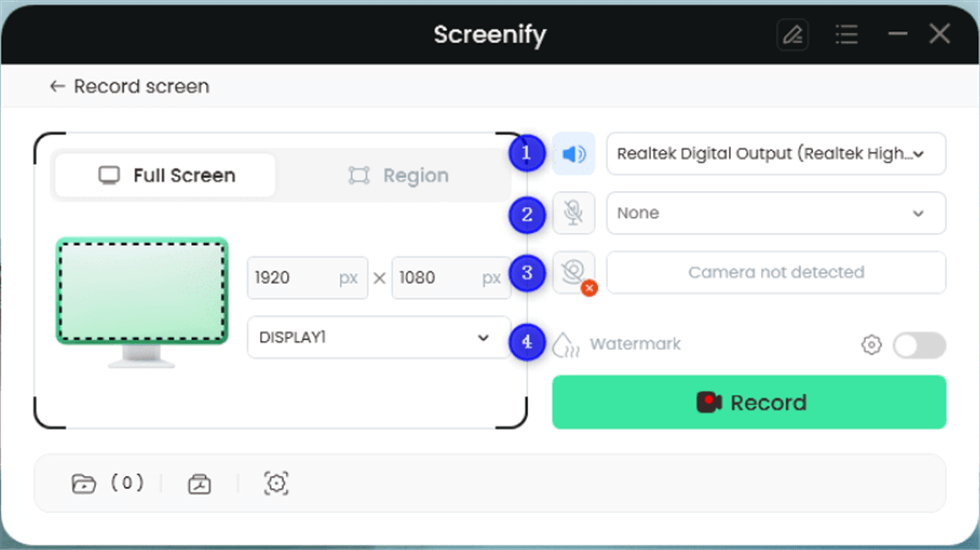
Record Setting
In this setting menu, you can:
1 Choose the System audio.
2 Choose the Microphone you want to record.
3 Choose the Camera you want to use.
4 Choose whether to add a watermark.
Step 4.Select Recording Screen.
Option 1. Full Screen Record
Please select Full Screen mode and choose the display you need to record. Hit Record button to initiate recording.、
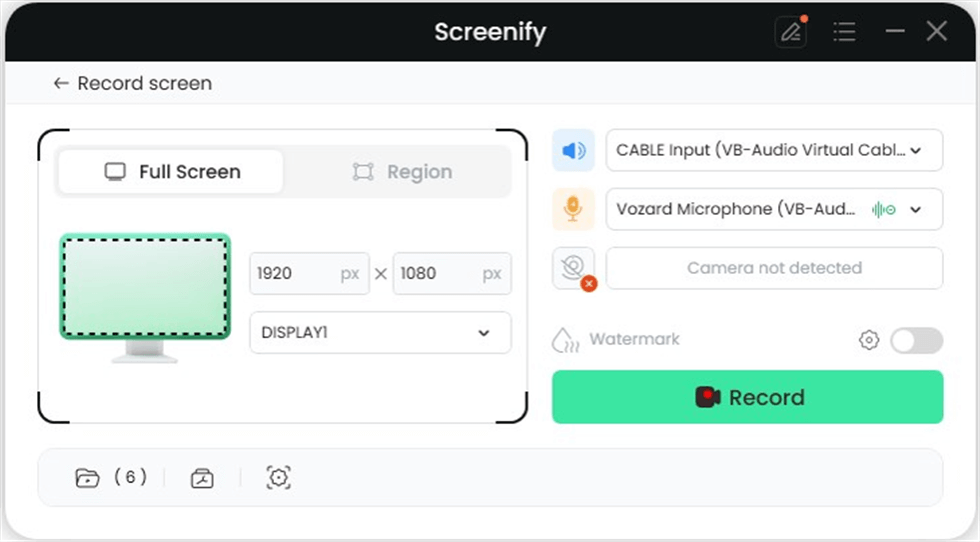
Full Screen
Option 2. Region Record
To record region, you need to manually select the recording area. After selection, you can still adjust the selected area. It supports customize selection, full screen, and proportional selection based on common social media dimensions.
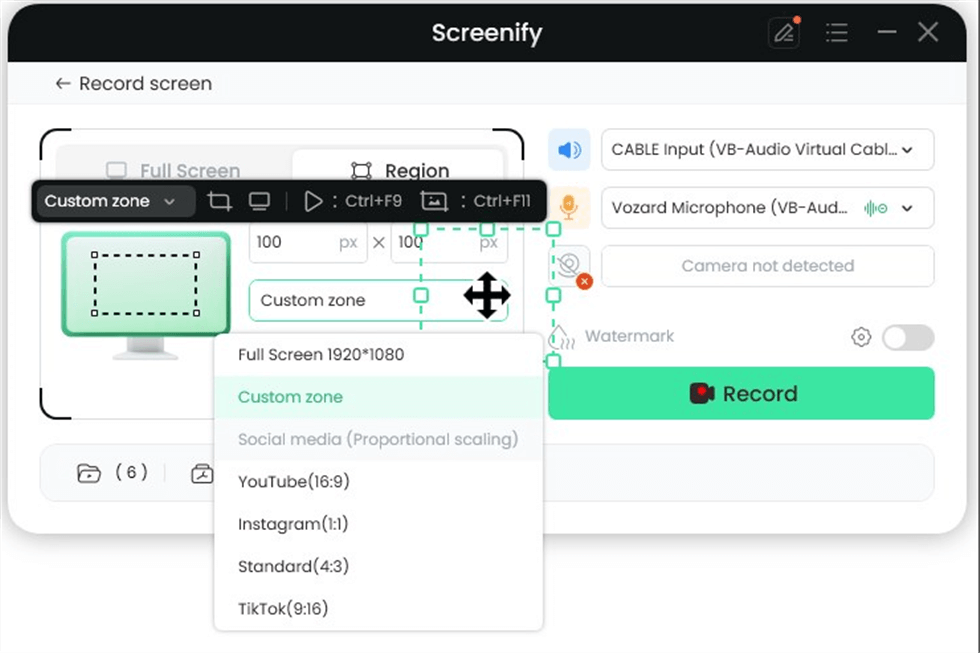
Record Region
Step 5.Wait for the Recording Countdown.
There is a 3-second countdown to help you prepare the recording after you are ready to start recording.

Recording Countdown
If you would like to see a recording countdown before your recording starts, you can enable the countdown option. Or you can tap it off. View this post to know how to set the countdown option.
Step 6.Start Recording.
The recording will begin after a 3-second countdown. You can make annotations on the recording interface during the recording.
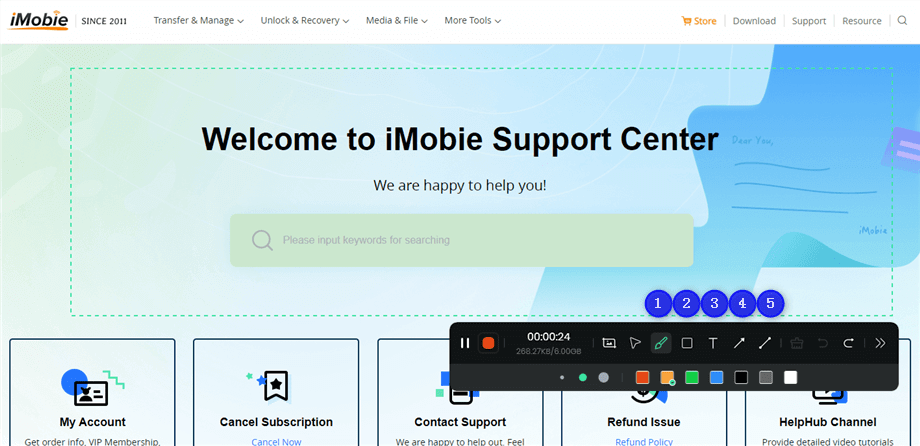
Annotate the Screen during Recording
With the toolbar, you can add the annotation in the screen:
1 Brush: Draw freehand on the screen recording interface to highlight or illustrate specific areas during the recording.
2 Rectangle: Draw rectangular shapes on the screen recording interface.
3 Text: Add written notes or labels directly onto the screen recording interface.
4 Arrow: Draw arrows on the screen recording interface to point out and emphasize specific areas.
5 Line: Draw straight lines on the screen recording interface to underline or connect specific points.
Step 7.Record Screen Process Completed.
When the recording is completed, you can click the red Stop button to end the recording. Your recorded files will be displayed. From here, you can preview and manage the recorded content as needed.
Screenify’s versatile and high-performance design makes it an ideal tool for recording protected videos. Whether it is used for online education, remote office, content creation, or product display, Screenify can provide professional and efficient recording solutions to help users easily achieve high-quality video recording.

Record Screen Process Completed
Part 4: How to Screen Record Protected Videos on Phone
Unfortunately, it’s not possible to screen-record protected videos on a phone using the built-in screen recorder or a third-party screen recorder app. However, we’ve got a trick that you use to bypass a protected video DRM protection and screen record it with high quality on your phone. All you need is the Zoom app.
While the Zoom app is popularly known as a video conferencing platform for conducting online meetings, it also offers a built-in screen recorder that allows you to record meeting sessions without hassles. So, you can easily use the Zoom app’s screen-sharing feature to broadcast the protected video, then screen record it using its screen recorder.
Here is how it works;
Step 1: Install the Zoom app on your Android or iOS device.
Step 2: Launch the app and select “New Meeting”. Then, once you start the meeting, tap the green icon at the bottom of your screen.
tap the green icon
Step 3: Tap on the “Three-dots” horizontal icon at the bottom right side. Then, choose “Record” (For Android) or “Record to the iCloud (For iPhone) option.
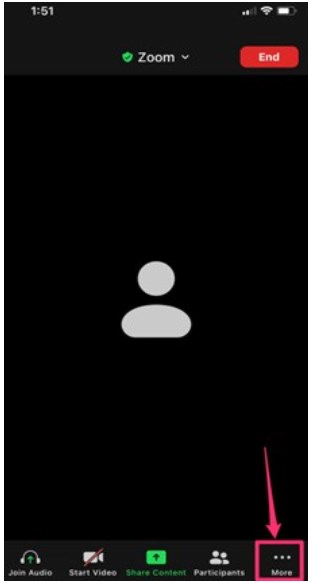
Tap on the “Three-dots”
Step 4: Play the protected video you want to screen record. Then, once you’re done, tap on the “Stop” icon to end the screen recording process.
Step 5: End the meeting session and go to Zoom’s official website to access the recorded video. The video will be saved in the “My Recordings” folder.
Part 5: How to Screen Record Protected Videos on Mac
Unlike Windows computers, you don’t need third-party software to screen record protected videos on Mac. You can easily use the built-in screen recorder feature in QuickTime player to get the job done. Here is how it works;
Step 1: Install the “QuickTime player” on your Mac if you haven’t installed it. Then, launch the tool.
Step 2: Click on “File” from the top menu. Then, select “New Recording”. Alternatively, you can easily press “Command + N”.
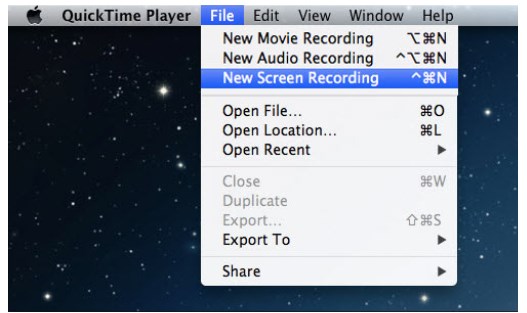
select “New Recording”
Step 3: Play the protected video to start screen recording it.
When you complete the recording process, navigate to the control widget and click on the “Stop” button to end the screen recording process.
Part6: FAQ about Record Protected Videos
1. How to screen record DRM-protected videos
The most effective ways to screen record DRM-protected videos is via a third-party screen recorder like Screenify, via the Zoom built-in screen recorder on your phone, or via QuickTime built-in screen recorder on Mac.
2. How do I get around DRM protection screen recording?
You need a specialized tool that can bypass DRM restrictions to be able to get around DRM protection screen recording. One of the tools that is proven to be very efficient for DRM protection screen recording is the Screenify Screen Recorder app.
3. Does DRM stop screen recording?
Yes, DRM stops screen recording. DRM systems employ an encryption technology that detects and blocks screen recording attempts on protected videos.
4. How do I take a screenshot of a DRM-protected video?
There are various ways to screenshot a DRM-protected video. You can either use specialized software like Screenify Screen Recorder or an external device camera.
Conclusion
Screen recording a protected video can be very tricky. However, with the right techniques, you can easily get the job done within a few clicks.
In the above guide, we’ve shared three ultimate ways to screen-record protected videos on mobile devices and computers. So, by now, you should already know how to screen-record protected videos on any device.
Additionally, we advise that you use the solutions we shared responsibly and within the bounds of the laws. Irresponsible recording and use of DRM-protected videos can lead to legal consequences.
Free Download * 100% Clean & Safe

Senior writer of the iMobie team as well as an Apple fan, love to help more users solve various types of iOS & Android-related issues.
Product-related questions? Contact Our Support Team to Get Quick Solution >
